Category:Anti Bot
5 Working Methods to Bypass Cloudflare (January 2026 Updated)

Founder @ Scrape.do


Let's be real. It's not 2018 and Cloudflare doesn't just slow scrapers down.
It breaks them.
If you’re scraping anything serious in 2026, you’ve already hit a wall: challenge pages, 403s, invisible JS traps, and now Turnstile CAPTCHAs that won’t even show up in a headless browser.
You need solutions that actually work. Not theories. Not decade-old scripts. Not Chrome hacks that fail on the second try.
This is the no BS guide that you need. ⭐
| Scrape.do Scraping API | Undetected-Chromedriver | Rebrowser-Puppeteer | CF-Clearance-Scraper | Camoufox | |
|---|---|---|---|---|---|
| Cloudflare Challenge | ✅ | ✅ | ✅ | ✅ | ✅ |
| Cloudflare Turnstile | ✅ | ❌ | ✅ | ✅ | ✅ |
| Setup and Maintenance | Easy (one-line API) | Medium | Medium | Hard (server setup) | Medium |
| Speed | Instant | Slow | Medium | Medium | Slow |
| Scalability | High | Low | Low | Low | Low |
| Resource Usage | None (remote) | High | High | High | High |
| Built-in Proxies | ✅ | ❌ | ❌ | ❌ | ❌ |
| Free? | 1000 Credits/Month | Local | Local | Local | Local |
| Support/Community | Official Support | Large | Small | Small | Small |
| Stealth Level | Very High | Medium | High | Medium | Very High |
With each method on this list, we will send a request to two Cloudflare-protected pages, one with a regular CF challenge and another with a CF turnstile you're forced to click; and we'll scrape first H2 and H3 respectively to see if we can get access.
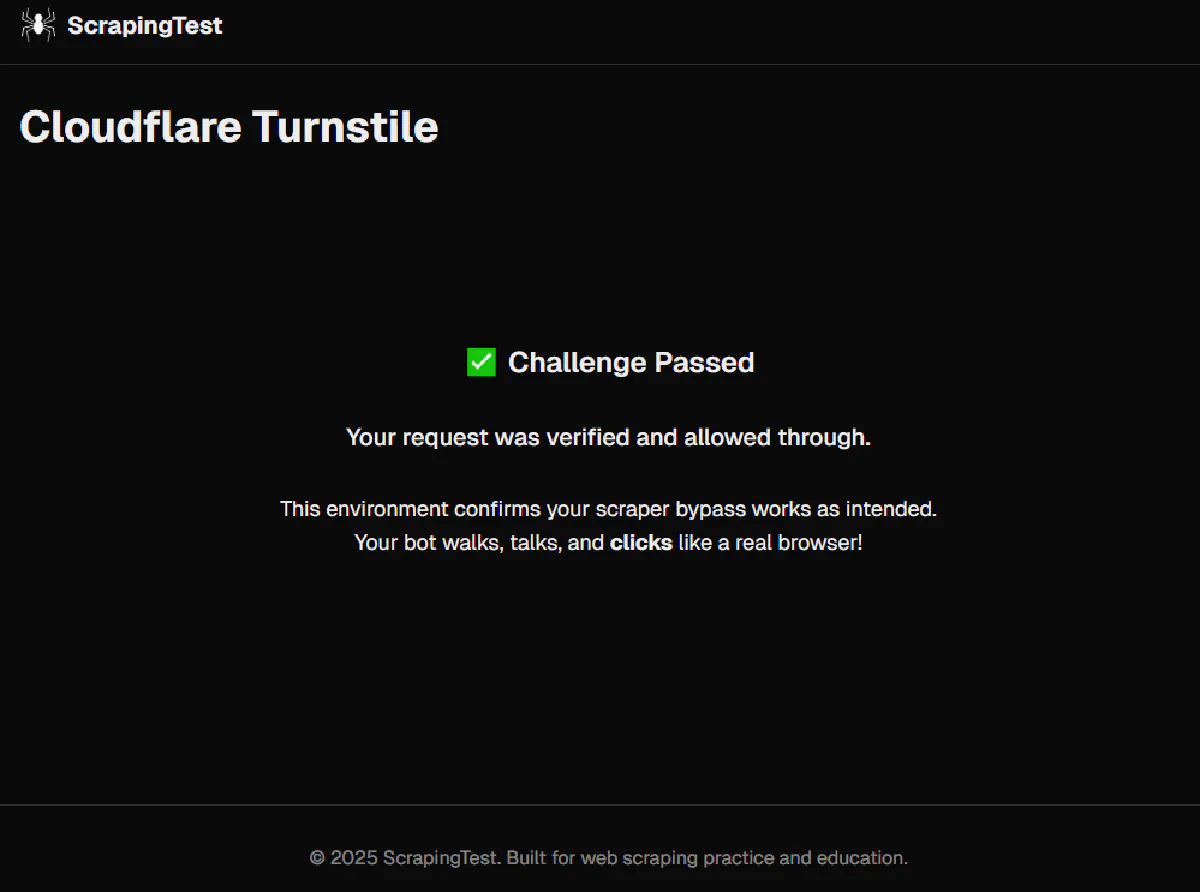
Here's the page we're targeting opened through a regular Chrome browser:
And here's where a regular headless browser like Selenium will get stuck:
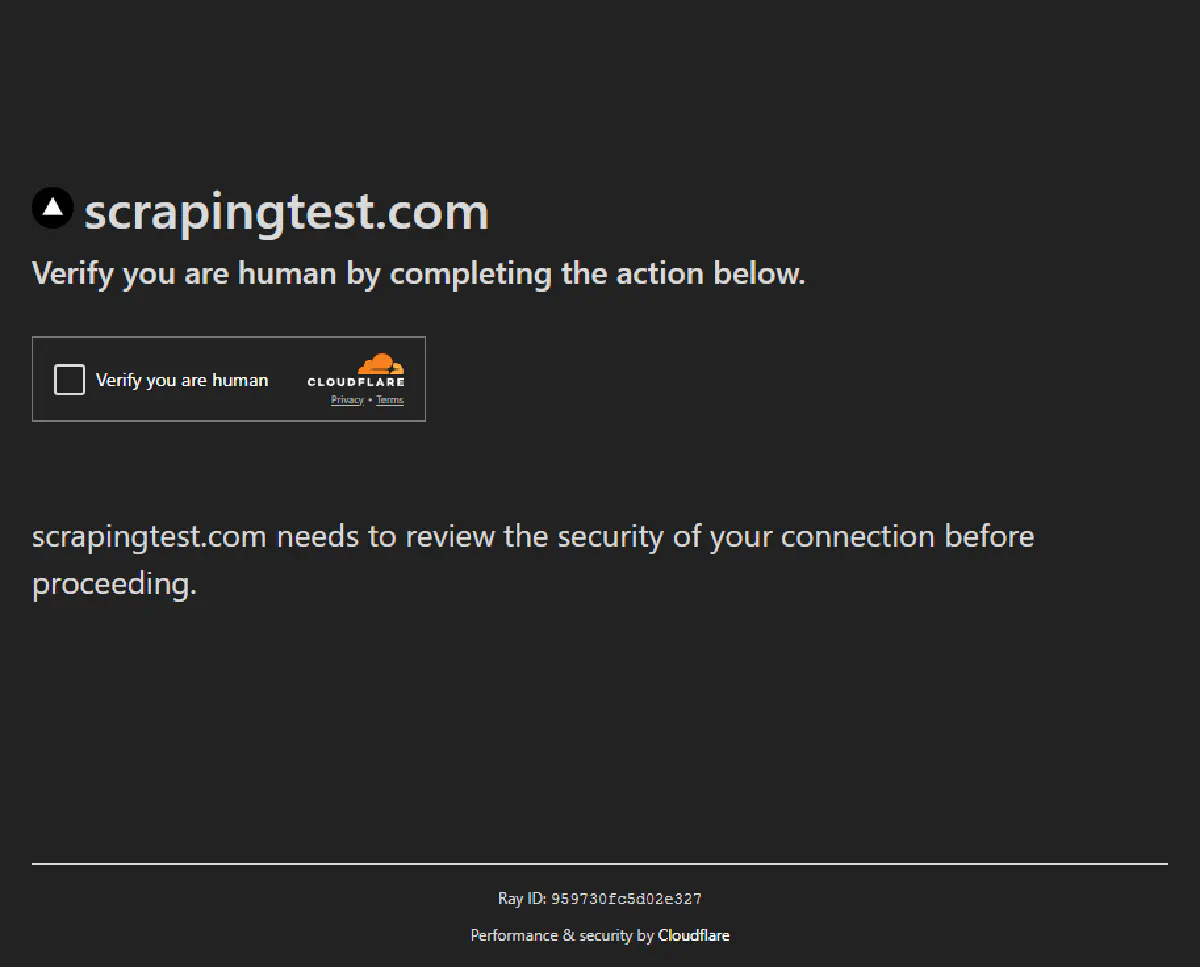
Let's see which tools and libraries can help us get the former image and not the latter.
1. Web Scraping API – quick, scalable, reliable, but paid
Scrape.do is the easiest and most scalable way to bypass Cloudflare in 2026.
If you want zero setup, zero browser configuration, and zero proxy headaches, a scraping API is the way to go.
It works out-of-the-box, handles everything under the hood (proxies, headers, TLS, challenges, CAPTCHAs), and scales to millions of requests without falling apart.
Scrape.do is built for this exact use case.
It has Cloudflare-specific handling, real browser rendering, and the infrastructure to deliver successful requests 99.98% of the time.
While you build your business and your product.
Pros
- Maintained by scraping pros: constantly updated by expert reverse engineers to keep up with the latest WAF changes, TLS upgrades, and browser fingerprinting techniques.
- 7/24 support: if anything breaks, you're connected directly to a developer—not a support queue. We debug with you.
- Zero to millions of requests in a snap: you can scale from local testing to production-level scraping without touching your code.
- Built-in features for advanced scraping: includes geo-targeting, custom headers, output formats (HTML/JSON/screenshot), browser rendering, session reuse, retries, and more.
Cons
- Paid: you get 1000 successful requests/month free, but anything beyond that is paid. You only pay for successful responses.
- Low customization, e.g. can't use your own IP addresses: Scrape.do handles proxy rotation automatically so you can't route traffic through your own proxy pool.
Setup and Usage
You don’t need to install anything or configure a headless browser. Just send a request through the Scrape.do API with the right parameters.
1. Get an API Token
Create a free Scrape.do account through here.
You’ll immediately get 1000 free credits per every month.
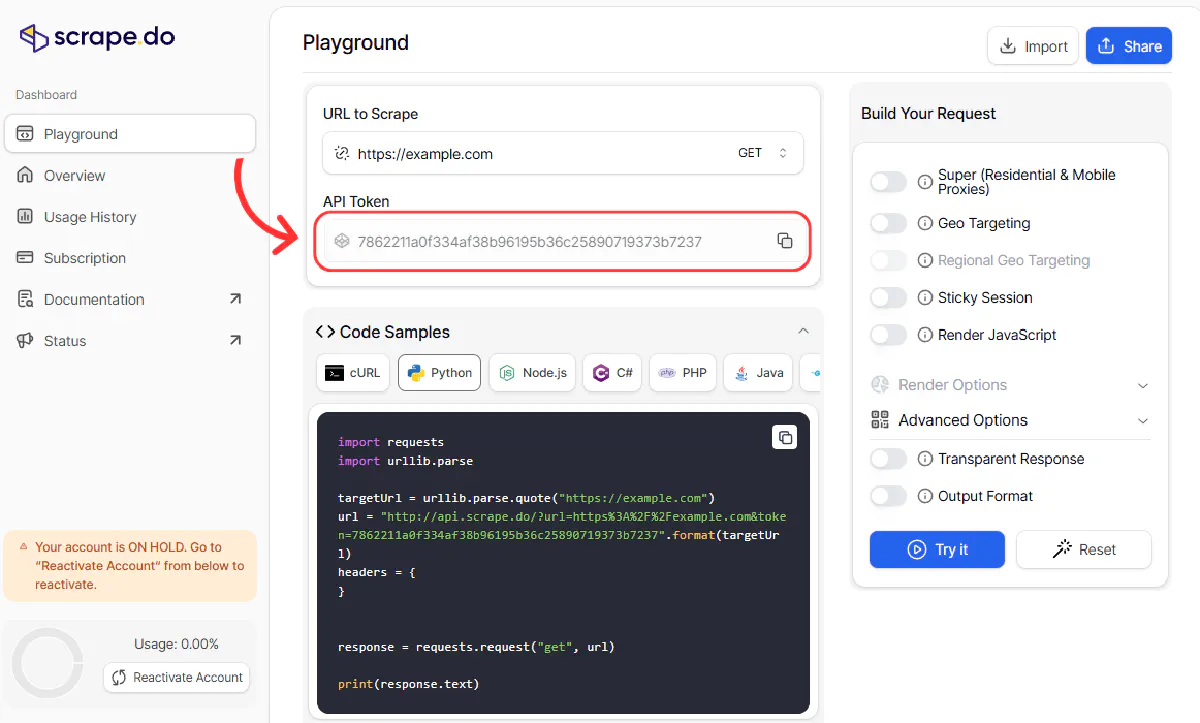
Now, Copy your API token from the dashboard, we'll need this.
2. Install Required Libraries
For Python, install libraries requests for sending HTTP requests and beautifulsoup4 for parsing HTML responses:
pip install requests beautifulsoup4For Node.js, you need axios for sending HTTP requests and cheerio for parsing HTML (jQuery-style):
npm install axios cheerioAnd that's all the setup you need ⚡
3. Send Your Request
Now, we will send our request and bypass Cloudflare through the Scrape.do API.
💡 We're using render=true paramater with Scrape.do to enable headless browser for JavaScript rendering.
For Python, run this code:
import requests
from bs4 import BeautifulSoup
import urllib.parse

token = "<your-token>"  # <-- Insert your scrape.do API token here
target_url = "https://scrapingtest.com/cloudflare-challenge"

# URL-encode the target URL
encoded_url = urllib.parse.quote(target_url)

# Construct the scrape.do API endpoint
api_url = f"http://api.scrape.do/?token={token}&url={encoded_url}&render=true"

# Make the GET request via scrape.do
response = requests.get(api_url)

# Parse the HTML response and extract the h2 and h3 tags
soup = BeautifulSoup(response.text, 'html.parser')
h2 = soup.find('h2')
h3 = soup.find('h3')

# Print the HTTP status code and extracted text
print(f"Status Code: {response.status_code}")
print(h2.get_text(strip=True) if h2 else None)
print(h3.get_text(strip=True) if h3 else None)
And for Node.js, run this code:
const axios = require("axios");
const cheerio = require("cheerio");

const token = "<your-token>"; // Replace with your scrape.do API token
const targetUrl = encodeURIComponent(
  "https://scrapingtest.com/cloudflare-challenge"
);

const config = {
  method: "GET",
  url: `https://api.scrape.do/?token=${token}&url=${targetUrl}&render=true`,
  headers: {},
};

axios(config)
  .then(function (response) {
    console.log("Status Code:", response.status);
    const $ = cheerio.load(response.data);
    const h2 = $("h2").first().text().trim();
    const h3 = $("h3").first().text().trim();
    console.log(h2 || null);
    console.log(h3 || null);
  })
  .catch(function (error) {
    console.log(error);
  });
Both requests will generate this output, successfully bypassing Cloudflare and scraping the page content:
Status Code: 200
✅ Challenge Passed
Your request was verified and allowed through.
And all without touching a headless browser.
2. Undetected-Chromedriver – free, customizable, but limited
Undetected-Chromedriver is a custom Selenium driver patched to avoid bot detection, specifically on platforms like Cloudflare.
It runs locally on your machine, gives you full browser control, and can pass through most JavaScript challenges and fingerprinting traps.
You can scroll, click buttons, wait for elements, and even inject your own JS scripts into the page.
But it has two major drawbacks: it’s slow (because it spins up a real browser), and it doesn’t work against Turnstile CAPTCHAs (Cloudflare’s most aggressive defense layer).
Still, for quick local tests or small projects, it’s one of the best free options available.
Pros
- Large community support: very active GitHub issues and discussions. If you run into a problem, it might already be solved.
- Zero to full control in a snap: you get complete control over the browser; clicks, scrolls, header injection, navigation, delays, user agents, and more.
- Built-in stealth plugin for Chrome: automatically disables automation flags and masks WebDriver detection signals.
Cons
- Can’t bypass Cloudflare Turnstile: if the site uses Turnstile CAPTCHA, the request will hang or fail and there’s no workaround.
- Slow response rate: launches a real browser window, waits for full rendering, uses system resources, which takes a couple seconds.
- Resource intensive: heavy on RAM and CPU. Not suitable for scale or parallel sessions without advanced setup.
Setup and Usage
To use Undetected-Chromedriver, you’ll need to install a few dependencies and run the script locally on your machine. It works with Python 3.7 or above.
1. Install Required Libraries
You need two libraries: selenium for browser automation and undetected-chromedriver for bypassing detection.
Install them with:
pip install selenium undetected-chromedriver✅ Make sure you have Google Chrome updated and installed on your system.
The script will automatically find and use your local Chrome browser.
2. Bypass Cloudflare with a Real Browser
Now we’ll launch a real browser using Undetected-Chromedriver, navigate to the test page, and extract <h2> and <h3> content after the challenge is passed.
Here’s the code:
import undetected_chromedriver as uc
from selenium.webdriver.common.by import By
from selenium.webdriver.support.ui import WebDriverWait
from selenium.webdriver.support import expected_conditions as EC

url = 'https://scrapingtest.com/cloudflare-turnstile'
options = uc.ChromeOptions()
options.add_argument('--no-sandbox')
options.add_argument('--disable-blink-features=AutomationControlled')

driver = uc.Chrome(options=options)
try:
    driver.get(url)
    wait = WebDriverWait(driver, 30)
    h2_text = h3_text = None
    try:
        h2_text = wait.until(EC.presence_of_element_located((By.TAG_NAME, 'h2'))).text.strip()
    except Exception:
        pass
    try:
        h3_text = wait.until(EC.presence_of_element_located((By.TAG_NAME, 'h3'))).text.strip()
    except Exception:
        pass
    print('Status Code: 200 (browser)')
    print('First <h2>:', h2_text)
    print('First <h3>:', h3_text)
finally:
    driver.quit()
If everything works the way they're supposed to, you should get this output:
Status Code: 200 (browser)
First <h2>: ✅ Challenge Passed
First <h3>: Your request was verified and allowed through.
This method will also bypass Turnstile without a problem.
Known Issues
Selenium can be a bit problematic :) Here are a few errors I ran into when setting up:
Missing distutils Module
You might see this error:
modulenotfounderror: No module named "distutils";Cause: Python 3.12+ no longer includes distutils by default.
Solution: Installed setuptools (which now provides distutils):
pip install setuptoolsChrome/ChromeDriver Version Mismatch
Error:
sessionnotcreatedexception: This version of ChromeDriver only supports Chrome
  version 138 Current browser version is 137.7151.122;
Cause: Your installed Chrome browser was version 137, but undetected-chromedriver downloaded ChromeDriver for version 138.
Solution: Updated Google Chrome to version 138 to match the ChromeDriver.
WinError 6: The handle is invalid
Error:
Exception ignored in: <function Chrome.__del__ ...>
OSError: [WinError 6] The handle is invalid
Cause: A known harmless issue on Windows when Python’s garbage collector tries to clean up the Chrome process after it’s already closed.
Solution: Ultimately, decided to ignore this harmless error as it does not affect scraping results.
💡 If you can see on non-headless mode that Selenium is able to bypass Cloudflare and access the page but can't extract the content, there is a likelihood that Selenium tries to extract before the page is loaded. Try adding some delays and timeouts.
3. Rebrowser-Puppeteer – control a natural browser
Rebrowser-Puppeteer is a patched version of Puppeteer that behaves more like a real user than a typical headless browser.
It’s built specifically for bypassing WAFs like Cloudflare by using modified Chrome binaries and evasions that are harder to fingerprint.
It also supports Turnstile CAPTCHAs, which most libraries can't bypass.
If you're looking for a local solution that mimics real user behavior (and don’t mind some manual setup), this tool can take you far, even through modern JavaScript challenges.
Pros
- Can also click Turnstile: one of the only tools that can interact with Cloudflare’s new Turnstile CAPTCHA programmatically.
- Straightforward setup: no browser installations or patching required, just install, run, and go.
- Simulates real browser behavior: mimics human interactions and bypasses most JS-based and behavioral detection.
Cons
- Discontinued library: no active updates or bug fixes. If it stops working after a Chrome update, you’ll need to patch it yourself.
- Small community: limited help or troubleshooting resources compared to mainstream tools.
- Not suitable for scale: runs locally, consumes a lot of resources, and doesn’t scale to multiple parallel sessions easily.
Setup and Usage
Rebrowser-Puppeteer works with Node.js and can be installed like any other npm package.
It uses Puppeteer under the hood, but with a modified Chromium binary and stealth plugins already patched in.
This makes it behave more like a real user and allows you to bypass Turnstile and challenge pages alike.
1. Install Node.js and Initialize Your Project
First, make sure you have Node.js installed.
Then run the following commands to set up your project:
npm init -y
npm install rebrowser-puppeteer puppeteer-extra puppeteer-extra-plugin-stealth
✅ This will install the modified Puppeteer build (
rebrowser-puppeteer), thepuppeteer-extrawrapper, and the stealth plugin used to mask headless indicators.
2. Bypass Cloudflare Using a Real Browser
Now we’ll launch the patched browser, navigate to the test page, and wait until we’ve passed the Cloudflare challenge.
💡 This script uses headful (non-headless) mode and clicks the Turnstile CAPTCHA if needed.
Here’s the full code:
const vanillaPuppeteer = require("rebrowser-puppeteer");
const { addExtra } = require("puppeteer-extra");
const puppeteer = addExtra(vanillaPuppeteer);
const createPuppeteerStealth = require("puppeteer-extra-plugin-stealth");
const puppeteerStealth = createPuppeteerStealth();
puppeteerStealth.enabledEvasions.delete("user-agent-override");
puppeteer.use(puppeteerStealth);

async function scrape() {
  let browser = null;
  try {
    browser = await puppeteer.launch({
      ignoreDefaultArgs: ["--enable-automation"],
      headless: false,
      args: [
        "--disable-features=Translate,AcceptCHFrame,MediaRouter,OptimizationHints,ProcessPerSiteUpToMainFrameThreshold,IsolateSandboxedIframes,AutomationControlled",
      ],
      defaultViewport: null,
    });

    const [page] = await browser.pages();
    const url = "https://scrapingtest.com/cloudflare-turnstile";
    let response = await page.goto(url, { waitUntil: "domcontentloaded" });
    let status = response.status();
    let source = await page.content();

    // Loop until we are past the challenge (look for h2/h3 as a sign of success)
    let h2 = null,
      h3 = null;
    while (true) {
      h2 = await page
        .$eval("h2", (el) => el.textContent.trim())
        .catch(() => null);
      h3 = await page
        .$eval("h3", (el) => el.textContent.trim())
        .catch(() => null);
      if (h2 || h3) break;

      // Try to click the Turnstile if present
      let cfInput = await page.$('[name="cf-turnstile-response"]');
      if (cfInput) {
        const parentItem = await cfInput.evaluateHandle(
          (element) => element.parentElement
        );
        const coordinates = await parentItem.boundingBox();
        if (coordinates) {
          await page.mouse.click(
            coordinates.x + 25,
            coordinates.y + coordinates.height / 2
          );
        }
      }
      await new Promise((resolve) => setTimeout(resolve, 1500));
      source = await page.content();
    }

    // Print results
    console.log("Status Code:", status);
    console.log("First <h2>:", h2);
    console.log("First <h3>:", h3);
  } catch (e) {
    console.error(e);
  } finally {
    if (browser) await browser.close();
  }
}

scrape();
At this point, you might get an instant error about Puppeteer Chromium version. Install the version stated in the error message to get past it.
If everything goes well, this is the output we will get indicating the bypass was successful:
Status Code: 403
First <h2>: ✅ Challenge Passed
First <h3>: Your request was verified and allowed through.
⚠️ Even though the HTTP status code is
403, the content is still fully loaded and correct. This is likely a quirk of how Cloudflare treats completed challenges inside browser environments.
4. CF-Clearance-Scraper – quick, scalable, reliable, but also paid
CF-Clearance-Scraper is a local API that acts like a middleman: it launches a real browser behind the scenes, solves Cloudflare challenges in your place, and returns clean page content to your script.
Unlike remote APIs like Scrape.do, it runs on your own machine.
You send POST requests to localhost:3000, and the server handles everything from launching the browser to solving CAPTCHAs and sending back HTML.
It can handle both Cloudflare challenge pages and Turnstile CAPTCHAs, and works well with Python, Node.js, or any language that can send HTTP requests.
Pros
- High bypass success: works on both challenge pages and Turnstile CAPTCHAs with real browser interaction.
- Easy to integrate: after setup, you can hit it with simple POST requests from any language.
- Supports full HTML scraping + screenshot: it returns full rendered HTML, or a screenshot if needed, depending on mode.
Cons
- Complex and long setup: requires Node.js, a GitHub clone, dependency installation, and server startup.
- Resource intensive: spins up Chromium headlessly and uses real CPU and RAM. Not ideal for constrained systems.
- Local-only: can’t scale to multiple machines without manual server duplication or Docker setup.
Setup and Usage
To use CF-Clearance-Scraper, you'll first need to install Node.js and run the server locally. Once it's running, you can interact with it just like any other API—but behind the scenes, it’s using a full browser to bypass Cloudflare.
1. Install Node.js and Clone the Project
If you don’t already have Node.js installed, download it from the official Node.js website.
Then open a terminal and run:
git clone https://github.com/zfcsoftware/cf-clearance-scraper
cd cf-clearance-scraper
This will download the full project into a folder on your machine.
2. Install Dependencies
Inside the project folder, install all required Node packages:
npm installThis installs Puppeteer, Express, and all tools used to launch the browser and solve Cloudflare challenges.
3. Start the Local Server
Now start the API server by running:
npm run startMake sure the terminal directory is inside
cf-clearance-scraperfolder.✅ Once started, the server will begin listening on
http://localhost:3000
You can now make POST requests to/cf-clearance-scraperto bypass Cloudflare.
4. Make a Request from Python
Now let’s send a request from Python to the local server and extract data from the target website.
💡 The scraper will launch a browser behind the scenes and return the fully rendered HTML.
import requests
from bs4 import BeautifulSoup

api_url = "http://localhost:3000/cf-clearance-scraper"
target_url = "https://scrapingtest.com/cloudflare-turnstile"

payload = {"url": target_url, "mode": "source"}
response = requests.post(api_url, json=payload)
html = response.text
try:
    data = response.json()
    html = data.get('body') or data.get('result') or response.text
except Exception:
    pass
soup = BeautifulSoup(html, 'html.parser')
h2 = soup.find('h2')
h3 = soup.find('h3')
print("Status Code:", response.status_code)
print(h2.get_text(strip=True) if h2 else None)
print(h3.get_text(strip=True) if h3 else None)
And here's your output:
Status Code: 200
✅ Challenge Passed
Your request was verified and allowed through.
And that's it! You’ve bypassed Cloudflare using your own local server.
5. Camoufox – stealthy anti-detect browser, open source, but resource-heavy
Camoufox is a stealth-first browser built on top of a custom Firefox engine with deep C++ hooks for fingerprint manipulation.
Unlike other solutions that rely on JavaScript injection or browser flags, Camoufox intercepts fingerprinting at the engine level, making detection virtually impossible.
It wraps Firefox with Playwright automation, bundles human-like mouse movements, blocks ads automatically, and can run in virtual headless mode for VPS deployments.
The result?
A browser that looks, acts, and fingerprints exactly like a real user even to the most aggressive anti-bot systems.
Pros
- Undetectable fingerprint spoofing: Camoufox modifies navigator properties, screen dimensions, fonts, and WebGL at the C++ level so there is no JavaScript injection means no detection vectors for websites to exploit.
- Built-in human behavior: includes realistic mouse movements, typing delays, and scrolling patterns that mimic real user interaction automatically.
- Open source and flexible: self explanatory.
- Free to use: self explanatory.
Cons
- Resource-intensive: spins up a full Firefox browser instance. Expect high RAM and CPU usage, not suitable for serverless environments or high-volume parallel scraping.
- Complex setup: requires downloading custom browser binaries and managing dependencies. More involved than simple API calls.
- Smaller community: fewer tutorials, Stack Overflow answers, and community support compared to Selenium or Puppeteer ecosystems.
Setup and Usage
To use Camoufox, you'll need to install the Python package and download the custom Firefox build.
It works with Python 3.7 or above and requires a decent amount of system resources.
1. Install Required Libraries
Install the Camoufox package with the optional geoip extra for proxy geo-spoofing capabilities:
pip install -U camoufox[geoip] browserforge✅ The
browserforgepackage provides realistic screen dimensions and device fingerprints that Camoufox uses for stealth.
2. Download the Custom Browser
After installation, fetch the custom Firefox build that Camoufox uses:
Windows (might need to add python at the start):
camoufox fetchmacOS:
python3 -m camoufox fetchLinux:
python -m camoufox fetch⚠️ On fresh Linux installations, you may need to install Firefox dependencies first:
sudo apt-get install libgtk-3-0 libx11-xcb1 libasound2
3. Bypass Cloudflare with Stealth Mode
Now let's create a script that handles both regular Cloudflare challenges and Turnstile CAPTCHAs using Camoufox's stealth capabilities.
We're adding Screen from e browserforge.fingerprints to make sure we have a set screen size (important for clicking on the right place) and also enabling os=["windows"] to tell Camoufox to generate a realistic Windows header.
Here's the complete code:
from camoufox.sync_api import Camoufox
from browserforge.fingerprints import Screen
import time

def scrape_cloudflare_with_camoufox(url):
    with Camoufox(
        headless=True,
        os=["windows"],
        screen=Screen(max_width=1920, max_height=1080),
    ) as browser:
        page = browser.new_page()
        response = page.goto(url)

        # Wait for initial page load
        page.wait_for_load_state('networkidle')

        # Handle Turnstile challenge if present
        for _ in range(15):
            time.sleep(1)

            # Look for Turnstile iframe
            for frame in page.frames:
                if frame.url.startswith("https://challenges.cloudflare.com"):
                    frame_element = frame.frame_element()
                    bbox = frame_element.bounding_box()
                    if bbox:
                        # Click on the Turnstile checkbox
                        click_x = bbox["x"] + bbox["width"] / 9
                        click_y = bbox["y"] + bbox["height"] / 2
                        page.mouse.click(x=click_x, y=click_y)
                        time.sleep(3)  # Wait for challenge processing
                    break

            # Check if challenge is resolved
            if page.query_selector("h2"):
                break

        # Final wait for page to stabilize
        page.wait_for_load_state("networkidle")

        # Extract content
        h2_el = page.query_selector("h2")
        h3_el = page.query_selector("h3")
        h2_text = h2_el.inner_text().strip() if h2_el else None
        h3_text = h3_el.inner_text().strip() if h3_el else None

        print(f"Status Code: {response.status}")
        print(f"First <h2>: {h2_text}")
        print(f"First <h3>: {h3_text}")

# Test both regular challenge and Turnstile
print("Testing regular challenge...")
scrape_cloudflare_with_camoufox("https://scrapingtest.com/cloudflare-challenge")
print("Testing Turnstile challenge...")
scrape_cloudflare_with_camoufox("https://scrapingtest.com/cloudflare-turnstile")
If everything works correctly, you should see this output for both tests:
Testing regular challenge...
Status Code: 200
First <h2>: ✅ Challenge Passed
First <h3>: Your request was verified and allowed through.
Testing Turnstile challenge...
Status Code: 403
First <h2>: ✅ Challenge Passed
First <h3>: Your request was verified and allowed through.
The beauty of Camoufox is that all of this happens with a browser fingerprint that's indistinguishable from a real user, making it extremely effective against even advanced anti-bot systems.
Facing the Reality
You can bypass Cloudflare for free.
As long as you’re okay with running a browser, burning local CPU, and hitting rate limits after a few hundred requests to a point where you'll need to buy proxies.
And at that point, you have to ask yourself: Am I really running this operation for free?
That’s why APIs like Scrape.do exist; not just to unblock a request or two, but to remove scraping friction entirely.
With Scrape.do, you get:
- One-line scraping with headless browser rendering
- Automated proxy rotation across 100M+ IPs
- CAPTCHA handling, TLS spoofing, session reuse
- Structured outputs (HTML, JSON, screenshots)
- 24/7 developer support
- And 1000 successful requests every month for free
Founder @ Scrape.do