# Zapier - Scrape.do Integration
> Source: https://scrape.do/documentation/integrations/zapier/
Step-by-step guide to integrate Scrape.do with Zapier for automated web scraping workflows
Scrape.do integrates with Zapier through webhooks to automate scraping workflows.
Use scheduled triggers to scrape websites, parse the response with AI or Python/JavaScript code, and export data to Google Sheets or any of Zapier's app integrations.
## 1. Create a New Zap and Select Trigger
Let's start by setting up the basic Zap workflow.
- From your dashboard, click the orange rectangle with **+** or **+ Create** and select **Zap**.
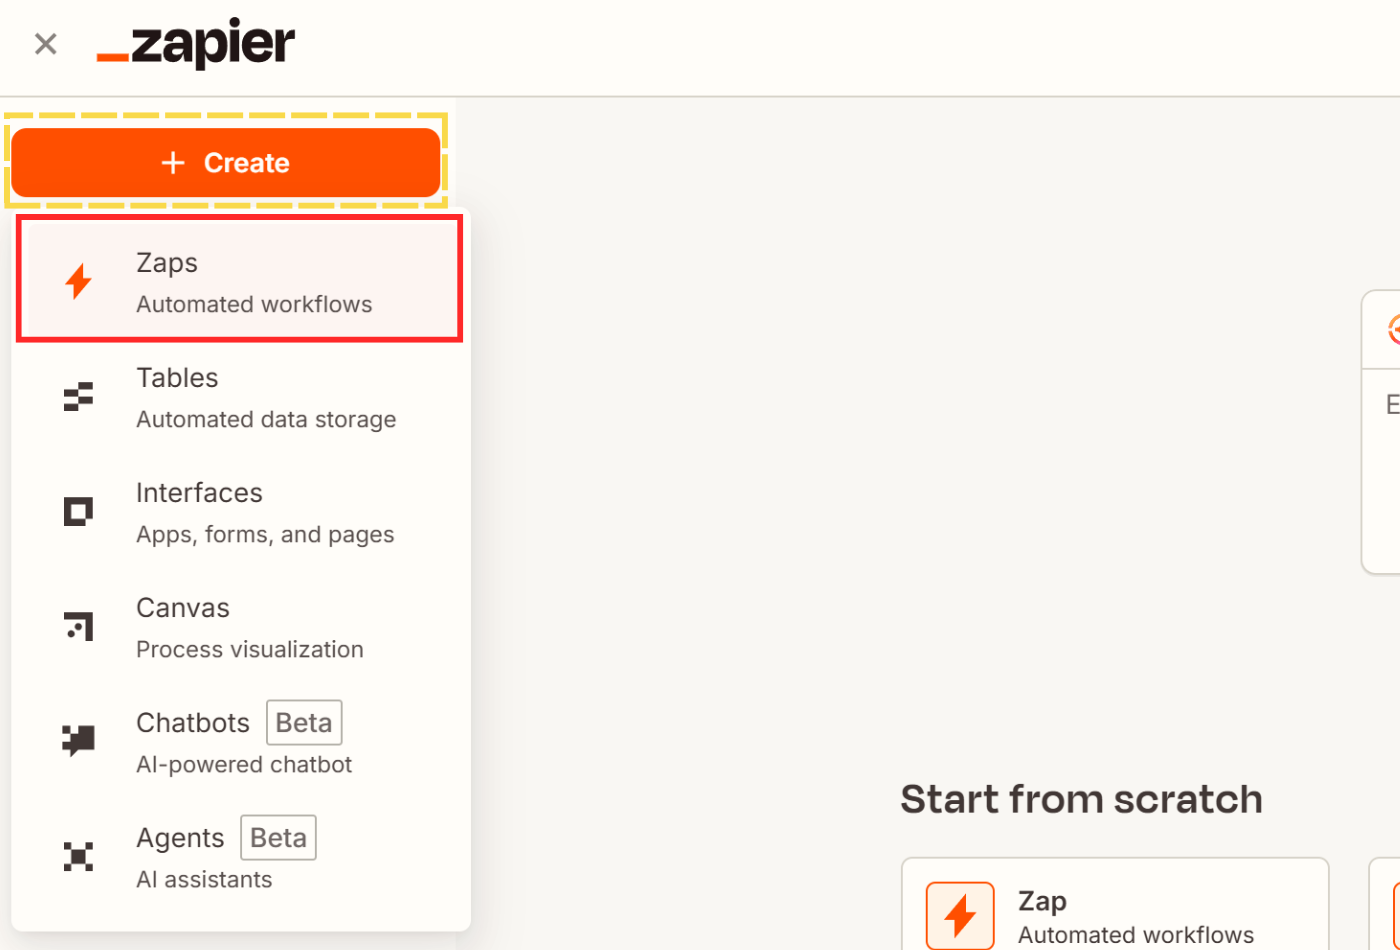
- This will bring you to an empty Zap editor with 2 steps: a **Trigger** and an **Action**.
- Click on **Trigger** and select **Schedule**, then choose **Every Day** as your Trigger event.
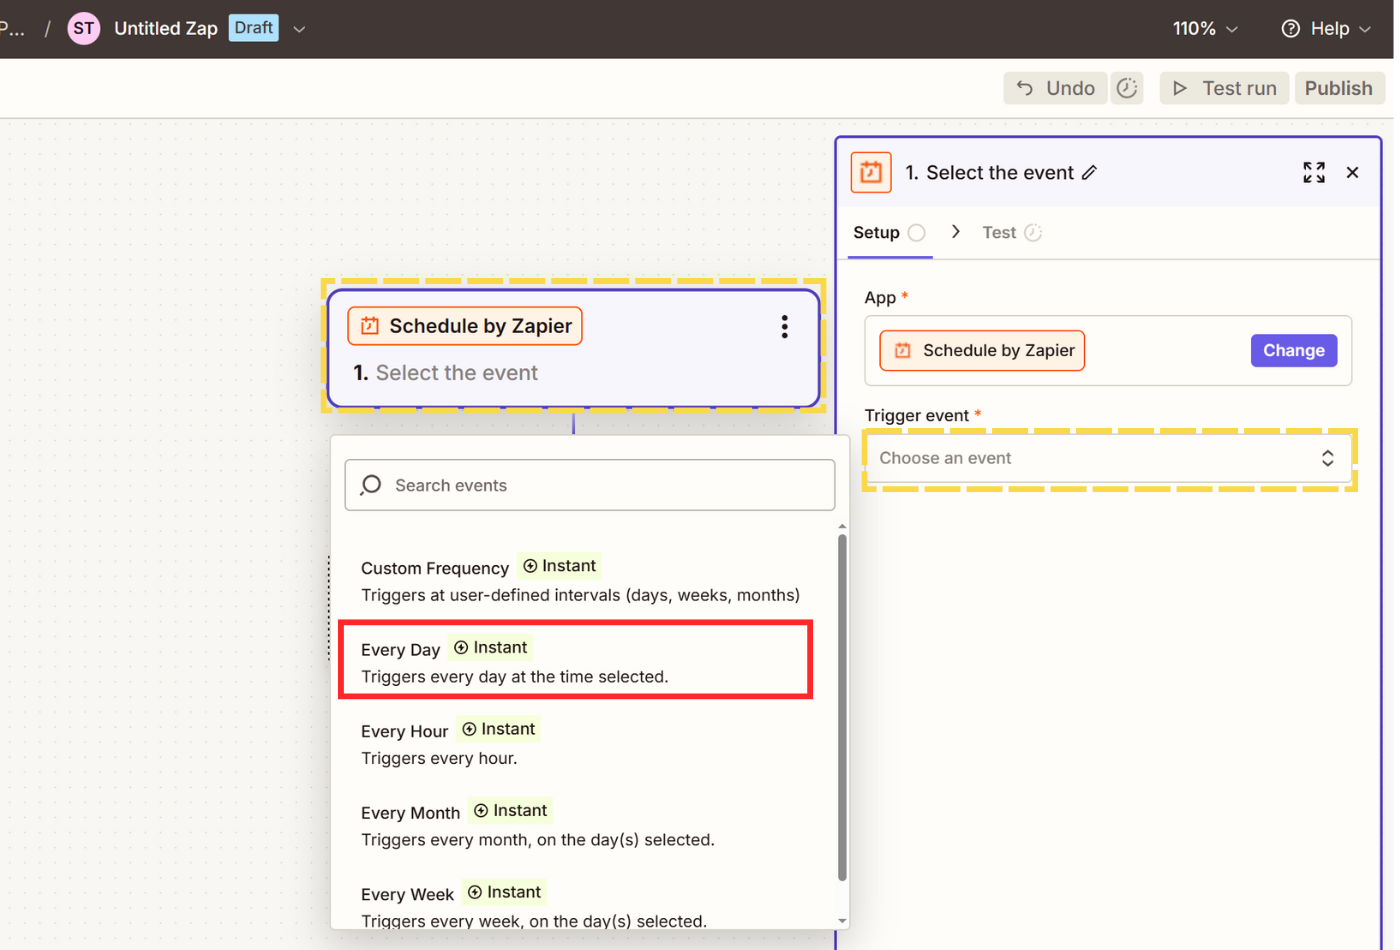
- Select a **Time of Day** of your choosing and test the trigger.
## 2. Send a Request to Scrape.do
Now we'll configure the webhook to send scraping requests to Scrape.do.
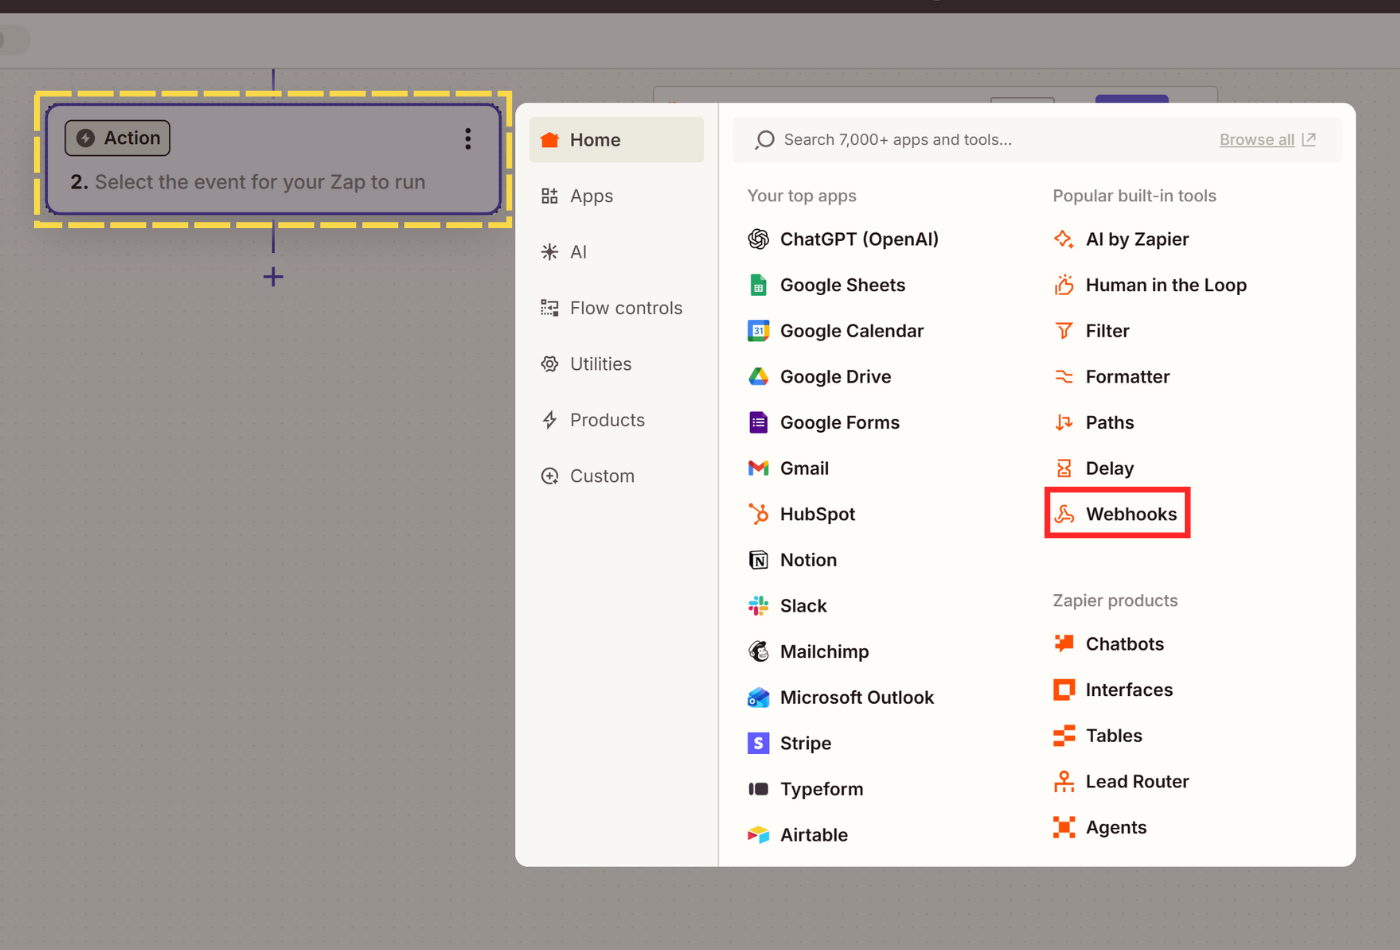
- Our main action is sending a webhook request to Scrape.do. Click on your action step and select **Webhooks** as your action app.
- In the **Setup** menu, choose **GET** as your Action event and click **Continue**.
- We will setup our scraping request in the **Configure** menu. First off, insert `http://api.scrape.do/` as **URL**.
- Then, click on **Add value set** and add these **Query String Parameters** and their values one-by-one:
- **url** - The URL of the web page you want to scrape. You can also input this from another data set you've created using Zapier.
- **token** - Your SDO token collected from your dashboard.
- **super** - Keep as `false` by default, change to `true` when you want to use residential and mobile proxies to improve your success rates.
- **geoCode** - Country code of where you want to connect to your target URL from. View available proxy locations [here](/documentation/proxies/geo-code).
- **render** - Enables JavaScript rendering through headless browsers. Keep `false` unless you run into dynamically rendered websites.
- **output** - Default value is `html`, which is better if you are going to manually parse the page using Python/JavaScript or Zapier's own Formatter. If you are going to use AI, it's better to select `markdown` as output to reduce input to a size AI tools can work with.
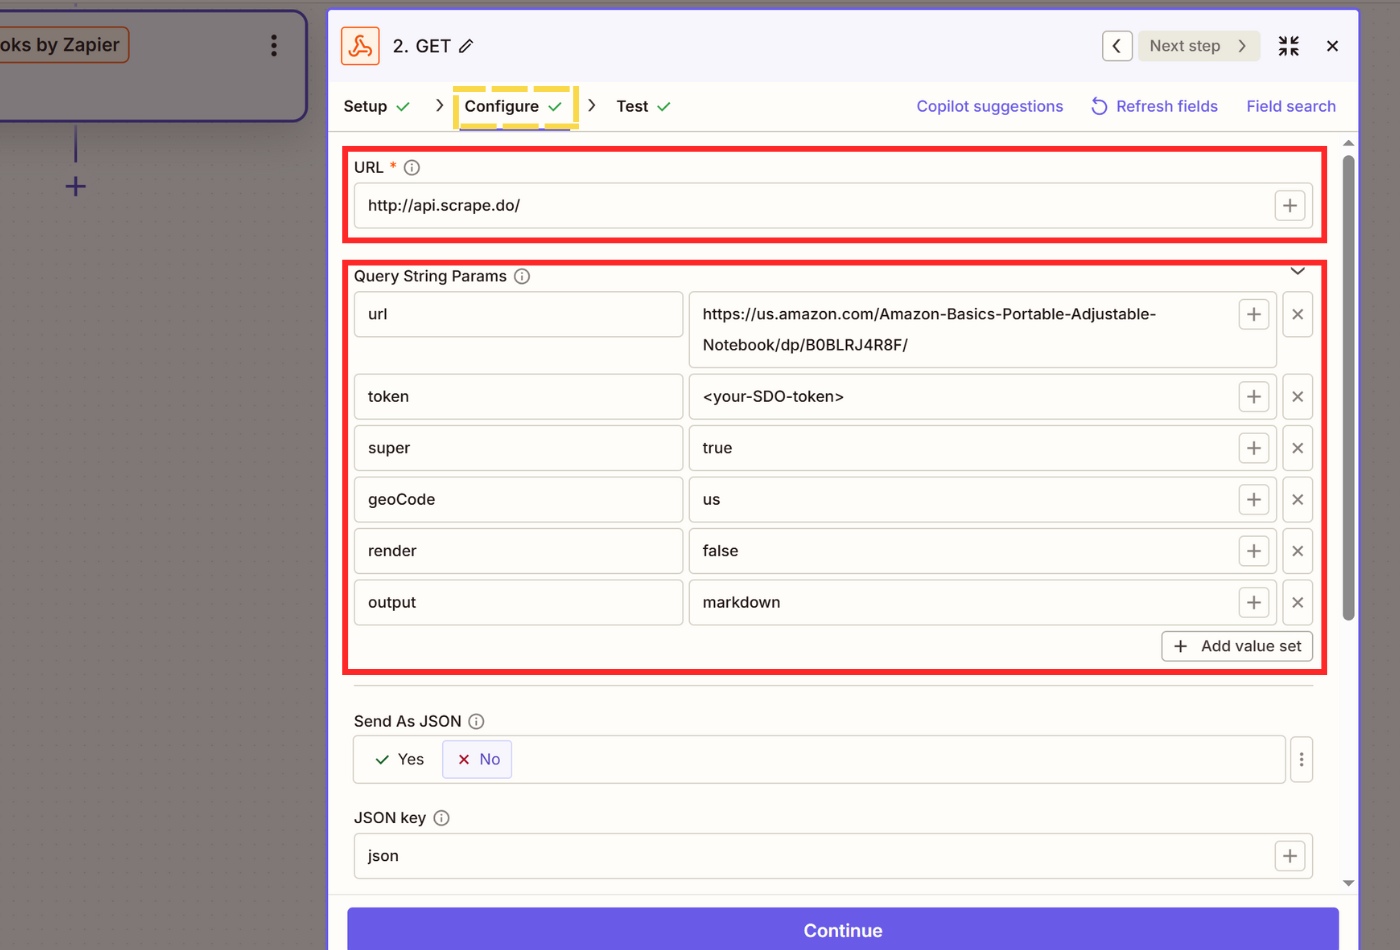
- Make sure **Send As JSON** is disabled. Test step and confirm that you are getting a successful response.
> If you are unable to get a response, go to [playground](https://dashboard.scrape.do/playground) and enable parameters such as **Super**, **Render JavaScript**, and/or disable **Block Resources** until you get a successful response.
## 3. Extract Data from Response
Once you have the raw HTML or markdown response, you need to parse it into structured data. You have two options for parsing data extracted through your Scrape.do webhook call.
### Option A: Use AI to Extract Data
Best if you are scraping different websites inside a single Zap. You will be able to scrape and organize different content structures into one single database in the same format.
- Hover over the **+** sign at the end of your Zap to add a new step and select **AI by Zapier**.
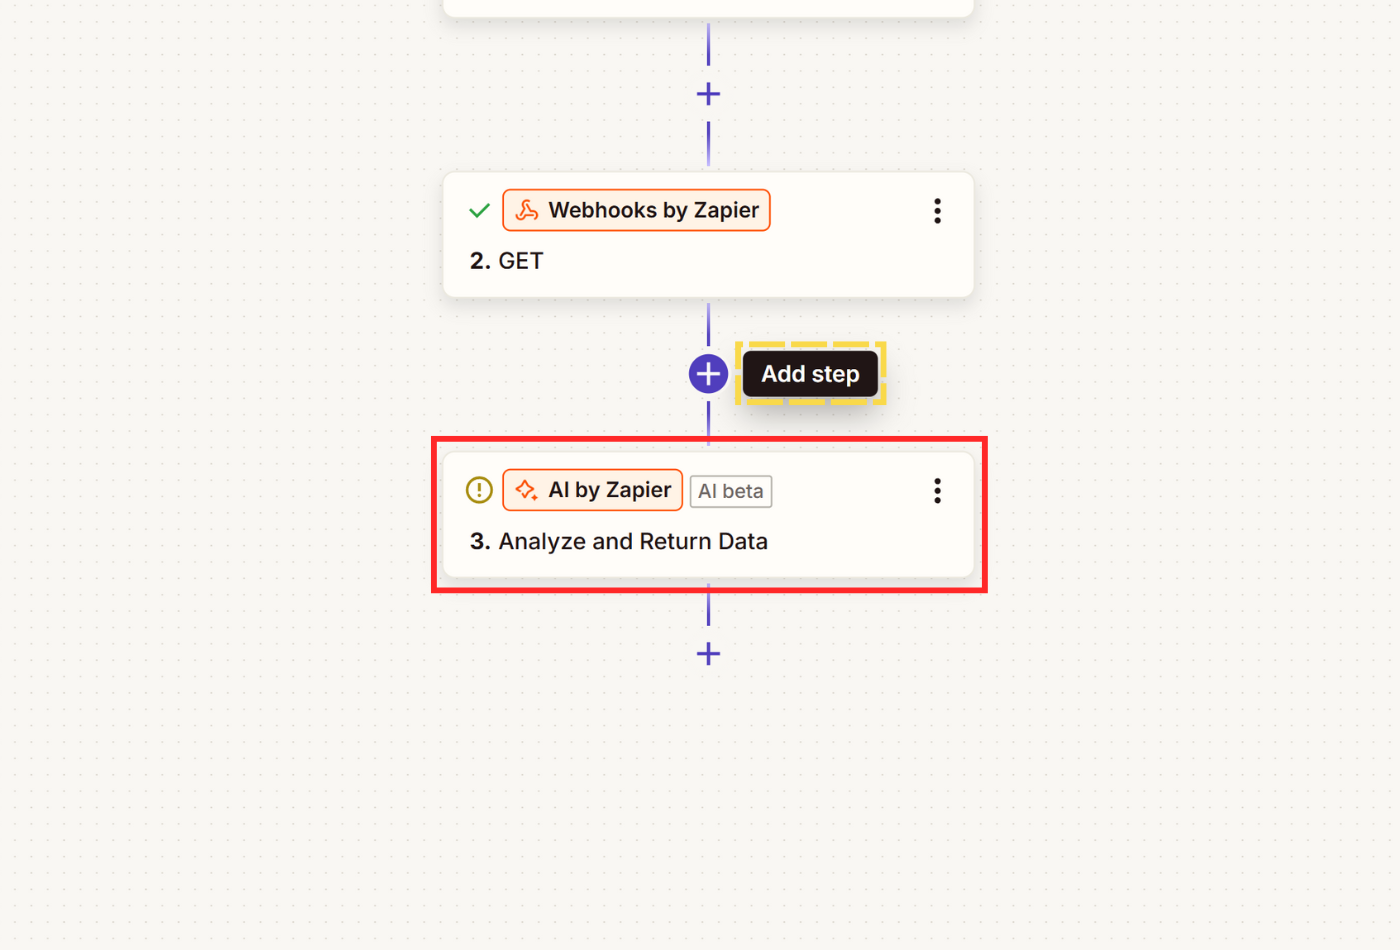
- Select **Extract** as Build mode. The default AI Model provided by Zapier for free should do the job, but feel free to connect your own model APIs to Zapier.
- In **Input fields**, we'll select what we scraped in the second step as source. Click **Select field value**, name your data source, then click **+** in Field value and click on the second step titled **Get in Webhooks by Zapier** and pick **Step Output**.
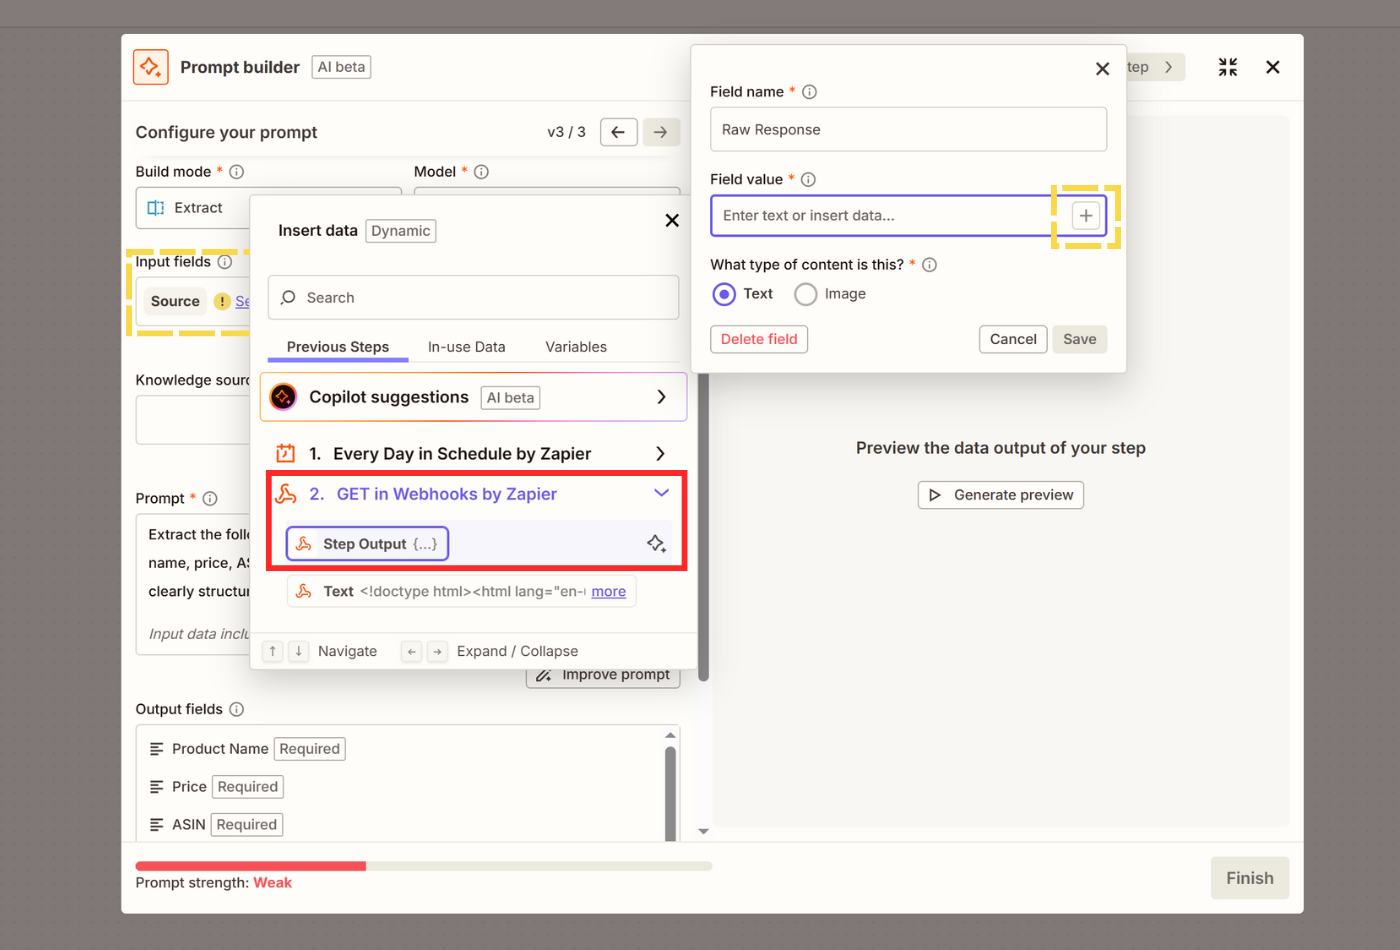
- Fill out the **Prompt** field. Explain specifically what you want to extract from the raw response in plain English. Click on **Improve prompt**.
- Finally, for the output fields, manually add/remove/edit fields, or simply click **Generate from prompt** to let AI take care of it.
- From the right half of the screen, click **Generate preview**, which will show you the final output.
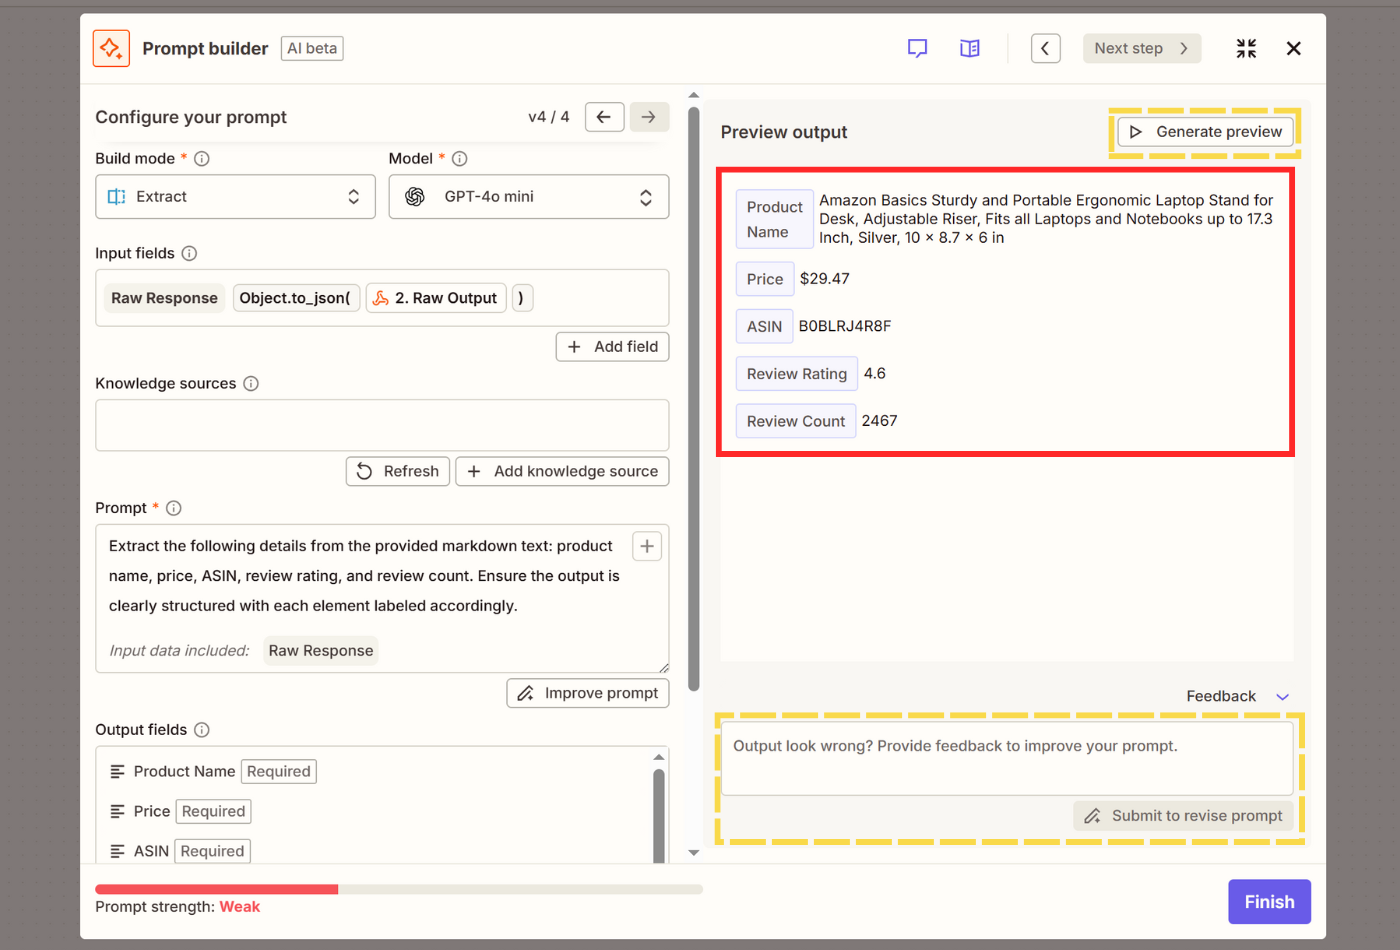
- Add comments and click **Submit to revise prompt** below your output if you want to further customize your extraction.
### Option B: Use Code by Zapier (Python/NodeJS)
If your Zap is scraping one website with a more static layout, you can use **Code by Zapier** to extract product details and save on performance + AI credits.
Also, if your raw response is larger than average even as markdown, this might be your only option too.
- Click **+ Add step** and search for **Code** to select **Code by Zapier** as your event.
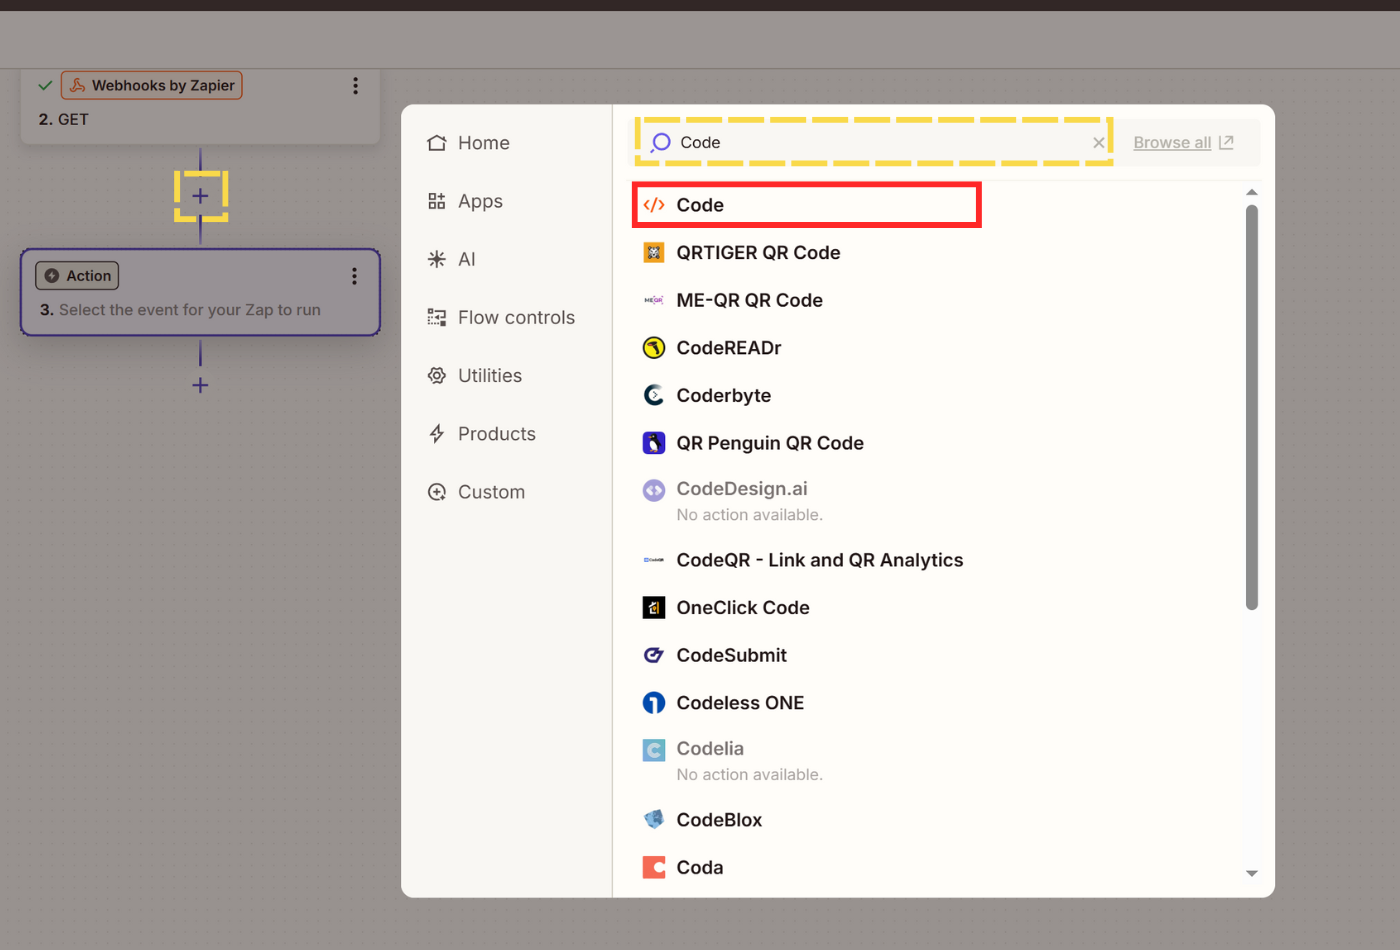
- Select **Python** as programming language and the **Text output** from the Webhook event as an input.
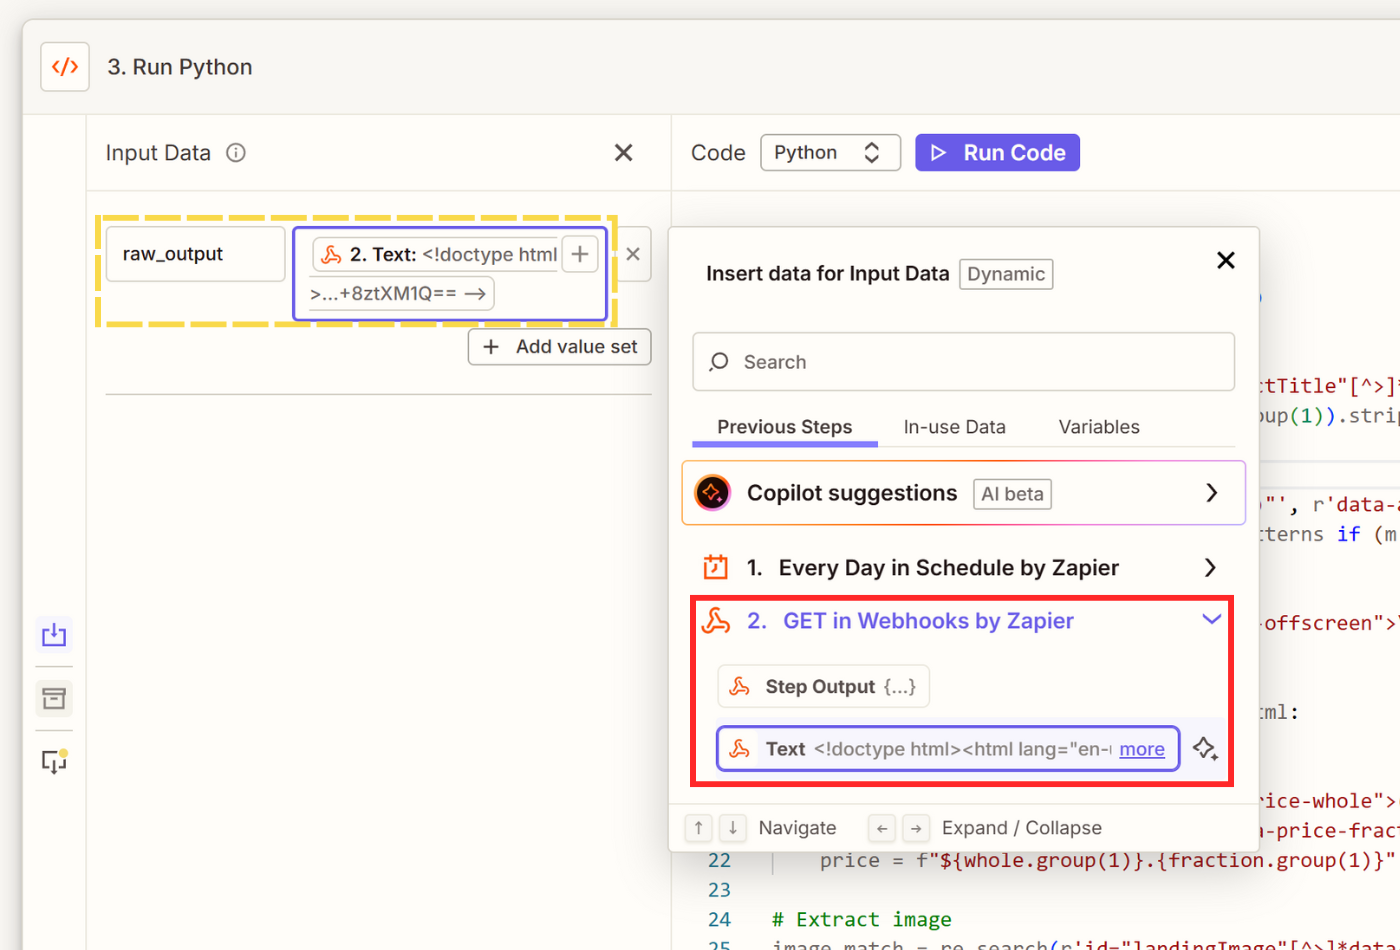
- Input your code to parse HTML and extract the fields you need.
**Example code (extract product details from Amazon):**
```python
import re
html = input_data.get('raw_response', '')
# Extract product name
name_match = re.search(r']*>(.*?)', html, re.DOTALL)
name = re.sub(r'\s+', ' ', name_match.group(1)).strip() if name_match else "Name not found"
# Extract ASIN
asin_patterns = [r'"asin":"([A-Z0-9]{10})"', r'data-asin="([A-Z0-9]{10})"', r'ASIN["\s:]+([A-Z0-9]{10})']
asin = next((m.group(1) for p in asin_patterns if (m := re.search(p, html))), "ASIN not found")
# Extract price
price_match = re.search(r'\$([0-9.,]+)', html)
if price_match:
price = f"${price_match.group(1)}"
elif "outOfStockBuyBox_feature_div" in html:
price = "Out of Stock"
else:
whole = re.search(r'([0-9,]+)', html)
fraction = re.search(r'([0-9]+)', html)
price = f"${whole.group(1)}.{fraction.group(1)}" if whole and fraction else "Price not found"
# Extract image
image_match = re.search(r'id="landingImage"[^>]*data-a-dynamic-image="[^"]*"(https://[^&]+?)"', html)
if not image_match:
image_match = re.search(r']*id="landingImage"[^>]*src="([^"]+)"', html)
image = image_match.group(1) if image_match else "No image"
# Extract rating
rating_match = re.search(r'(\d+\.?\d*)\s*out of', html)
rating = rating_match.group(1) if rating_match else "No rating"
# Return output for Zapier
output = {'asin': asin, 'name': name, 'price': price, 'image': image, 'rating': rating}
return output
```
- Once you run your code, you should have a clean output to now export in the next step.
## 4. Export Data to Google Sheets
Now that we have structured data, let's store it in Google Sheets for easy access and analysis.
- Go to your Google Drive and create a new spreadsheet. Name the spreadsheet and a sheet inside based on the work you want to complete.
- Add the field names you've extracted in the previous step as headers, such as **Product name**, **Price**, **ASIN/SKU**, etc.
- Click on **+ Add step** and select **Google Sheets**.
- In the **Setup** step, select **Create Spreadsheet Row** to log the newly extracted data to the bottom of the table in your sheet.
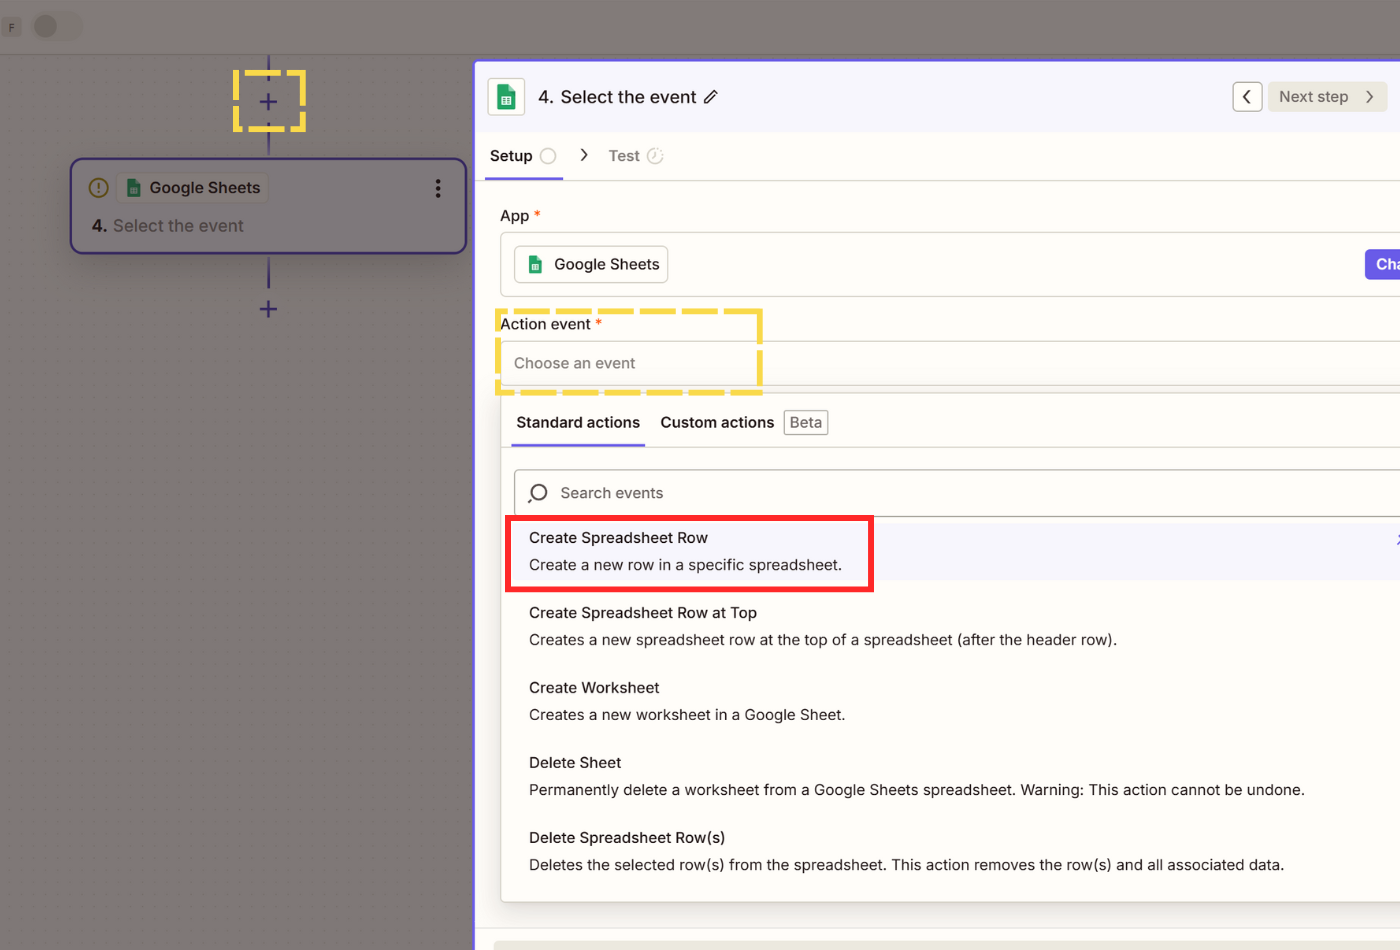
- Connect your Google Drive account if you haven't already and select your account.
- In the **Configure** step, select the Spreadsheet and Worksheet you've created.
- Rows will be automatically fetched from your Worksheet. Click **+** under each Row and add the extracted data from the previous step. **Copilot Suggestions** will provide accurate data most of the time unless what you're working with is highly complex.

- Finally, test and confirm if your Zap is able to write new rows inside your spreadsheet.
## 5. Test and Publish
Before going live, make sure everything works as expected.
Finally, choose a fresh URL with new data to test your Zap from start to finish. It should take a couple of seconds, but if all the steps worked correctly, it should:
- Send a request to your target URL through Scrape.do via Webhooks
- Get and store the raw HTML/markdown
- Extract your preferred fields from the raw response using AI/custom extraction logic
- Write your structured new data into your Google Spreadsheet, every day or based on any trigger of your choice
You can also modify the trigger so it works every time you add a new row to a spreadsheet to scrape the URL you've inputted.