# Playwright MCP Deep Dive: The Ultimate Guide with Examples
> Source: https://scrape.do/blog/playwright-mcp/
Published: 2026-06-24 · Updated: 2026-06-24 · Authors: Antonello Zanini · Categories: Scraping Tools, Headless Browser, AI
Playwright MCP has become the go-to MCP server for browser automation in AI agents and AI-powered applications. In this detailed guide, you will learn everything you need to know about it. You will also see how to use it in real-world examples.
Let’s dive in!
## What is Playwright MCP?
[Playwright MCP](https://github.com/microsoft/playwright-mcp) is an MCP server developed by Microsoft and [built around Playwright](https://scrape.do/blog/web-scraping-with-playwright/), the popular browser automation framework for end-to-end testing and web interaction. It enables LLMs and AI agents to control browsers through Playwright-powered tools exposed via the [_Model Context Protocol_ standard](https://modelcontextprotocol.io/specification/2025-11-25).
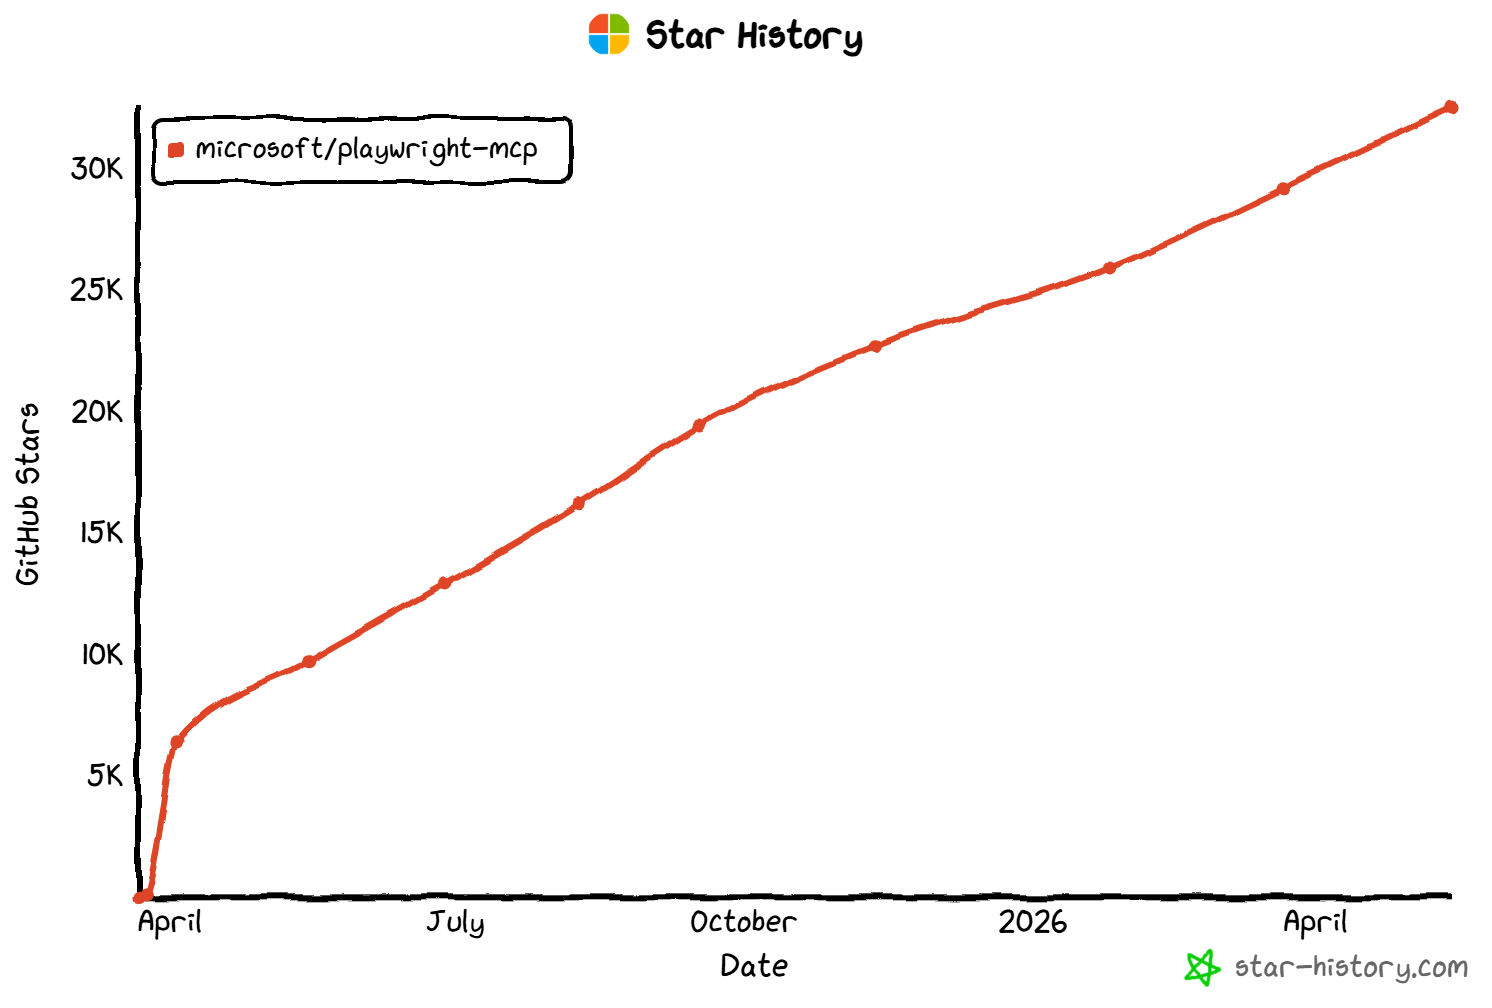
Since its release in March 2025, the project has quickly become one of the most popular MCP servers. It now has over 32k GitHub stars and [over 2 million weekly downloads on npm](https://www.npmjs.com/package/@playwright/mcp), highlighting strong adoption across the AI agent ecosystem.
To learn more, explore the official [Playwright MCP documentation](https://playwright.dev/docs/getting-started-mcp).
## Playwright MCP: Getting Started
In this chapter, you will understand how to configure Playwright MCP and what it offers in terms of tools and configuration options.
### Standard Setup
Playwright MCP can be started locally using the `npx` command below:
```bash
npx @playwright/mcp@latest
```
This launches the Playwright MCP server on your machine via the [`playwright/mcp`](https://www.npmjs.com/package/@playwright/mcp) npm package. There, it waits for instructions from an MCP client.
In most MCP clients following the Anthropic MCP configuration file format, you can plug in Playwright MCP with this JSON config:
```json
{
"mcpServers": {
"playwright": {
"command": "npx",
"args": ["@playwright/mcp@latest"]
}
}
}
```
In general, Playwright MCP works with any tool that can act as an MCP client. This includes Claude Code, Codex CLI, Gemini CLI, Cursor, Windsurf, Visual Studio Code, OpenClaw, as well as agent frameworks such as LangChain, LlamaIndex, CrewAI, and similar AI agent-building stacks.
### Advanced Configuration
Playwright MCP supports advanced configuration through CLI arguments passed via the `npx` command in the `args` field. This allows you to fine-tune browser behavior, security constraints, networking, and runtime capabilities directly from your MCP client setup.
For example, you can extend the basic configuration like this:
```json
{
"mcpServers": {
"playwright": {
"command": "npx",
"args": [
"@playwright/mcp@latest",
"--headless",
"--browser=firefox",
"--timeout-navigation=60000"
]
}
}
}
```
The above config instructs Playwright to launch Firefox in headless mode and with a 60-second navigation timeout.
Some of the most relevant CLI arguments include:
| **CLI Argument** | **Description** |
| ----------------- | ------------------------------------------------------------------- |
| `--headless` | Run the browser without UI |
| `--browser` | Choose the browser to control (`chrome`, `firefox`, `webkit`, etc.) |
| `--caps` | Enable extra sets of tools (`vision`, `pdf`, `devtools`, etc.) |
| `--device` | Emulate a specific device |
| `--viewport-size` | Set the browser viewport size |
| `--user-data-dir` | Path where to persist the browser profile data |
| `--isolated` | Run with temporary in-memory profile |
| `--storage-state` | Load saved authentication/session state |
| `--cdp-endpoint` | Remote CDP endpoint to connect to |
| `--proxy-server` | Configure proxy for browser traffic |
Explore all CLI arguments [in the official documentation](https://github.com/microsoft/playwright-mcp#configuration).
In addition to CLI flags, Playwright MCP can be fully configured using a JSON configuration file via the `--config` flag:
```bash
npx @playwright/mcp@latest --config path/to/config.json
```
This file enables deeper customization of browser behavior, server settings, networking rules, timeouts, snapshots, secrets handling, [extension management](https://github.com/microsoft/playwright/tree/main/packages/extension#readme), and more. It is the recommended approach for complex or production-grade setups, as described in the [Playwright MCP configuration schema](https://github.com/microsoft/playwright-mcp#configuration-file).
### Available Tools
Playwright MCP tools are categorized based on the tasks they handle. By default, Playwright MCP exposes over 20 “Core automation” tools for browser automation. To enable additional categories of tools, you need to pass the following CLI arguments:
- **“Configuration” tools**: Via `--caps=config`.
- **“Network” tools**: Via `--caps=network`.
- **“Storage” tools**: Via `--caps=storage`.
- **“DevTools” tools**: Via `--caps=devtools`.
- **“Coordinate-based” tools**: Via `--caps=vision`.
- **“PDF generation” tools**: Via `--caps=pdf`.
- **“Test assertion” tools**: Via `--caps=testing`.
When configured to support all categories, Playwright MCP provides over 70 tools. Below is a selection of the most important ones:
| **Tool Name** | **Category** | **Description** |
| ---------------------------- | --------------- | -------------------------------------------------------------------------------------------------------------- |
| `browser_navigate` | Core automation | Navigate to a given URL |
| `browser_click` | Core automation | Click on a web page element |
| `browser_type` | Core automation | Type text into an input or editable element |
| `browser_snapshot` | Core automation | Capture accessibility snapshot of the current page |
| `browser_take_screenshot` | Core automation | Capture a visual screenshot of the page |
| `browser_fill_form` | Core automation | Fill multiple form fields in one operation |
| `browser_select_option` | Core automation | Select value(s) in a dropdown element |
| `browser_press_key` | Core automation | Press a keyboard key or shortcut |
| `browser_wait_for` | Core automation | Wait for time duration or specific text changes |
| `browser_hover` | Core automation | Hover the mouse over a page element |
| `browser_evaluate` | Core automation | Run JavaScript in page context |
| `browser_network_requests` | Network | List network requests made by the page |
| `browser_network_request` | Network | Inspect full details of a specific network request |
| `browser_route` | Network | Mock or intercept network requests by URL pattern |
| `browser_storage_state` | Storage | Save cookies and local storage state to a file |
| `browser_set_storage_state` | Storage | Restore cookies and local storage from a file |
| `browser_cookie_list` | Storage | List browser cookies |
| `browser_localstorage_get` | Storage | Retrieve a `[localStorage](https://developer.mozilla.org/en-US/docs/Web/API/Window/localStorage)` value by key |
| `browser_sessionstorage_set` | Storage | Set a `[sessionStorage](https://developer.mozilla.org/en-US/docs/Web/API/Window/sessionStorage)` value |
| `browser_pdf_save` | PDF generation | Store current page as PDF |
Playwright MCP also includes advanced DevTools, vision-based controls, PDF generation, tracing, video recording, and testing/assertion tools. For the full and up-to-date tool reference, [refer to the official repository](https://github.com/microsoft/playwright-mcp#tools).
## How the Playwright MCP Server Works
The Playwright MCP server sits between any AI-powered application or agent (acting as an MCP client) and the Playwright browser automation engine.
In detail, the Playwright MCP works as a translation layer that converts high-level natural language intentions into precise browser operations through a predefined set of tools. Each tool maps to underlying Playwright APIs (e.g., the `browser_click` tool ultimately corresponds to a `.click()` action on a resolved Playwright locator).
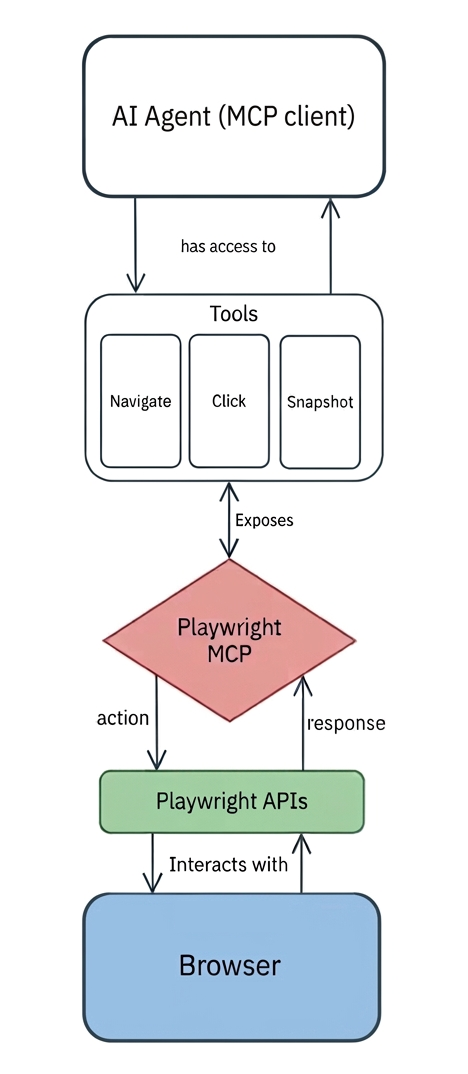
Now, assume you instruct an AI agent to click the “Load more” button on a webpage. This is what would happen:
1. **Intent interpretation**: The agent analyzes the current page state, usually obtained via `browser_snapshot`, and determines that a click action is required on a specific UI element.
2. **Tool selection**: The agent invokes `browser_click` on the target DOM element derived from the accessibility snapshot (not raw pixel coordinates or ad-hoc selectors).
3. **Translation by MCP server**: The Playwright MCP server receives the request and performs the corresponding [Playwright `click()` API](https://playwright.dev/docs/api/class-locator#locator-click) call by first resolving the target into a concrete Playwright locator, mapping the abstract instruction to a real DOM element.
4. **Execution in the browser**: Playwright executes the [JavaScript `.click()` method](https://developer.mozilla.org/en-US/docs/Web/API/HTMLElement/click) on the selected DOM element inside the active browser instance (Chromium, Firefox, or WebKit), directly interacting with the live page.
5. **State propagation back to the agent**: The updated page state is captured and returned through MCP to the agent.
A core design principle to understand is that Playwright MCP relies on structured [accessibility snapshots](https://developer.mozilla.org/en-US/docs/Glossary/Accessibility_tree) instead of screenshots or vision models. This approach makes browser automation faster, lighter, and more deterministic as the AI model interacts directly with the page’s accessibility tree rather than interpreting pixels visually. Plus, it consumes way fewer tokens.
## Why Add Playwright MCP to Your AI Agent
Large language models are great at reasoning and generating output, whether it is text, images, audio, or video. Still, they are inherently limited when it comes to interacting with external environments.
Out of the box, LLMs cannot visit websites, interact with your desktop, or connect with third-party solutions. Without the right set of tools, their knowledge remains static and disconnected from the real world.
Playwright MCP addresses the web interaction gap by giving AI agents direct access to a live browser environment. Instead of guessing or hallucinating page states, the AI-powered application connected to Playwright can browse, interact with, and extract data from online pages.
That transforms the AI system from a passive reasoner into an active operator of web interfaces. In practice, Playwright MCP gives agents “eyes and hands” for the web, unlocking scenarios that are otherwise difficult or unreliable for pure LLMs. Let’s explore some use cases it supports!
## When You Should Add Playwright MCP
Playwright MCP becomes essential whenever your AI agent needs to interact with the web. At a high level, it unlocks these core use cases:
- **Web scraping**: Navigate JavaScript-based, dynamic websites and [extract structured information from their pages](https://scrape.do/blog/how-to-scrape-javascript-rendered-web-pages-with-python/). For example, an agent could collect product prices from an e-commerce site that loads content dynamically, or extract listings from dynamic job boards involving infinite scrolling.
- **Browser-based workflow automation**: Perform multi-step tasks that normally require human interaction. For instance, automatically filling out job applications, doing online grocery shopping, or submitting expense reports via online forms.
- **Automated testing and quality assurance**: Explore web applications and generate end-to-end tests. For example, generating Playwright test scripts from natural language descriptions, as well as detecting UI regressions.
## How to Integrate Playwright MCP in Claude Code, Codex, and Cursor
In the sections below, you will be guided through the process of adding the Playwright MCP to Claude Code, Codex, and Cursor. To configure Playwright MCP in other tools or AI clients, refer to the instructions in [the official repository](https://github.com/microsoft/playwright-mcp#getting-started).
### Requirements
Before proceeding, make sure you have:
- [Node.js 18+ installed locally](https://nodejs.org/en/download) (the latest LTS version is recommended).
- [Claude Code](https://code.claude.com/docs/en/quickstart), [Codex](https://developers.openai.com/codex/quickstart), or [Cursor](https://cursor.com/docs/get-started/quickstart) installed and properly configured.
- Playwright installed, with browser binaries and extra dependencies. For Chrome setup, run:
```bash
npx playwright install chrome --with-deps
```
## Setting Up Playwright MCP in Claude Code
### Step #1: Add the Playwright MCP
Add the Playwright MCP to your [local Claude Code config](https://code.claude.com/docs/en/mcp) with:
```bash
claude mcp add playwright npx @playwright/mcp@latest
```
The output will be:
```
Added stdio MCP server playwright with command: npx @playwright/mcp@latest to local config
```
The `claude mcp add` command will add the following snippet to your local `.claude.json` file:
```json
{
"mcpServers": {
"playwright": {
"type": "stdio",
"command": "npx",
"args": ["@playwright/mcp@latest"],
"env": {}
}
}
}
```
If you prefer to set it globally across all projects, run:
```bash
claude mcp add --scope user playwright npx @playwright/mcp@latest
```
This time, the output will be:
```
Added stdio MCP server playwright with command: npx @playwright/mcp@latest to user config
```
This updates the `~/.claude.json` file with the same MCP server configuration.
Remember that Playwright MCP only exposes “Core automation” tools by default. For example, to also enable the “Network” tools, use:
```bash
claude mcp add playwright --scope user npx @playwright/mcp@latest -- --caps=network
```
This results in:
```json
{
"mcpServers": {
"playwright": {
"type": "stdio",
"command": "npx",
"args": ["@playwright/mcp@latest", "--caps=network"],
"env": {}
}
}
}
```
As an alternative approach, you can also manually edit the `.claude.json` file and add the configuration directly.
**Important**: For integration with Claude Desktop, [make sure your `claude_desktop_config.json` file contains the Playwright MCP configuration](https://modelcontextprotocol.io/docs/develop/connect-local-servers).
### Step #2: Verify the Integration
Launch Claude Code and run the `/mcp` command. This is what you should see:
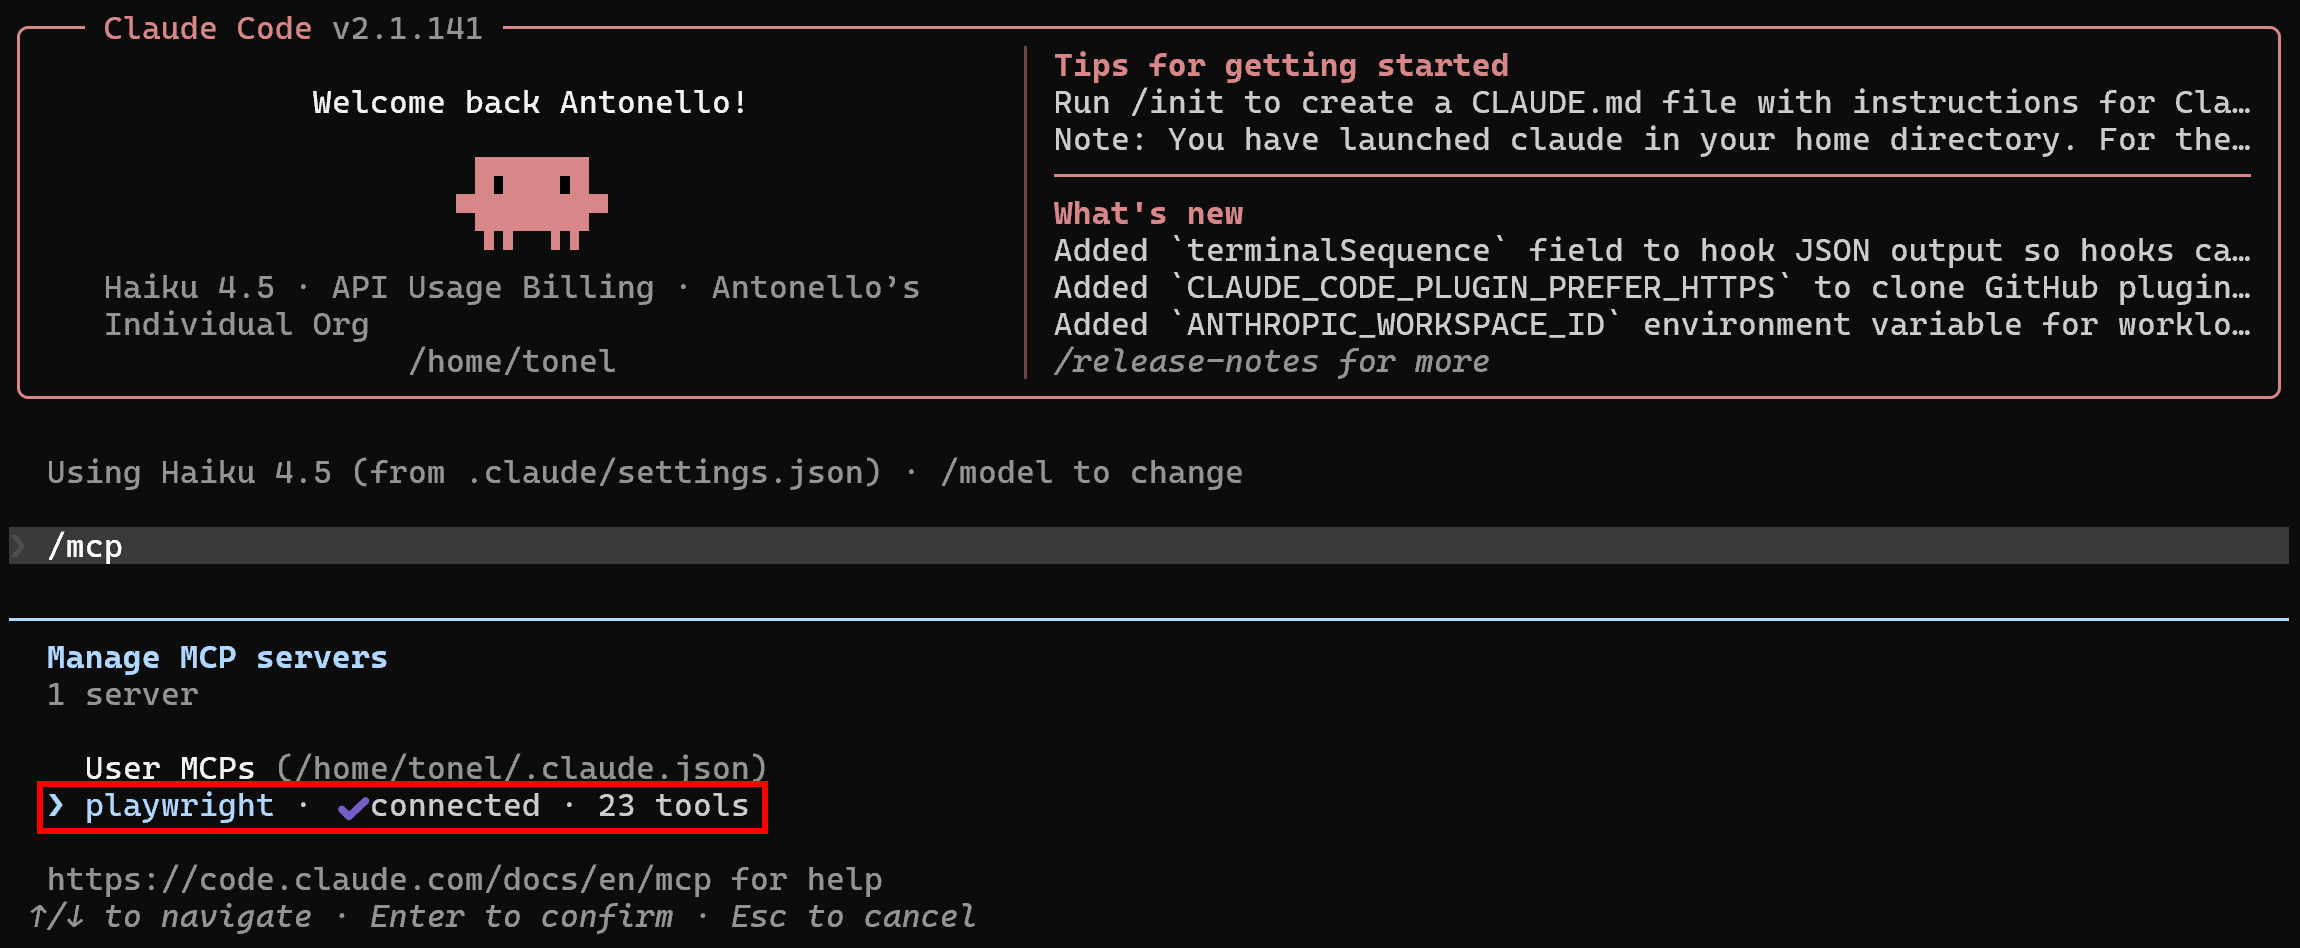
You should see a “playwright” MCP server listed, exposing the default set of core automation tools (around 20).
Great! Playwright MCP is now active in Claude Code.
## Setting Up Playwright MCP in OpenAI Codex
### Step #1: Add the Playwright MCP
Register the Playwright MCP in your [global Codex config](https://developers.openai.com/codex/mcp) with:
```bash
codex mcp add playwright npx "@playwright/mcp@latest"
```
The output will be:
```
Added global MCP server 'playwright'.
```
Now, if you open the `~/.codex/config.toml` file, you will see that it contains:
```toml
[mcp_servers.playwright]
command = "npx"
args = ["@playwright/mcp@latest"]
```
For project-level setup, make sure the project-scoped `.codex/config.toml` file contains the same configuration.
To configure additional categories of tools (such as the “Network” tools), run instead:
```bash
codex mcp add playwright npx @playwright/mcp@latest --caps=network
```
This time, the resulting configuration will be:
```toml
[mcp_servers.playwright]
command = "npx"
args = ["@playwright/mcp@latest", "--caps=network"]
```
### Step #2: Verify the Integration
Start Codex and fire the `/mcp` command:
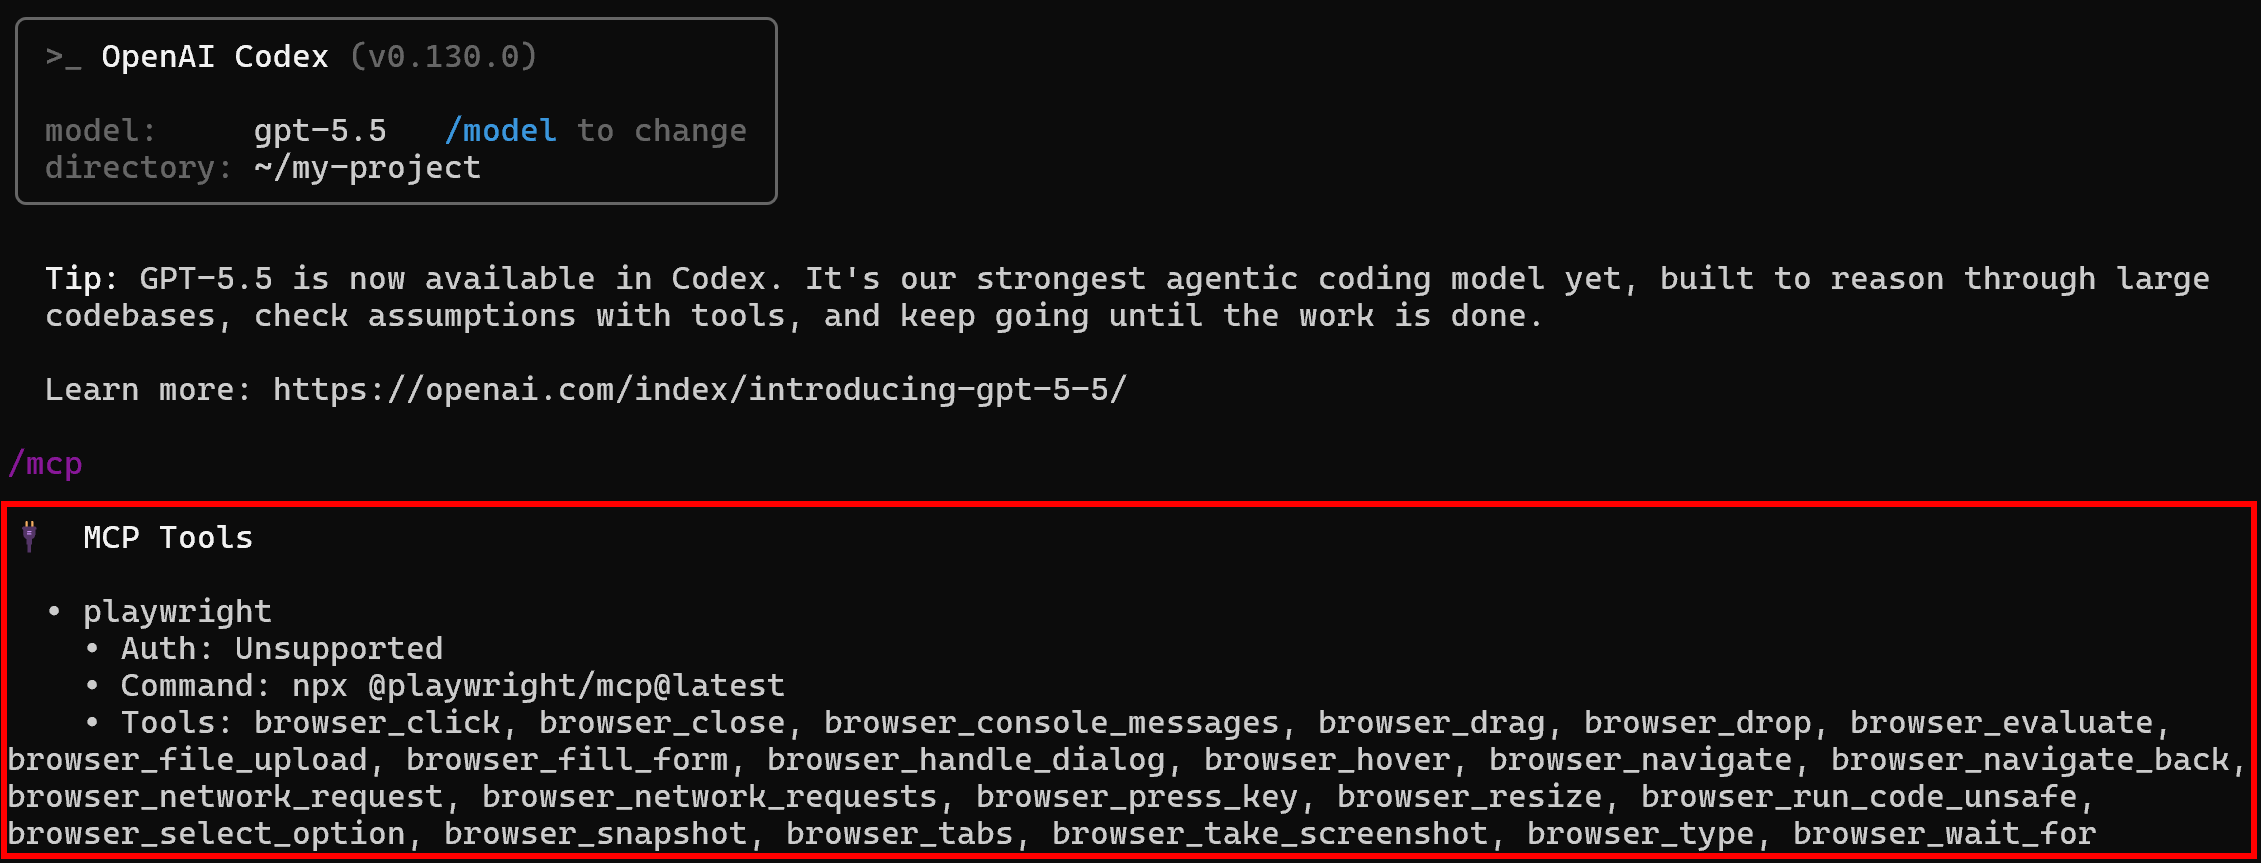
You should see the configured “playwright” server exposing the MCP Playwright tools.
Awesome! Codex is now connected to the Playwright MCP server.
## Setting Up Playwright MCP in Cursor
### Step #1: Add the Playwright MCP
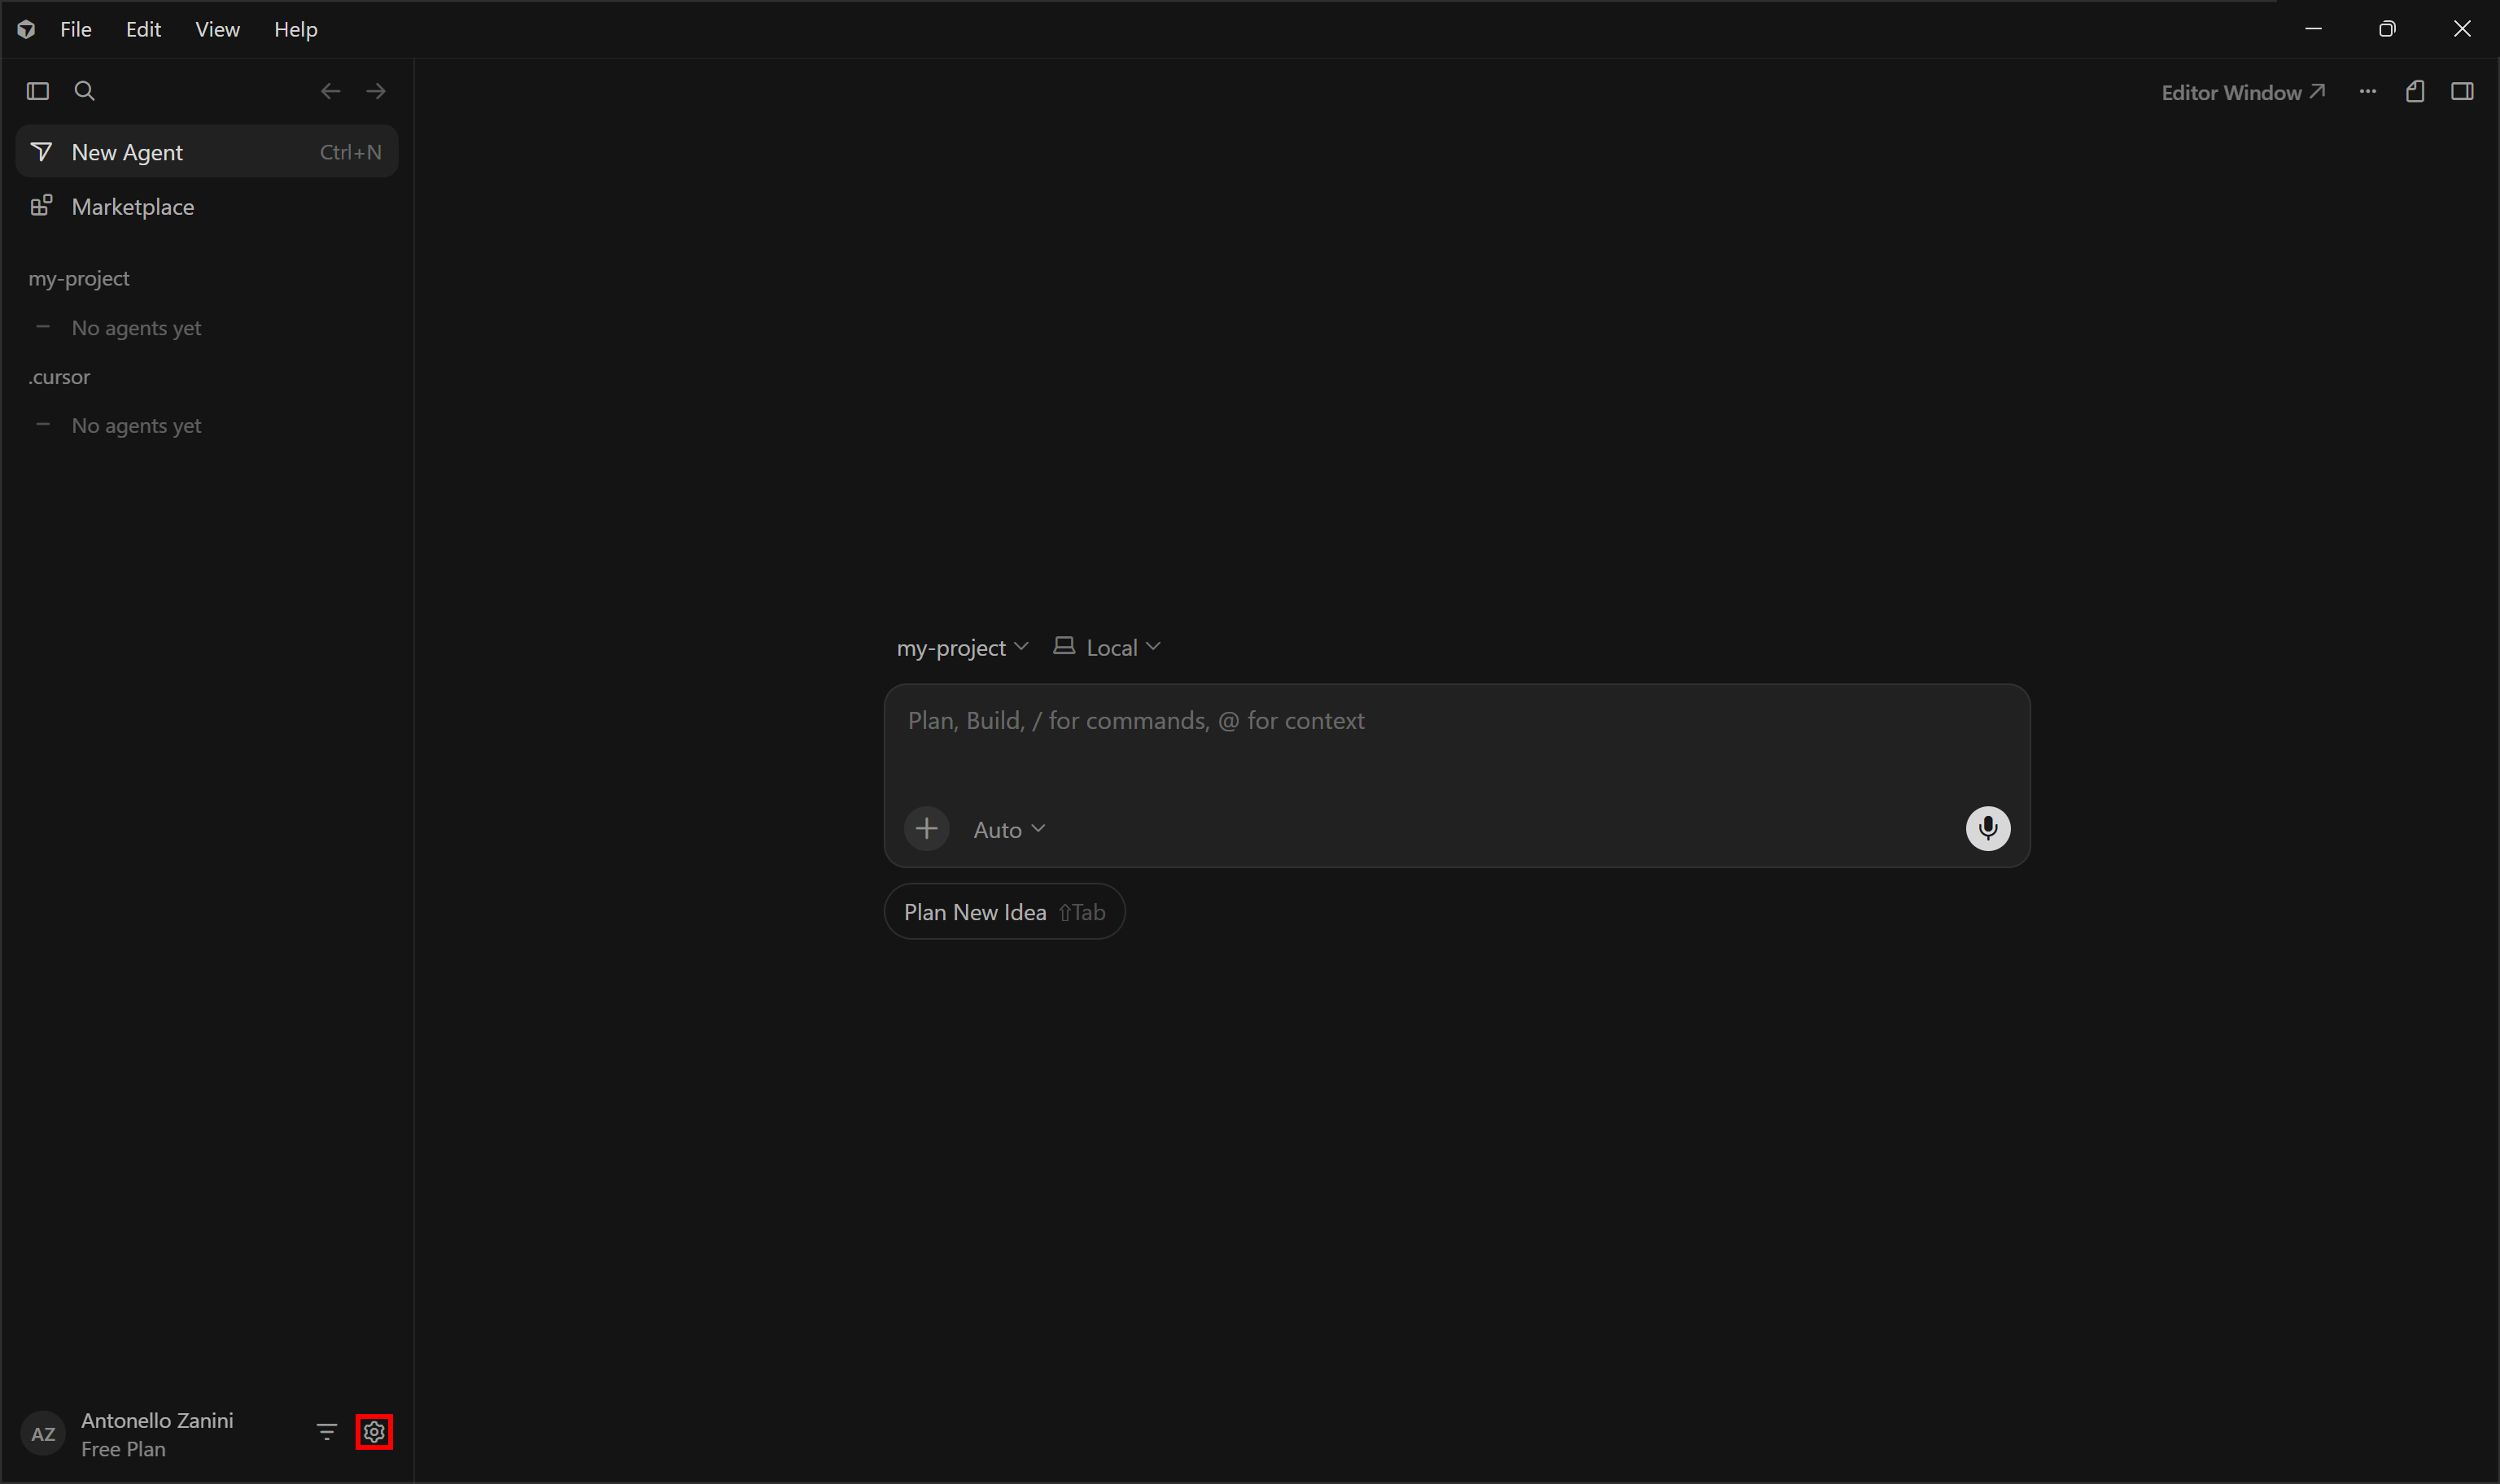
Start by launching Cursor and clicking the gear icon in the bottom-left corner:
This will open the “Settings” page. From there, navigate to the “Tools & MCP” section and click the “Add Custom MCP” button:
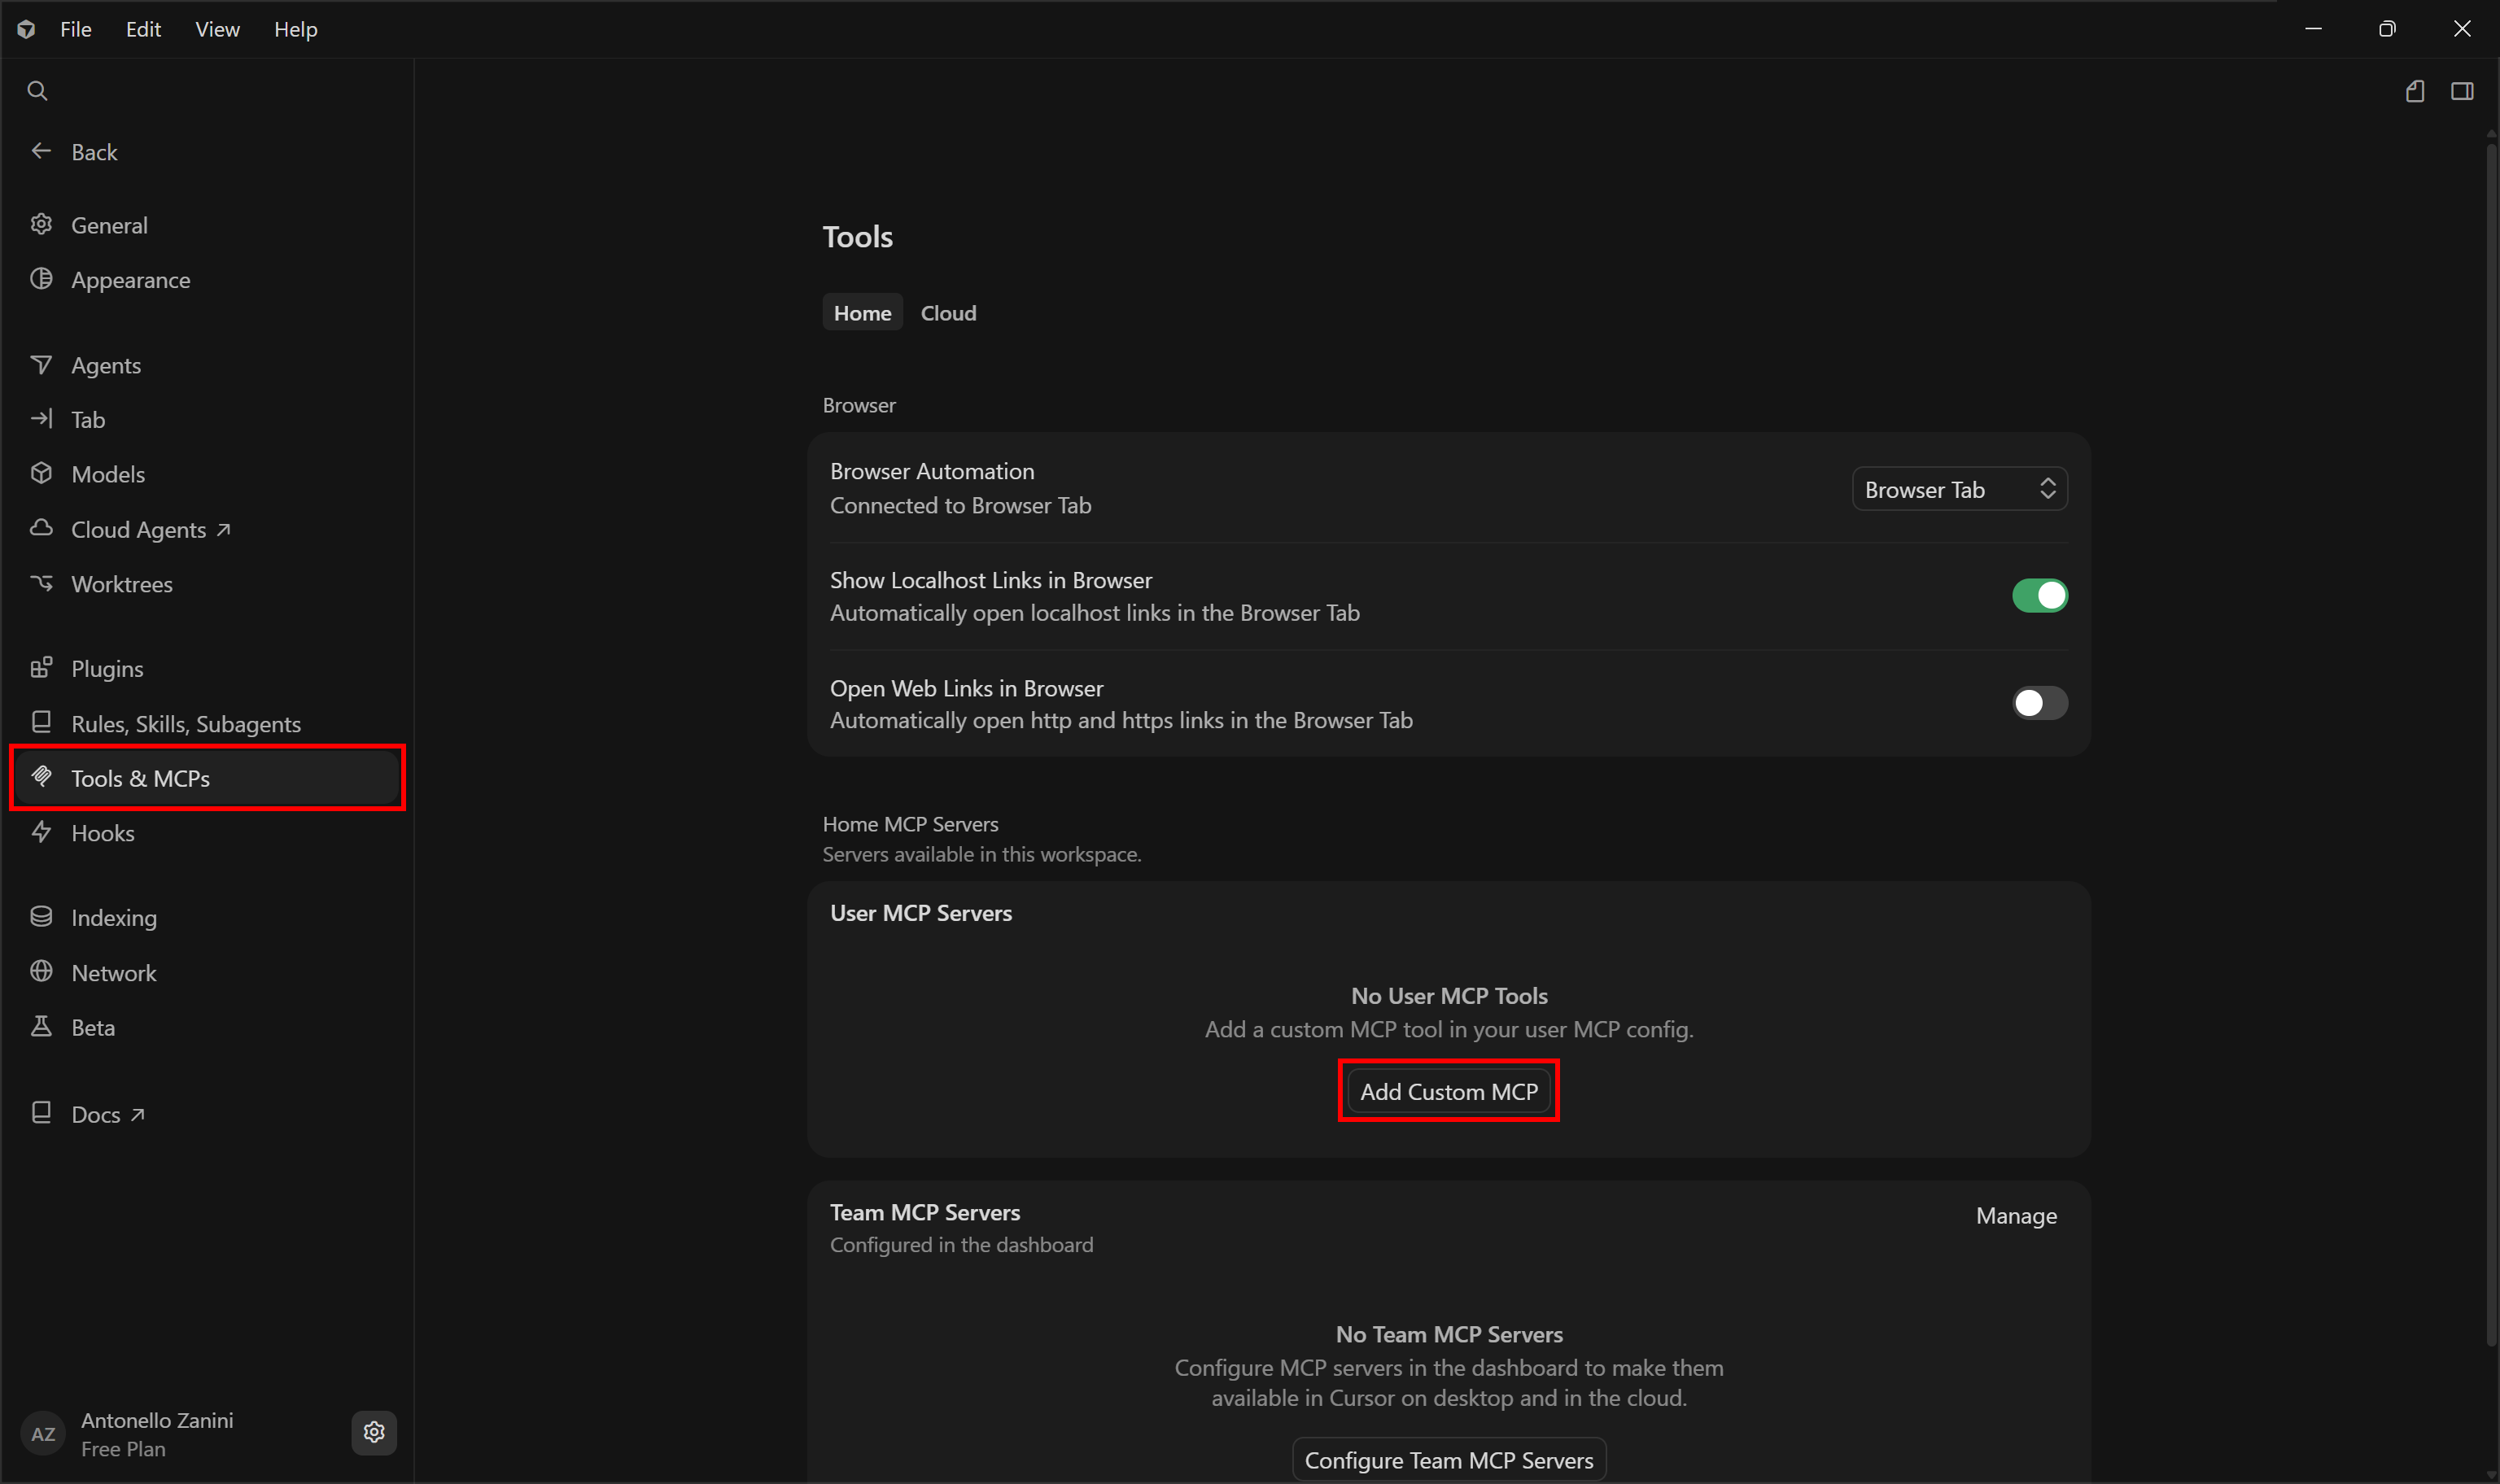
This will open the `~/.cursor/mcp.json` configuration file in Cursor. That file represents the [global configuration file for MCP server integrations](https://cursor.com/docs/mcp).
Make sure it contains:
```json
{
"mcpServers": {
"playwright": {
"type": "stdio",
"command": "npx",
"args": ["@playwright/mcp@latest"],
"env": {}
}
}
}
```
Then, save the file and close it.
**Note**: For a project-based setup, add a `.cursor/mcp.json` file in your project and populate it as above.
### Step #2: Verify the Integration
After saving the Cursor `mcp.json` file, a “playwright” server will appear in the “Tools & MCP” settings page:
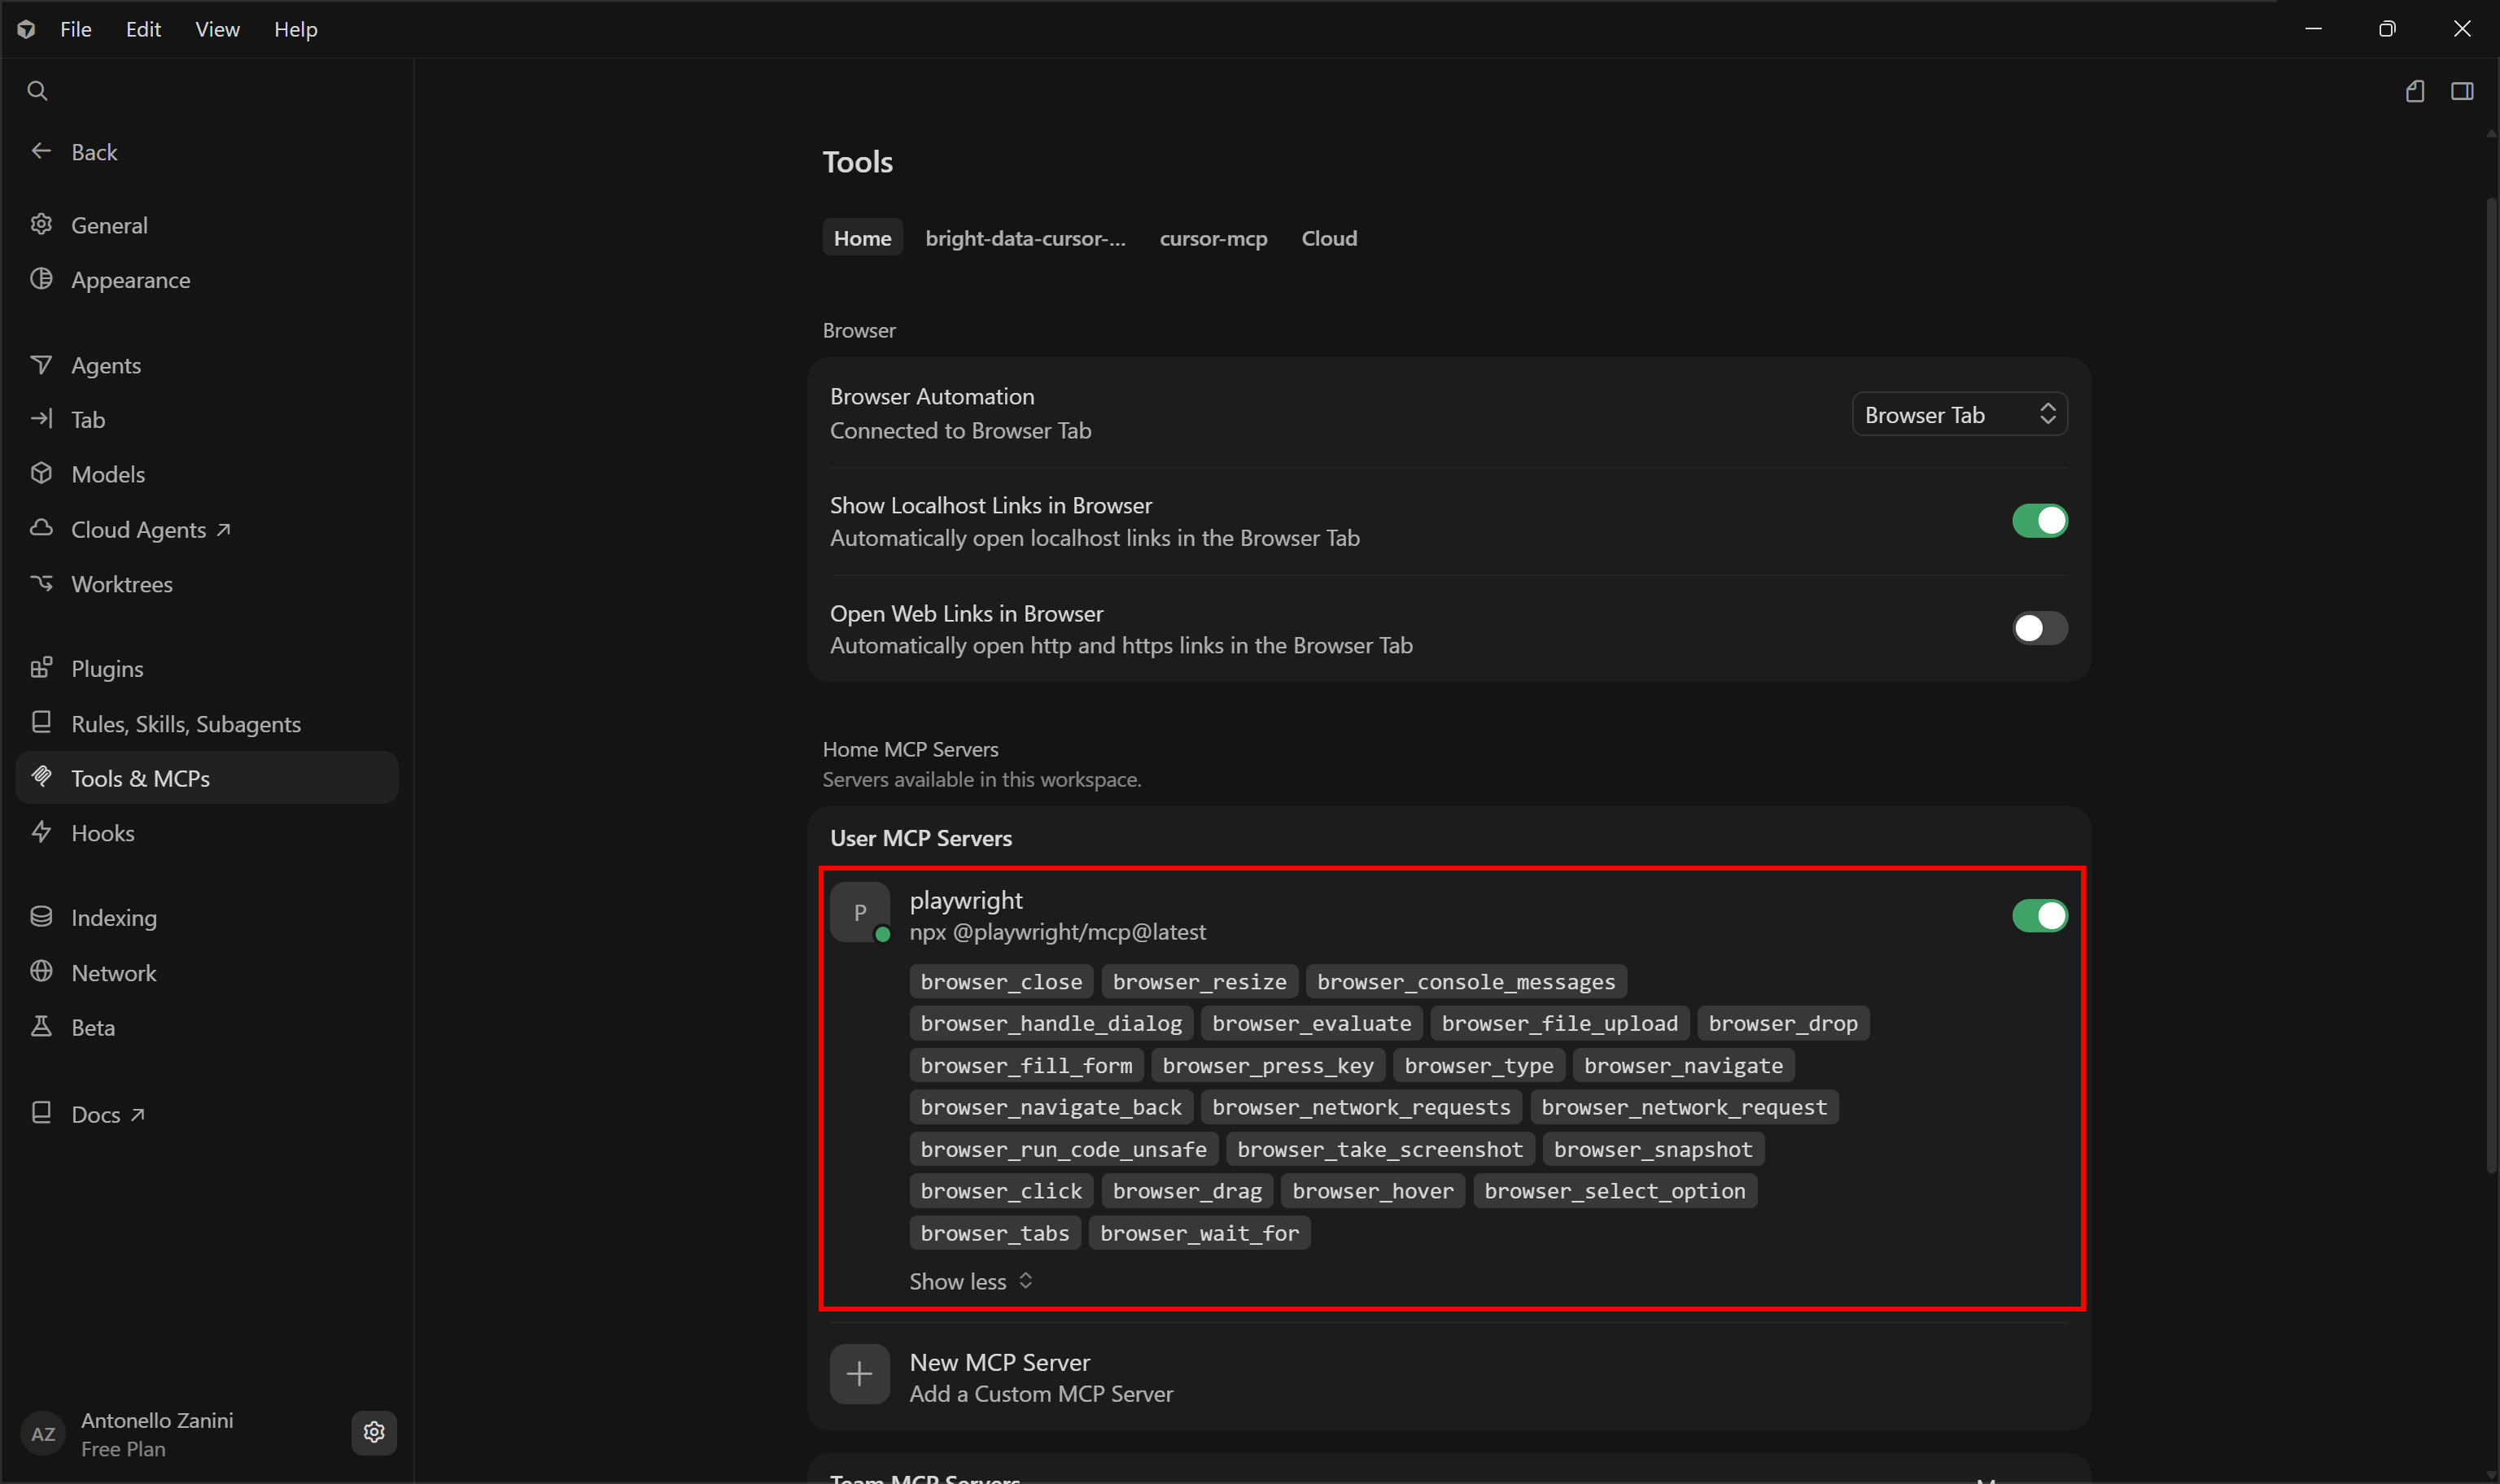
Fantastic! The Playwright MCP server is now available to the Cursor AI agents.
## Playwright MCP: Main Scenarios
See the Playwright MCP server in action across its main supported use cases through real-world examples.
### Web Scraping
Web scraping is one of the main use cases for the Playwright MCP server. When connected to it, an AI agent can interact with dynamic web pages, automate user interactions, and then extract content either from the underlying HTML or by executing JavaScript directly on the page.
The target webpage shown in this section is the [“Load more” version of the Scraping Course e-commerce page](https://www.scrapingcourse.com/button-click):
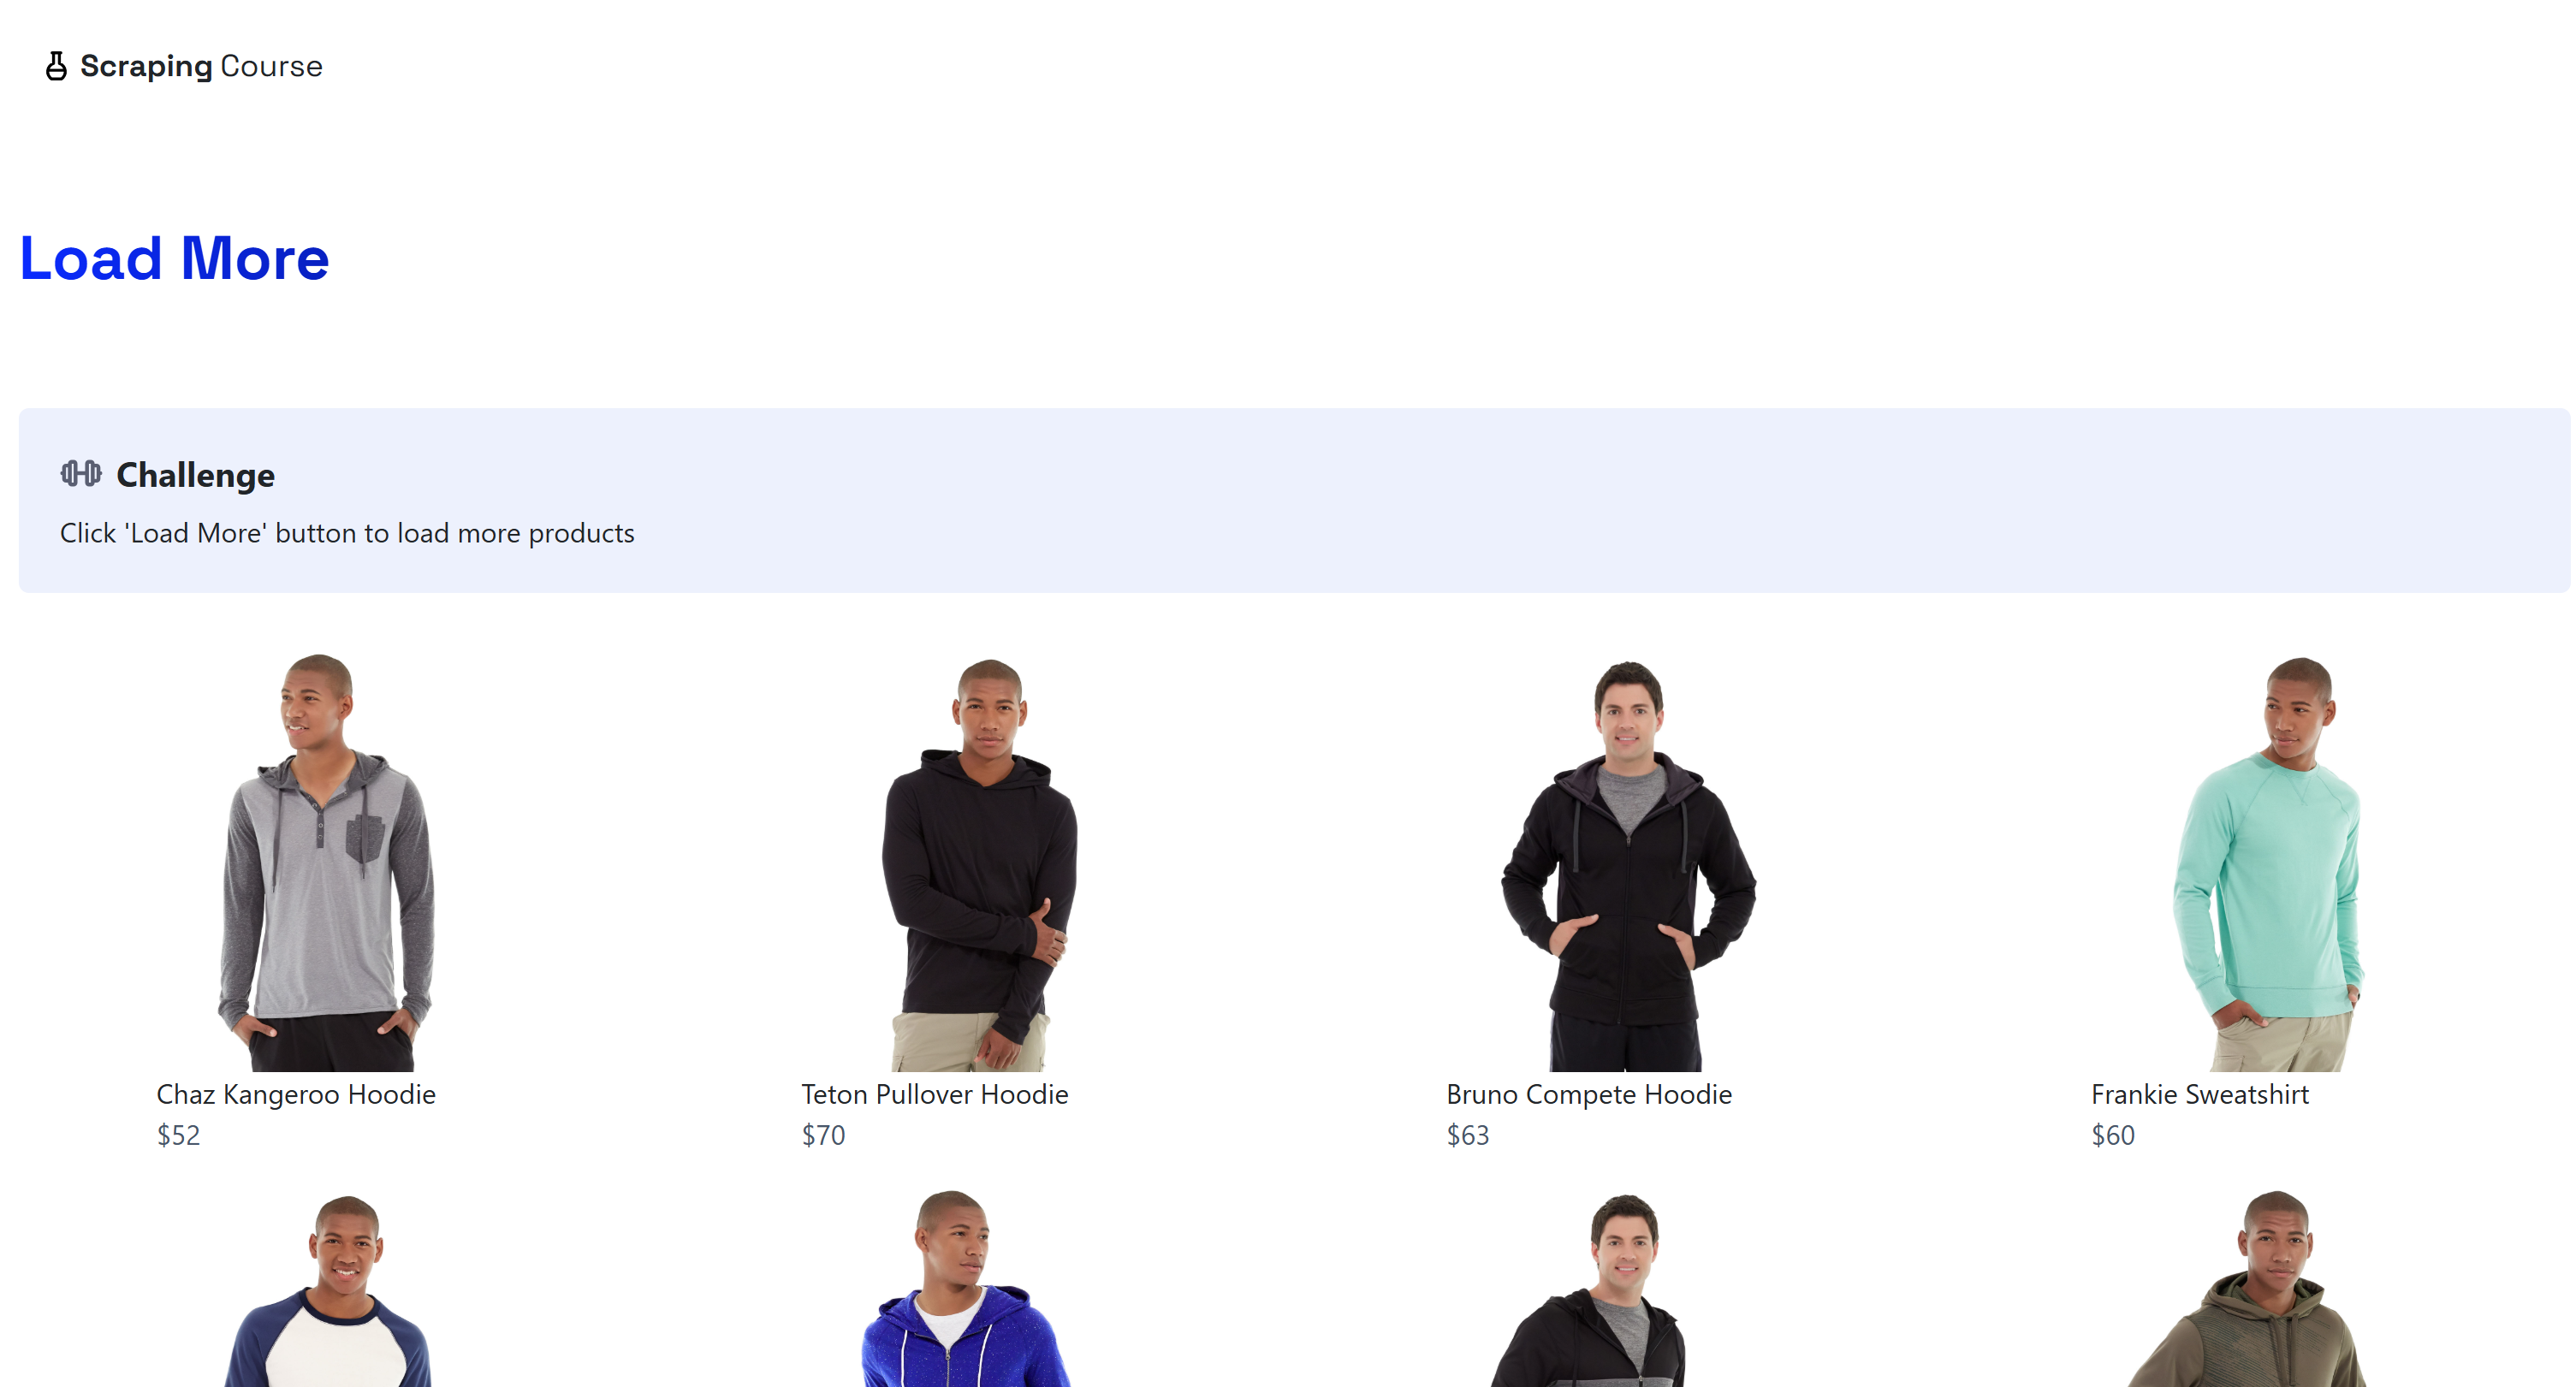
This page features dynamic product loading. The goal is to let your AI agent load multiple batches of products and then scrape them all using a natural language prompt, without any manual coding.
#### Step #1: Get Familiar With the Target Page
Before writing any scraping prompt, you need to understand how the target web page works and which interactions must be replicated to access the desired data. Visit the target page in your browser (preferably in incognito mode to ensure a fresh session).
Note that the website initially shows only 12 products and dynamically loads 12 more each time you click the “Load more” button:
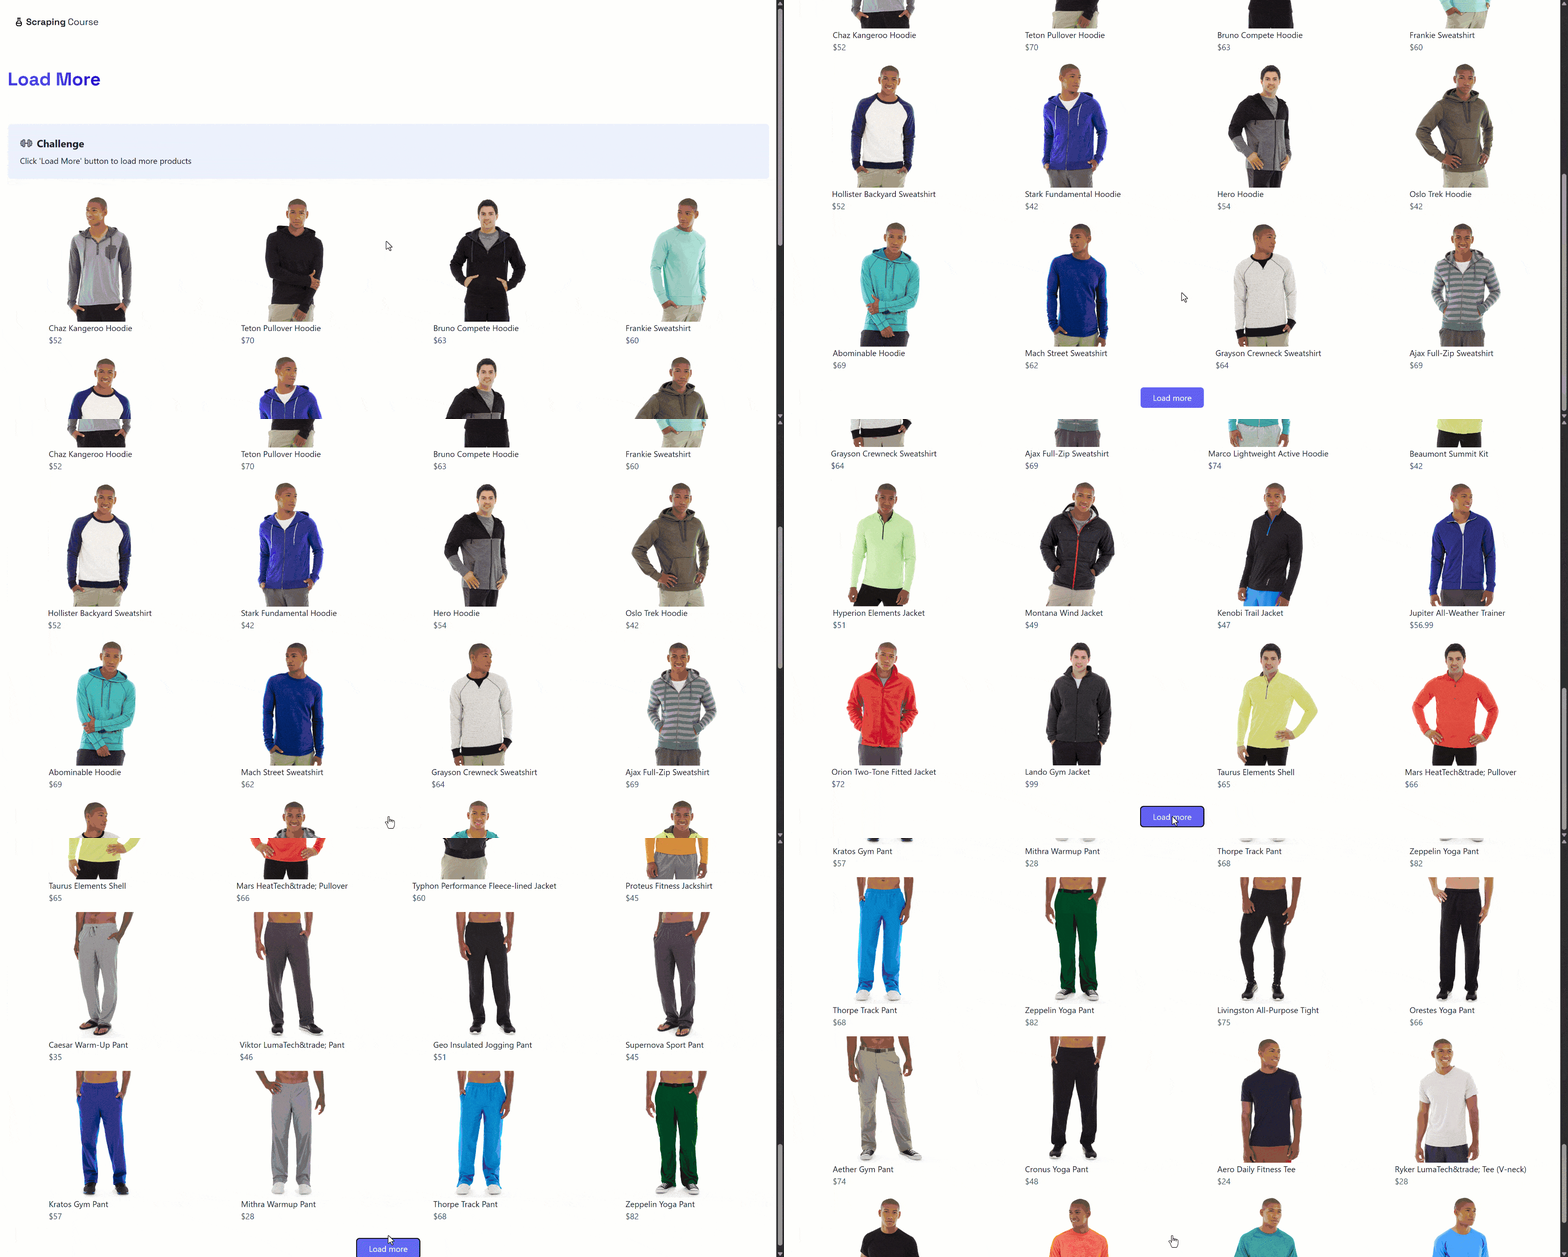
Cool! You have the knowledge you need to write an effective scraping prompt.
#### Step #2: Write the Scraping Prompt
Turn the information gathered earlier into a clear and structured prompt:
```
Open "https://www.scrapingcourse.com/button-click" in a browser session. Locate the "Load more" button and click it, waiting for new products to appear on the page. Repeat this process 3 times.
Once all products are loaded, scrape the full list of products from the page. Return the results as a `products.json` file containing an array of products. Each product should include: `url`, `image_url`, `name`, and `price`.
```
This precisely instructs the AI agent on which interactions to perform on the page and how many times to repeat them. After all products are loaded, it extracts the full dataset and exports it as a structured JSON file.
#### Step #3: Execute the Prompt
Launch the prompt in Claude Code (or any other AI tool with MCP client capabilities) connected to Playwright MCP. This is what you should see:
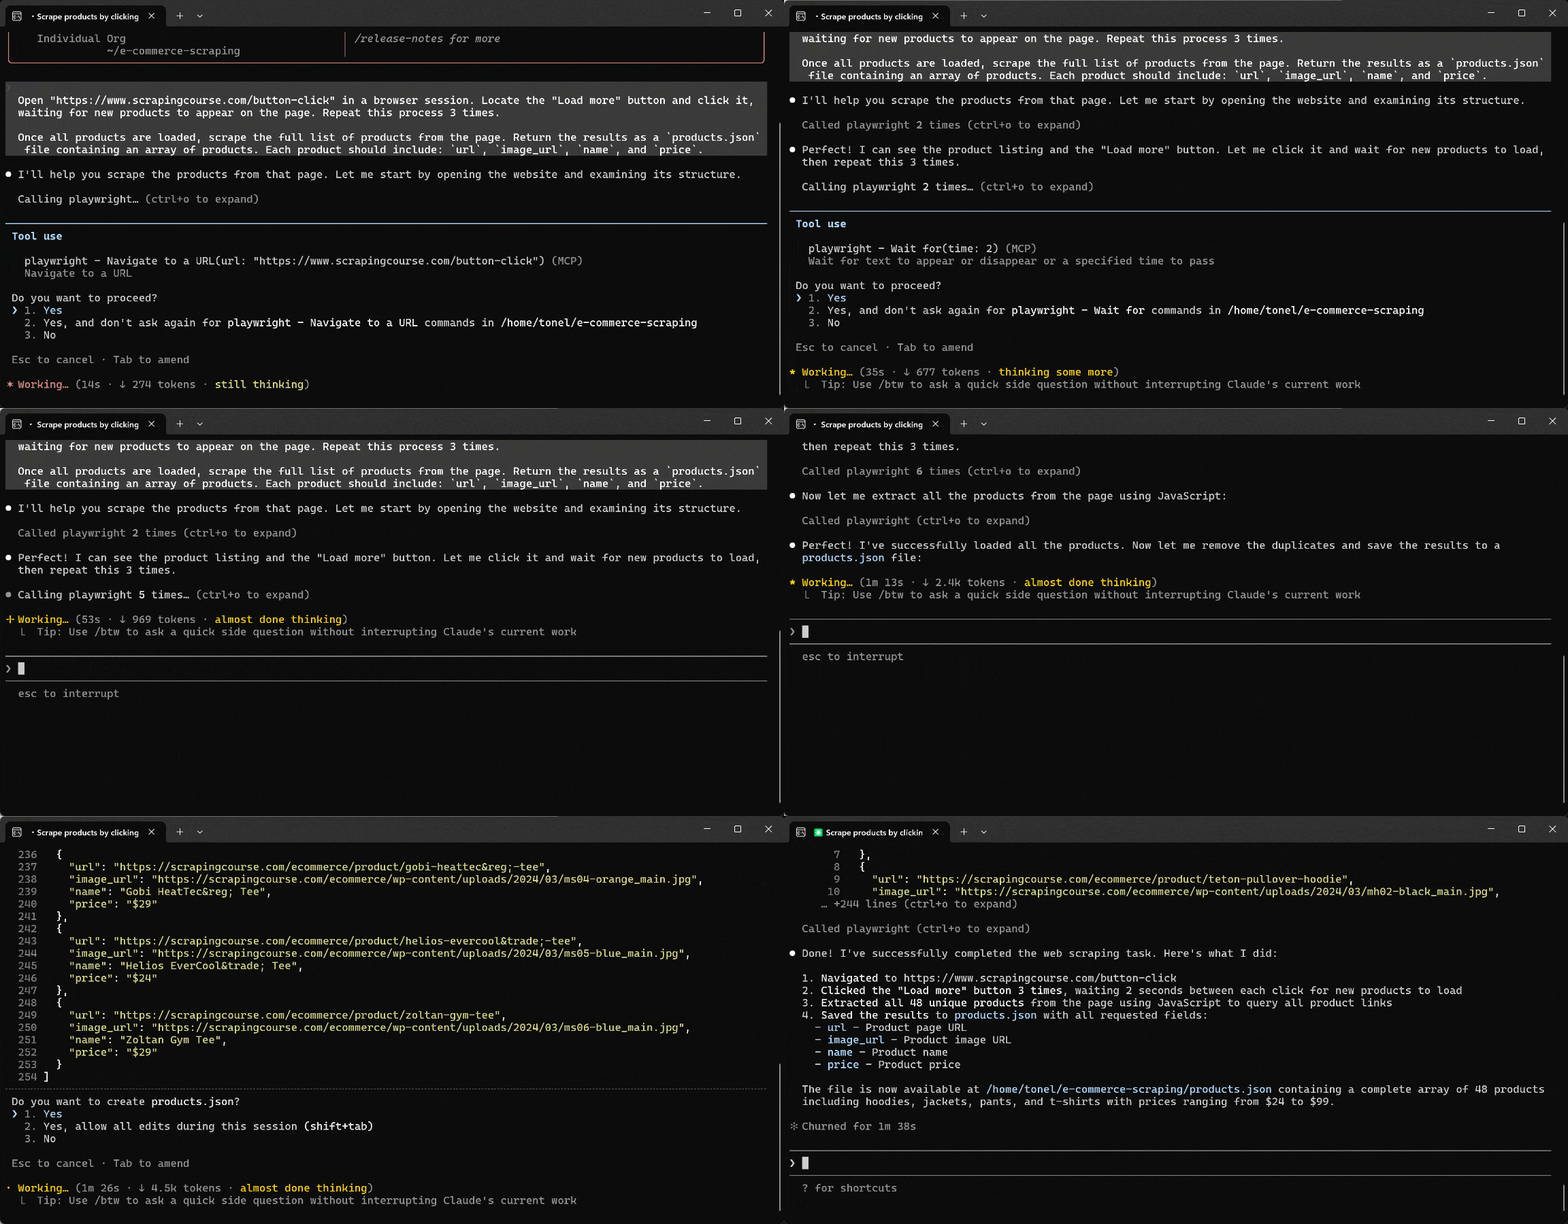
During execution, the AI agent:
1. Calls the `browser_navigate` tool to open the target page.
2. Employ `browser_snapshot` to capture the page structure and locate the “Load more” button
3. Clicks the button through `browser_click`.
4. Waits for dynamic content to load using `browser_wait_for`.
5. Repeats the click-and-wait cycle three times in total.
6. Generates a JavaScript scraping script on the fly and launches on the page via `browser_evaluate` to extract product data from the DOM.
7. Closes the browser session using `browser_close`.
8. Exports the scraped data into a `products.json` file.
#### Step #4: Inspect the Product Output
Your project folder now contains a `products.json` file. Open it, and you will see:
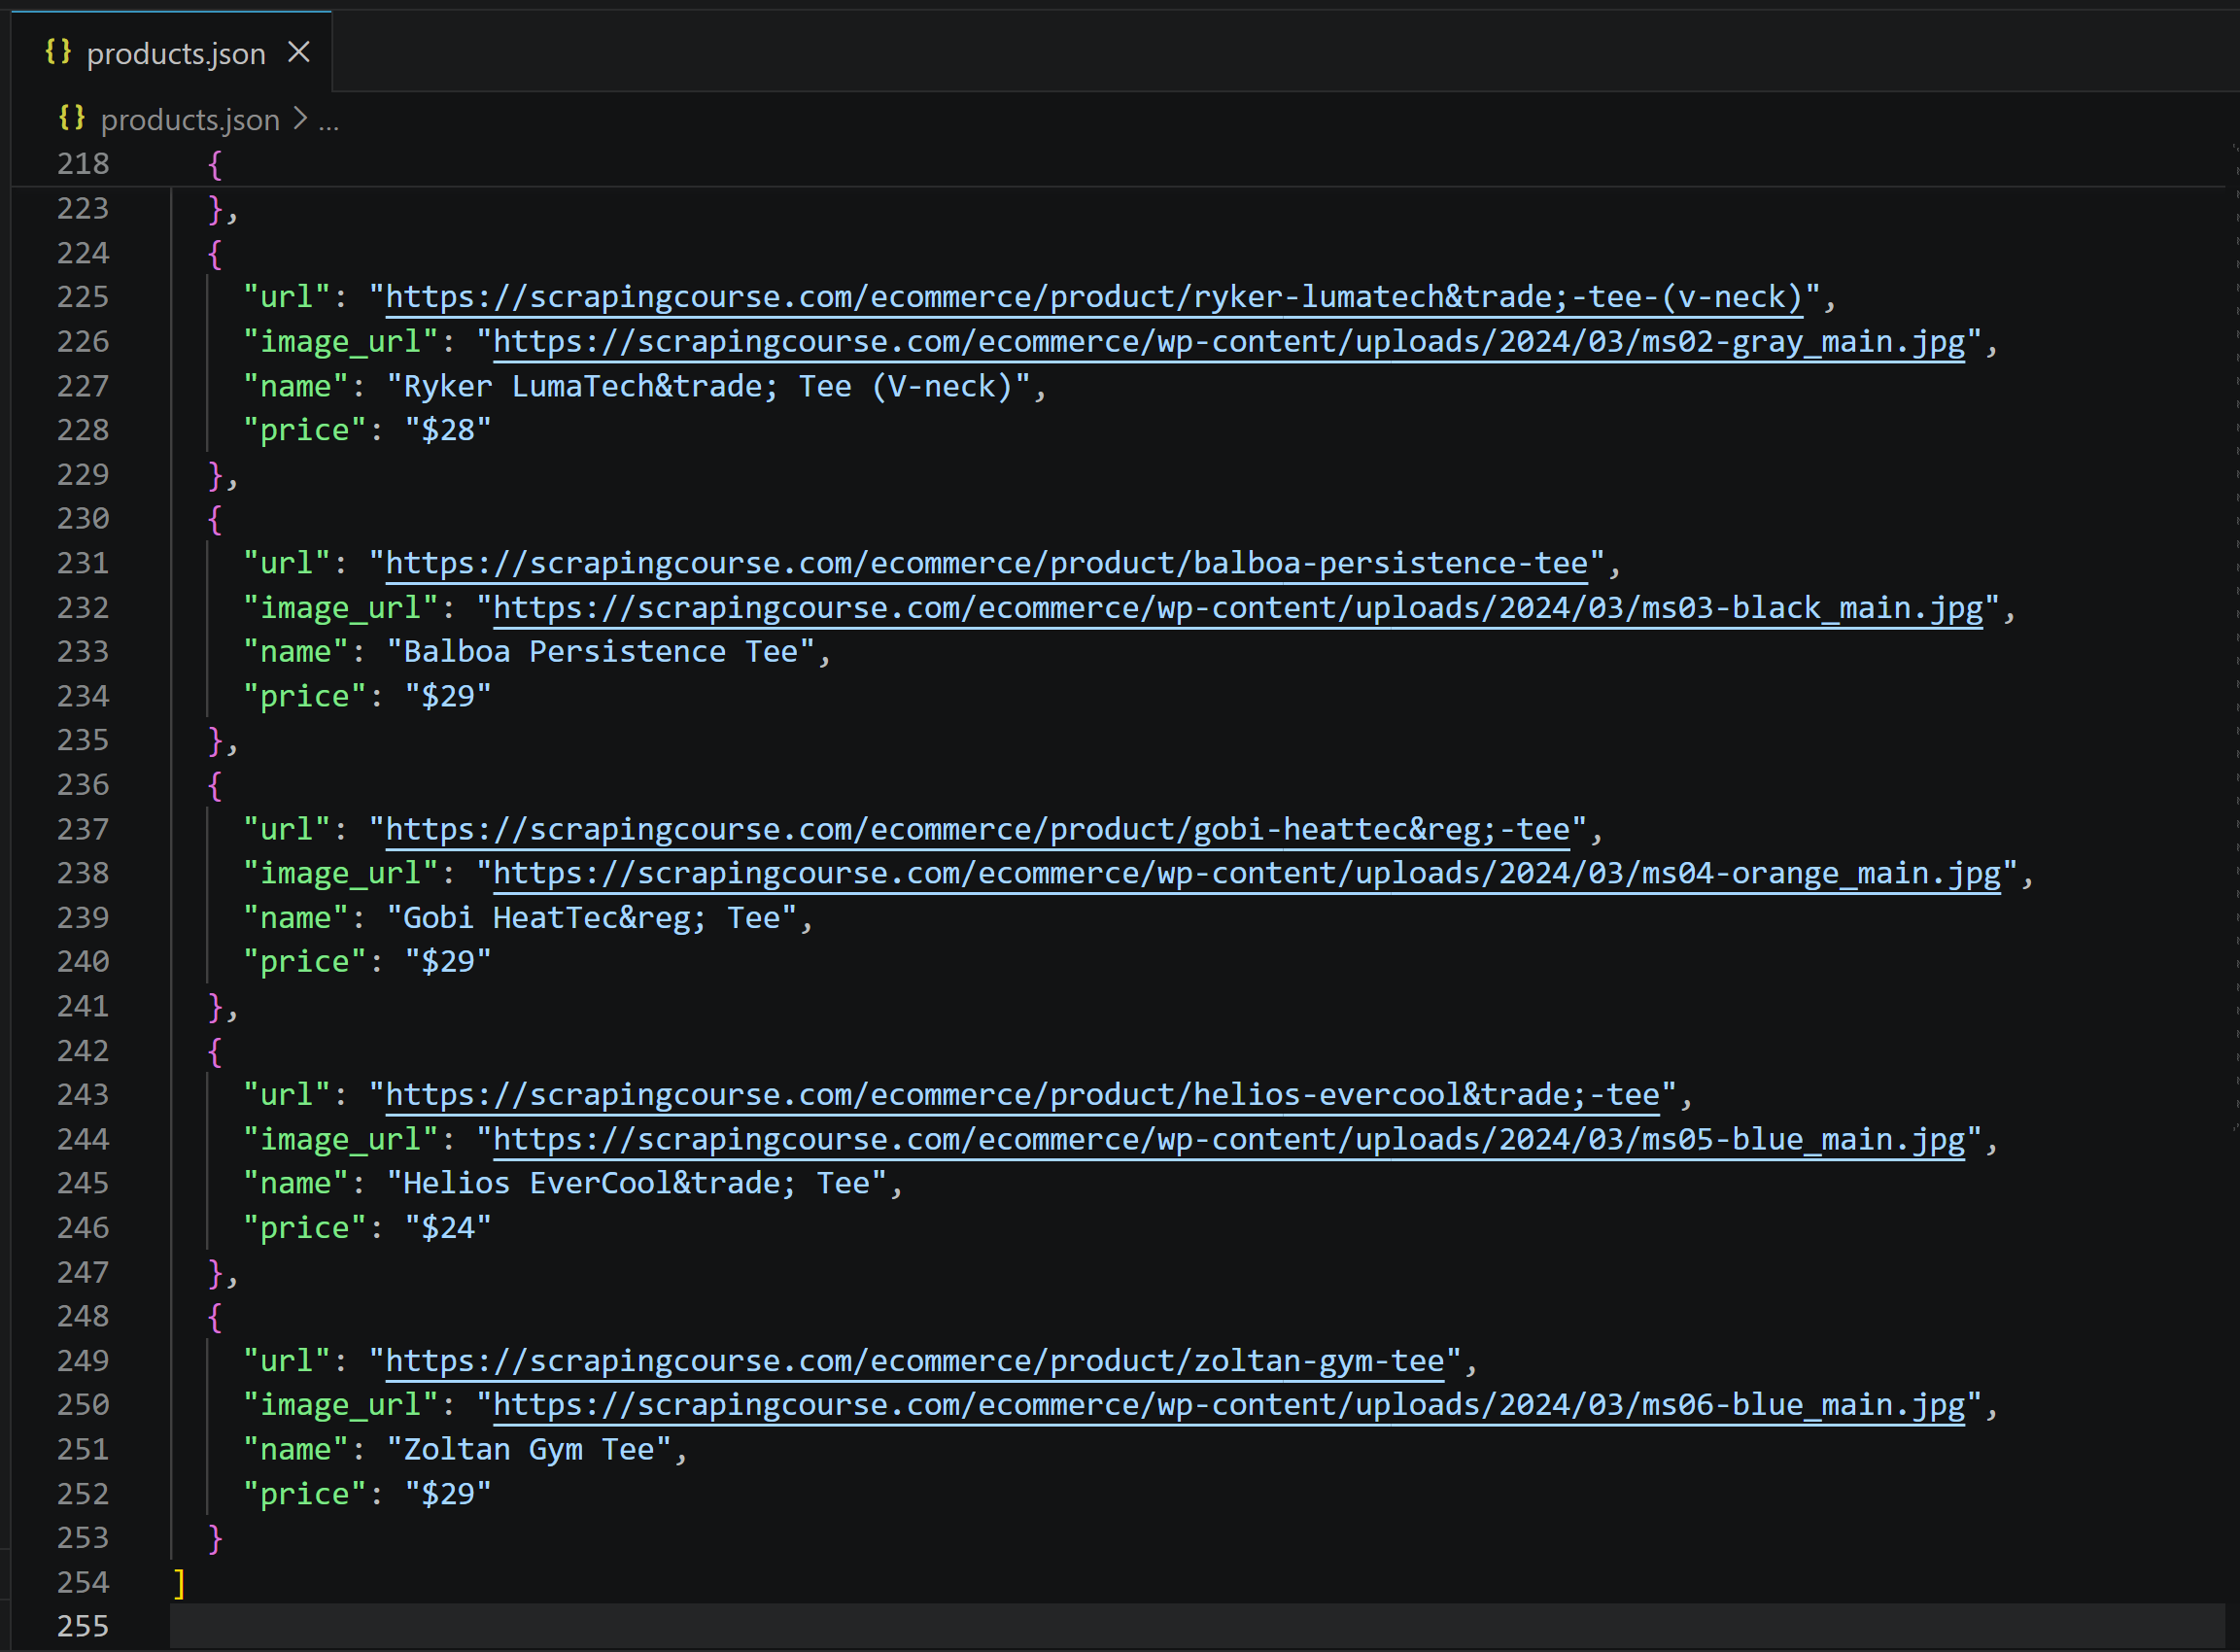
The list contains 48 products in total (12 initial + 12 × 3 load-more cycles), with information retrieved from the target page.
Mission complete! Your AI agent was able to perform web scraping on a dynamic site based on the common “Load more” UI pattern, thanks to the capabilities provided by the Playwright MCP server.
#### [Extra] Infinite Scrolling Scraping Example
Assume you want to achieve the same result, but on the [infinite-scrolling version of the same e-commerce page](https://www.scrapingcourse.com/infinite-scrolling). Dealing with infinite scrolling is more challenging, as the Playwright API does not provide a direct scrolling method.
In this case, you would use the following prompt:
```
Open "https://www.scrapingcourse.com/infinite-scrolling" in a browser session. Scroll to the bottom of the page to trigger infinite loading and wait for new products to appear. Repeat this process 3 times.
Once all products are loaded, scrape the full list of products from the page. Return the results as a `products.json` file containing an array of products. Each product should include: `url`, `image_url`, `name`, and `price`.
```
The execution will be similar:
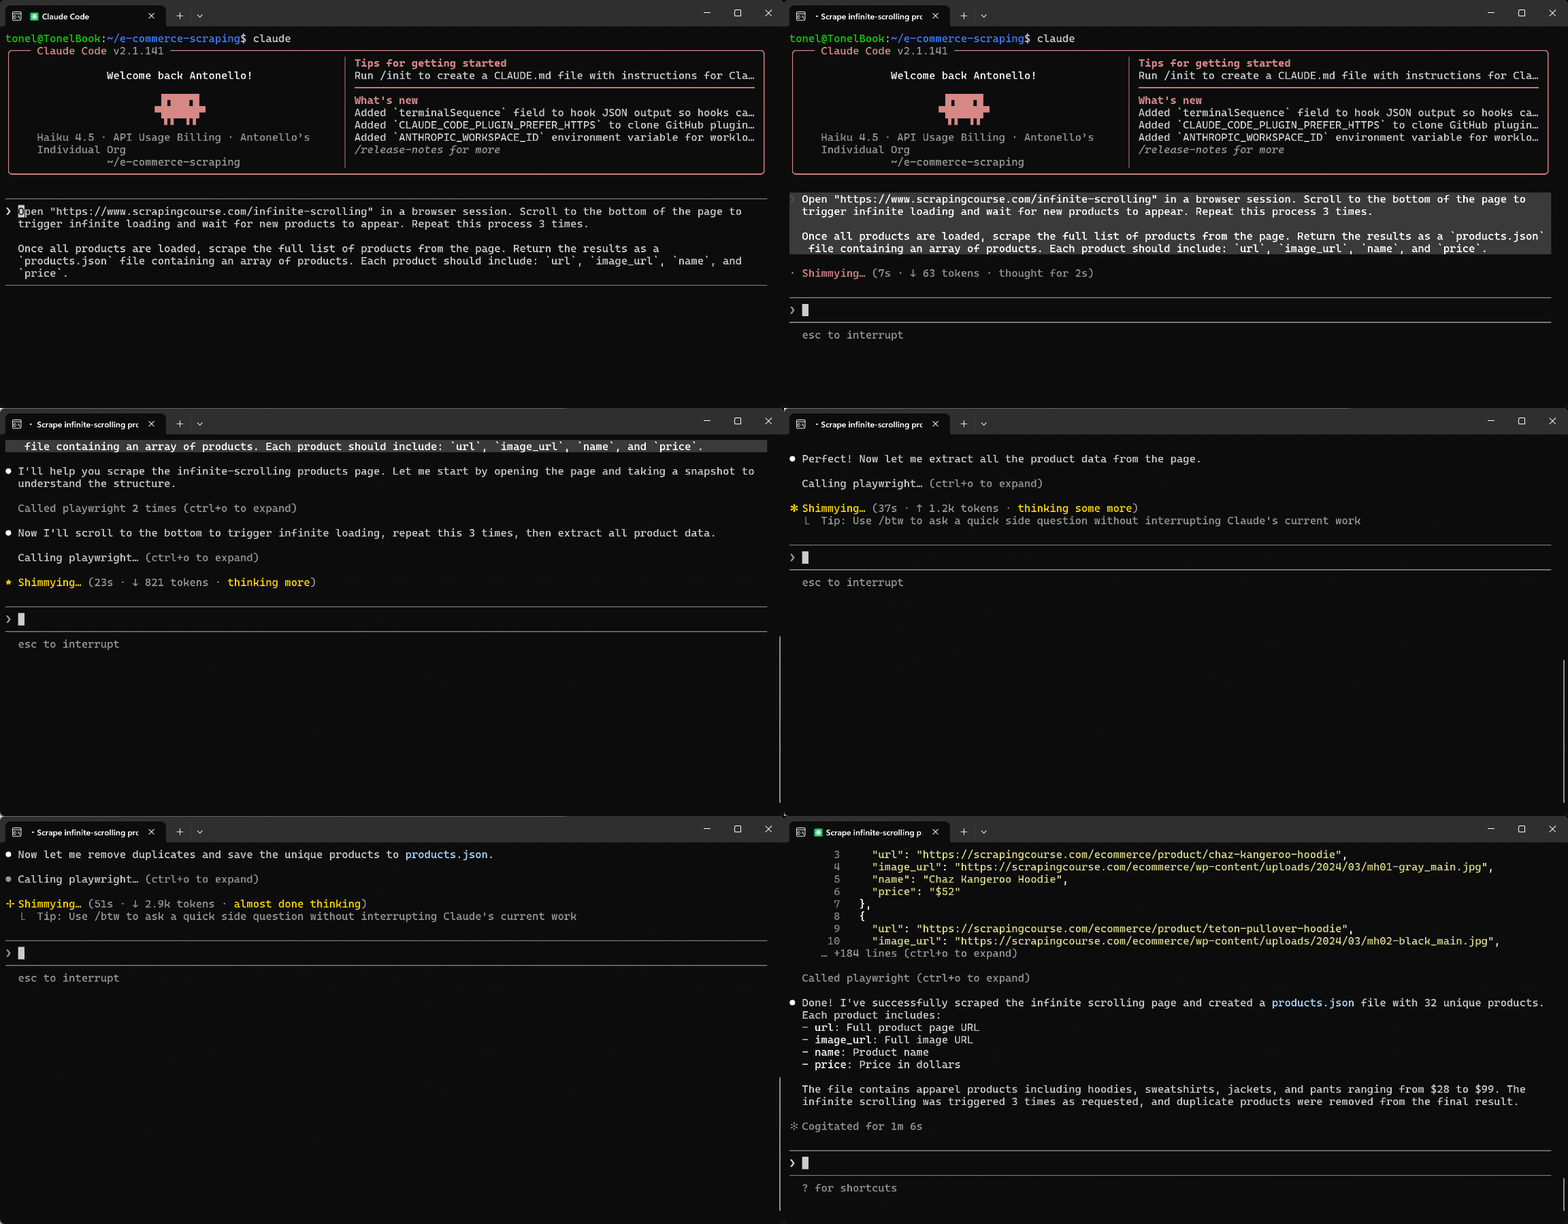
The main difference is that, to perform the scrolling action, the AI generates the following JavaScript snippet on the fly and executes it via the `browser_evaluate` tool:
```javascript
async () => {
const scrolls = [];
// Perform 3 scroll cycles
for (let i = 0; i < 3; i++) {
// Scroll to bottom
window.scrollTo(0, document.body.scrollHeight);
// Wait for new products to load (2 second delay)
await new Promise((resolve) => setTimeout(resolve, 2000));
scrolls.push(`Scroll ${i + 1} complete`);
}
return scrolls;
};
```
The resulting `products.json` file will contain the same type of structured product data as before. Excellent!
### Automated Interaction
Playwright MCP can also power a wide range of browser-based automated workflows. For example, you can instruct your agent to perform tedious operations for you, such as completing online grocery checkout flows on a given website when provided with a grocery list.
In this case, we will showcase it against a [simple website whose content is behind a login-protected form](https://www.scrapingcourse.com/login):
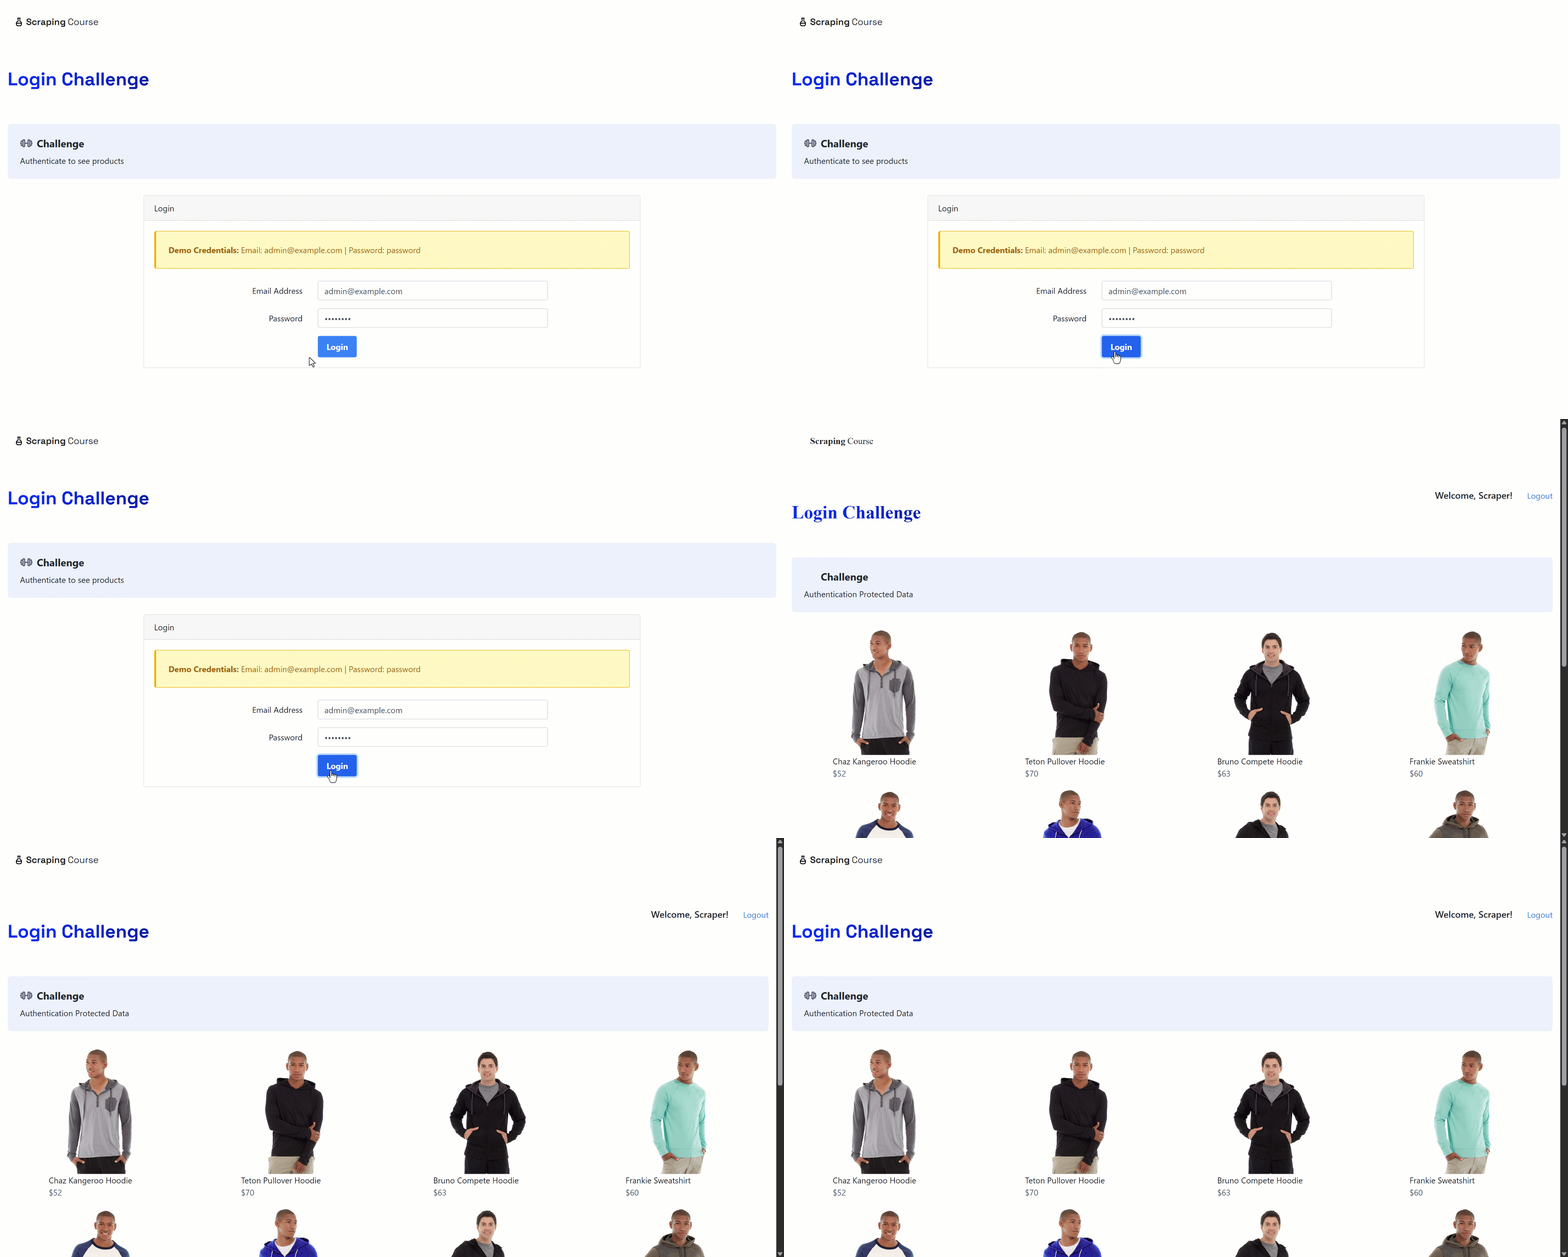
The idea is that the agent fills out the form correctly, submits it, and accesses the authenticated content, providing proof by taking a screenshot.
**Reminder**: Scraping data behind login walls should be [avoided for legal and ethical reasons](https://scrape.do/blog/ethics-of-web-scraping-detailed-review/). Use this workflow for legitimate automation tasks, not for extracting private or restricted information.
#### Automating the Workflow
By inspecting the target page, you will see the required sample login credentials. Instruct your AI agent to automate the full form-filling workflow with the following prompt:
```
Open "https://www.scrapingcourse.com/login" in a browser and complete the login form with the following credentials:
- Email Address: "admin@example.com"
- Password: "password"
Then submit the form. After login, wait for the page to fully load and take a screenshot of the resulting page. Save the screenshot as a local file.
```
The result will be:
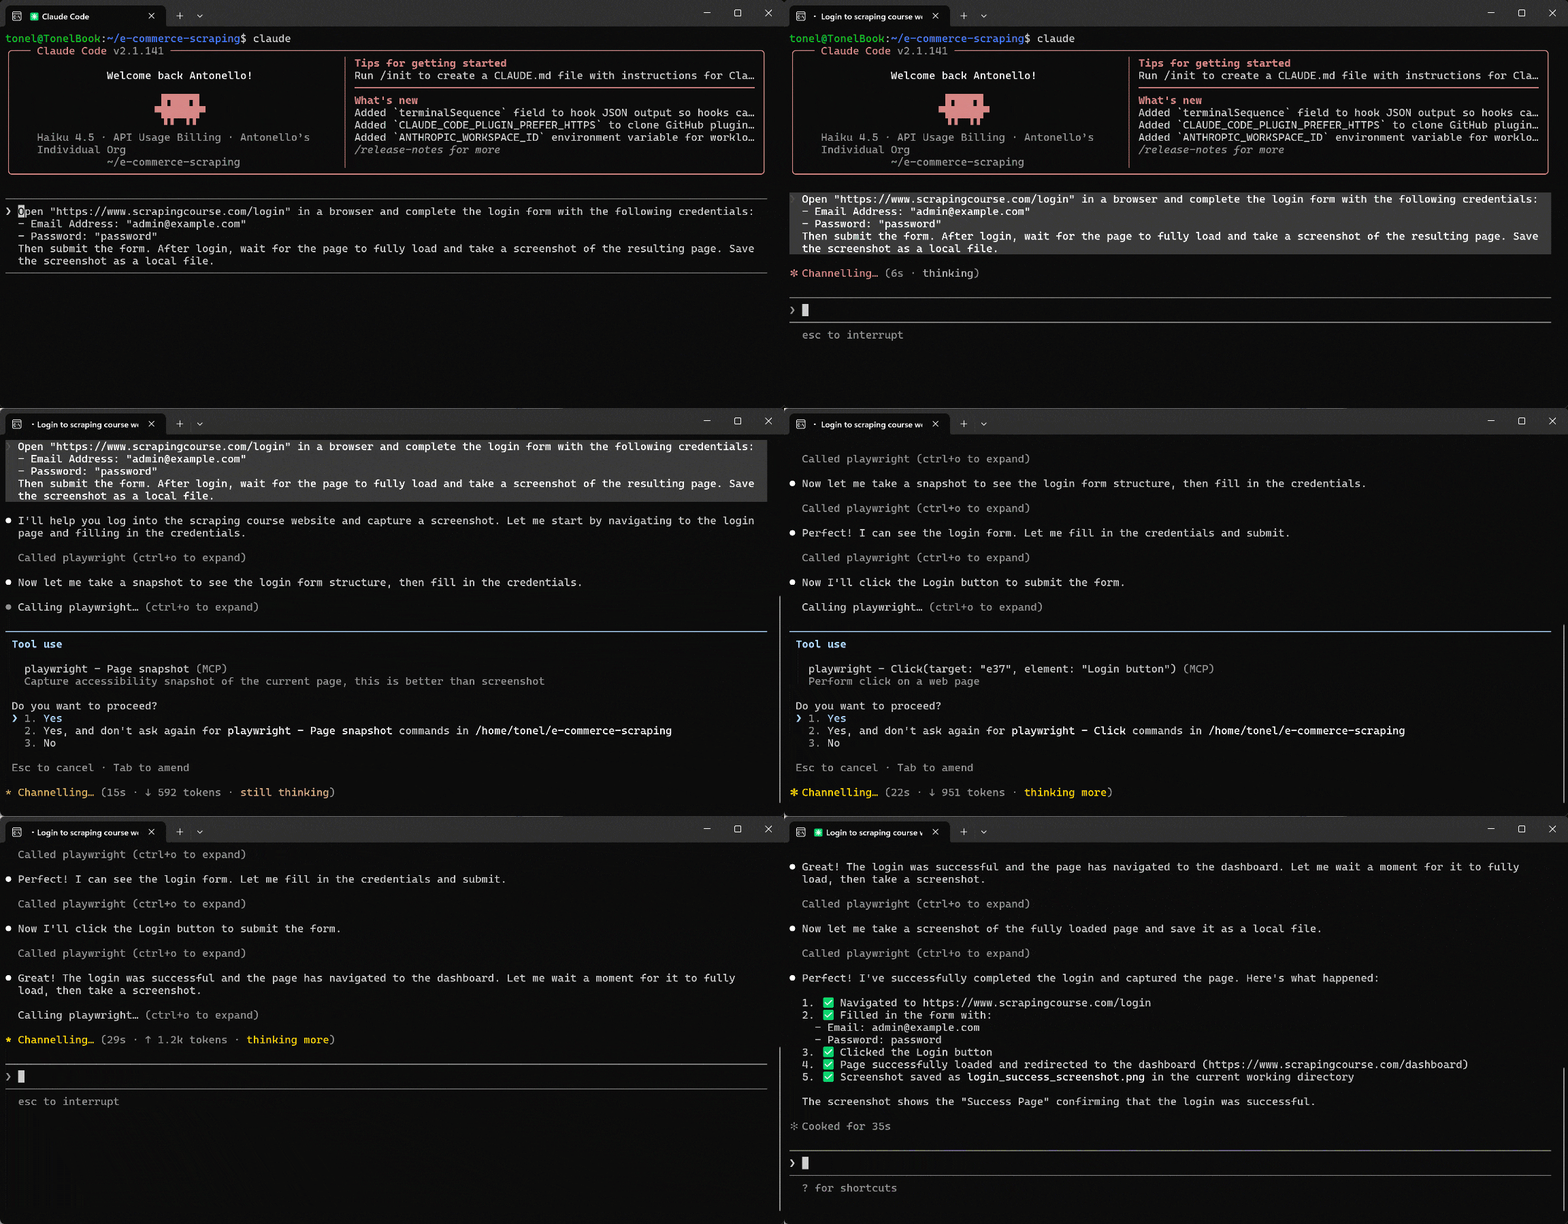
The AI agent:
1. Visited the target page using `browser_navigate`.
2. Retrieved the accessibility snapshot using `browser_snapshot` to understand the page structure.
3. Filled out the form using the appropriate form interaction tool.
4. Clicked the login button using `browser_click`.
5. Waited for the page to load using `browser_wait_for`.
6. Took a screenshot of the viewport using `browser_take_screenshot`, saving it as `login_success_screenshot.png`.
Open the `login_success_screenshot.png` file in your project folder after execution, and you will see:

Amazing! The AI agent successfully completed the workflow by accessing the content behind the login wall.
#### [Extra] Other Examples
To explore other automation workflow examples provided by Playwright MCP, watch this video:
### Competitor Monitoring
Instead of manually browsing, copying, or inspecting pages on competitors’ websites, a Playwright MCP–equipped agent can autonomously navigate, explore UI structures, and extract structured information. This makes it possible to continuously monitor how competitors present products, pricing, and messaging over time, including UI changes and content updates.
The key advantage is that the agent does not rely on fixed scraping logic tied to a single page layout. It instead follows high-level instructions, which makes the workflow adaptable to different competitors and evolving website structures.
#### Step #1: Craft a Competitor Monitoring Prompt
Below is a reusable prompt designed to work across different competitor websites:
```
Visit the competitor website and analyze how they present product and pricing information:
1. Open "https://www.figma.com/" in a browser.
2. Navigate to the "Pricing" page.
3. Take a full-page screenshot of the pricing section.
4. Extract and summarize key information, including:
- Product or service names
- Pricing tiers and corresponding prices
- Key features, benefits, and value propositions highlighted per tier
5. Organize the extracted data into a structured Markdown report.
6. Save the report as a local file.
```
**Note**: This prompt is intentionally generic. While the example uses Figma, the same structure can be reused for any competitor by simply changing the domain and target section (for example: “Plans”, “Pricing”, or “Products”).
#### Step #2: Execute the Prompt
Launch the prompt in your AI agent setup (in this case, Claude Code extended with the Playwright MCP tool):
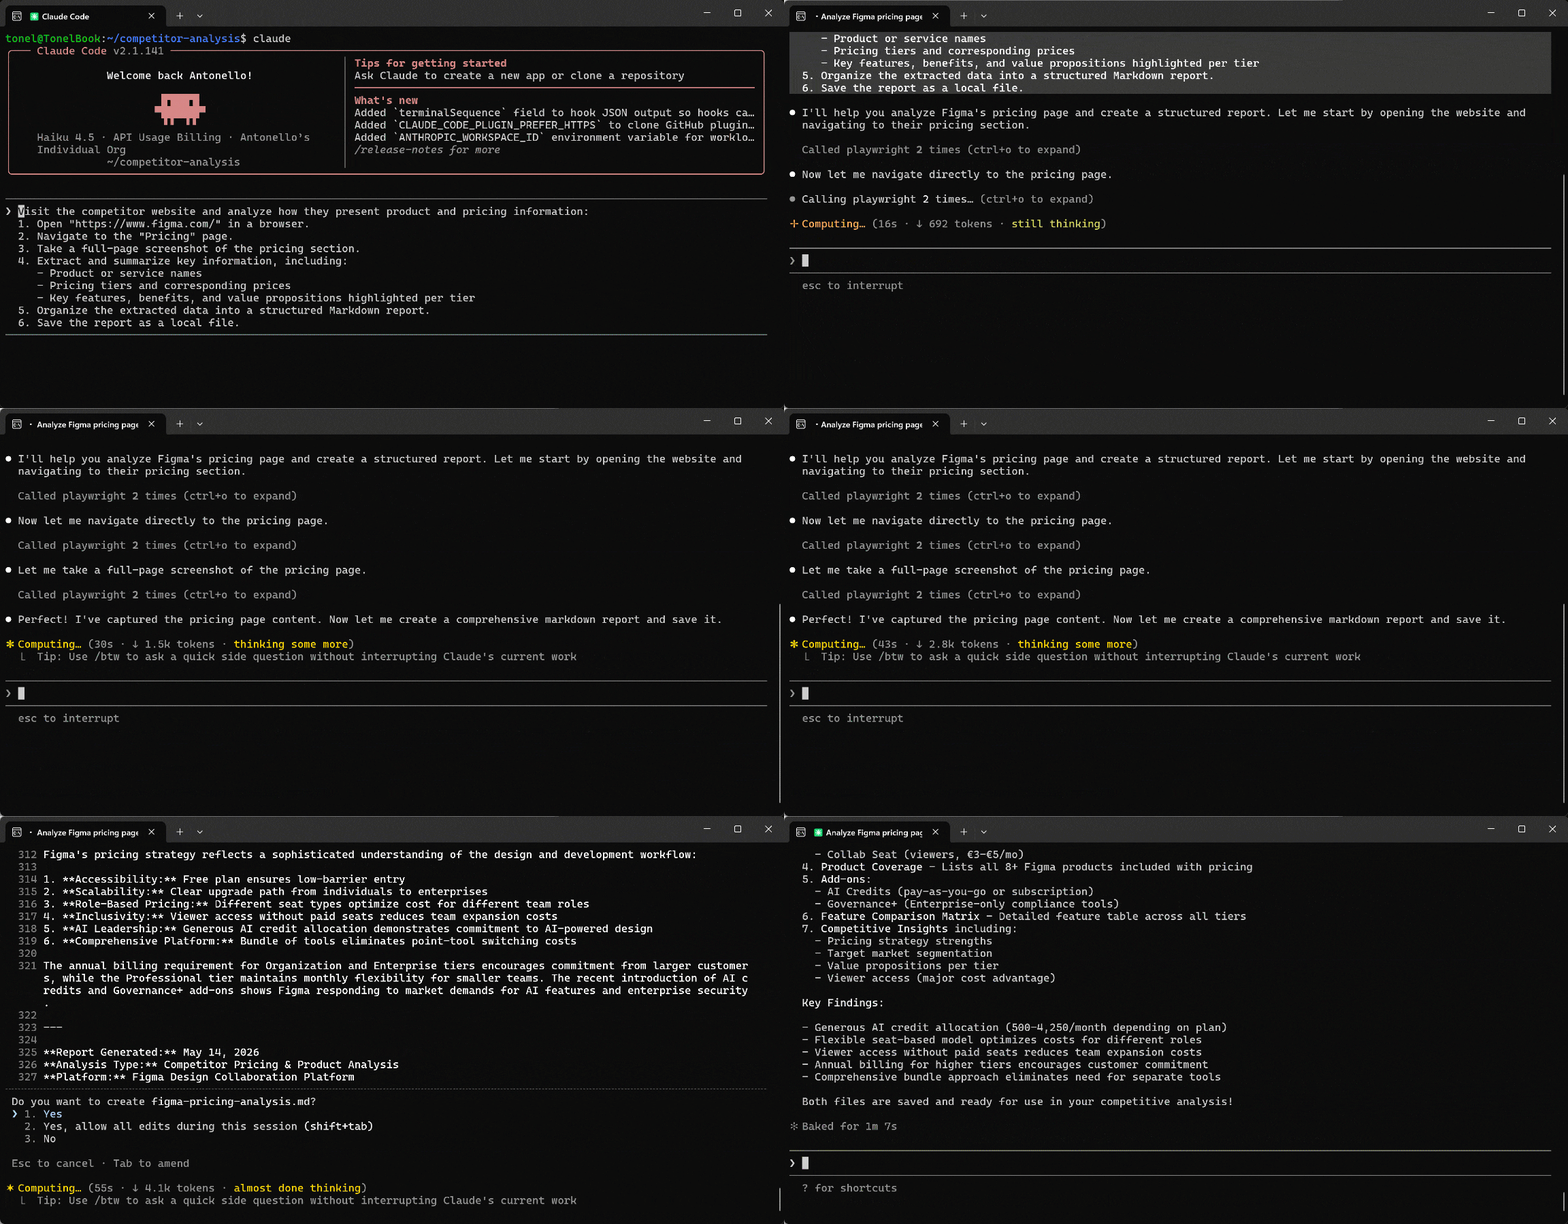
In the execution flow, the AI agent:
1. Calls the `browser_navigate` tool to visit `https://www.figma.com/`.
2. Uses `browser_snapshot` to capture the page structure and locate the “Pricing” link.
3. Employs `browser_click` to click the “Pricing” link and reach the target page.
4. Calls `browser_take_screenshot` to take a full-page screenshot, storing it as `figma-pricing-page.png`.
5. Generates a simple JavaScript script to extract the text from the `` nodes.
6. Executes the script via `browser_evaluate`.
7. Processes the image together with the extracted text to analyze the page and produce the required report.
8. Stores the produced report as a local `figma-pricing-analysis.md` file.
#### Step #3: Explore the Results
After execution, the project directory will contain a generated Markdown report summarizing the
competitor’s pricing structure, along with a screenshot of the pricing page:
```
your-competitor-analysis-project/
├── figma-pricing-analysis.md
└── figma-pricing-page.png
```
Open the `figma-pricing-page.png` file, and you should see the full-page screenshot:
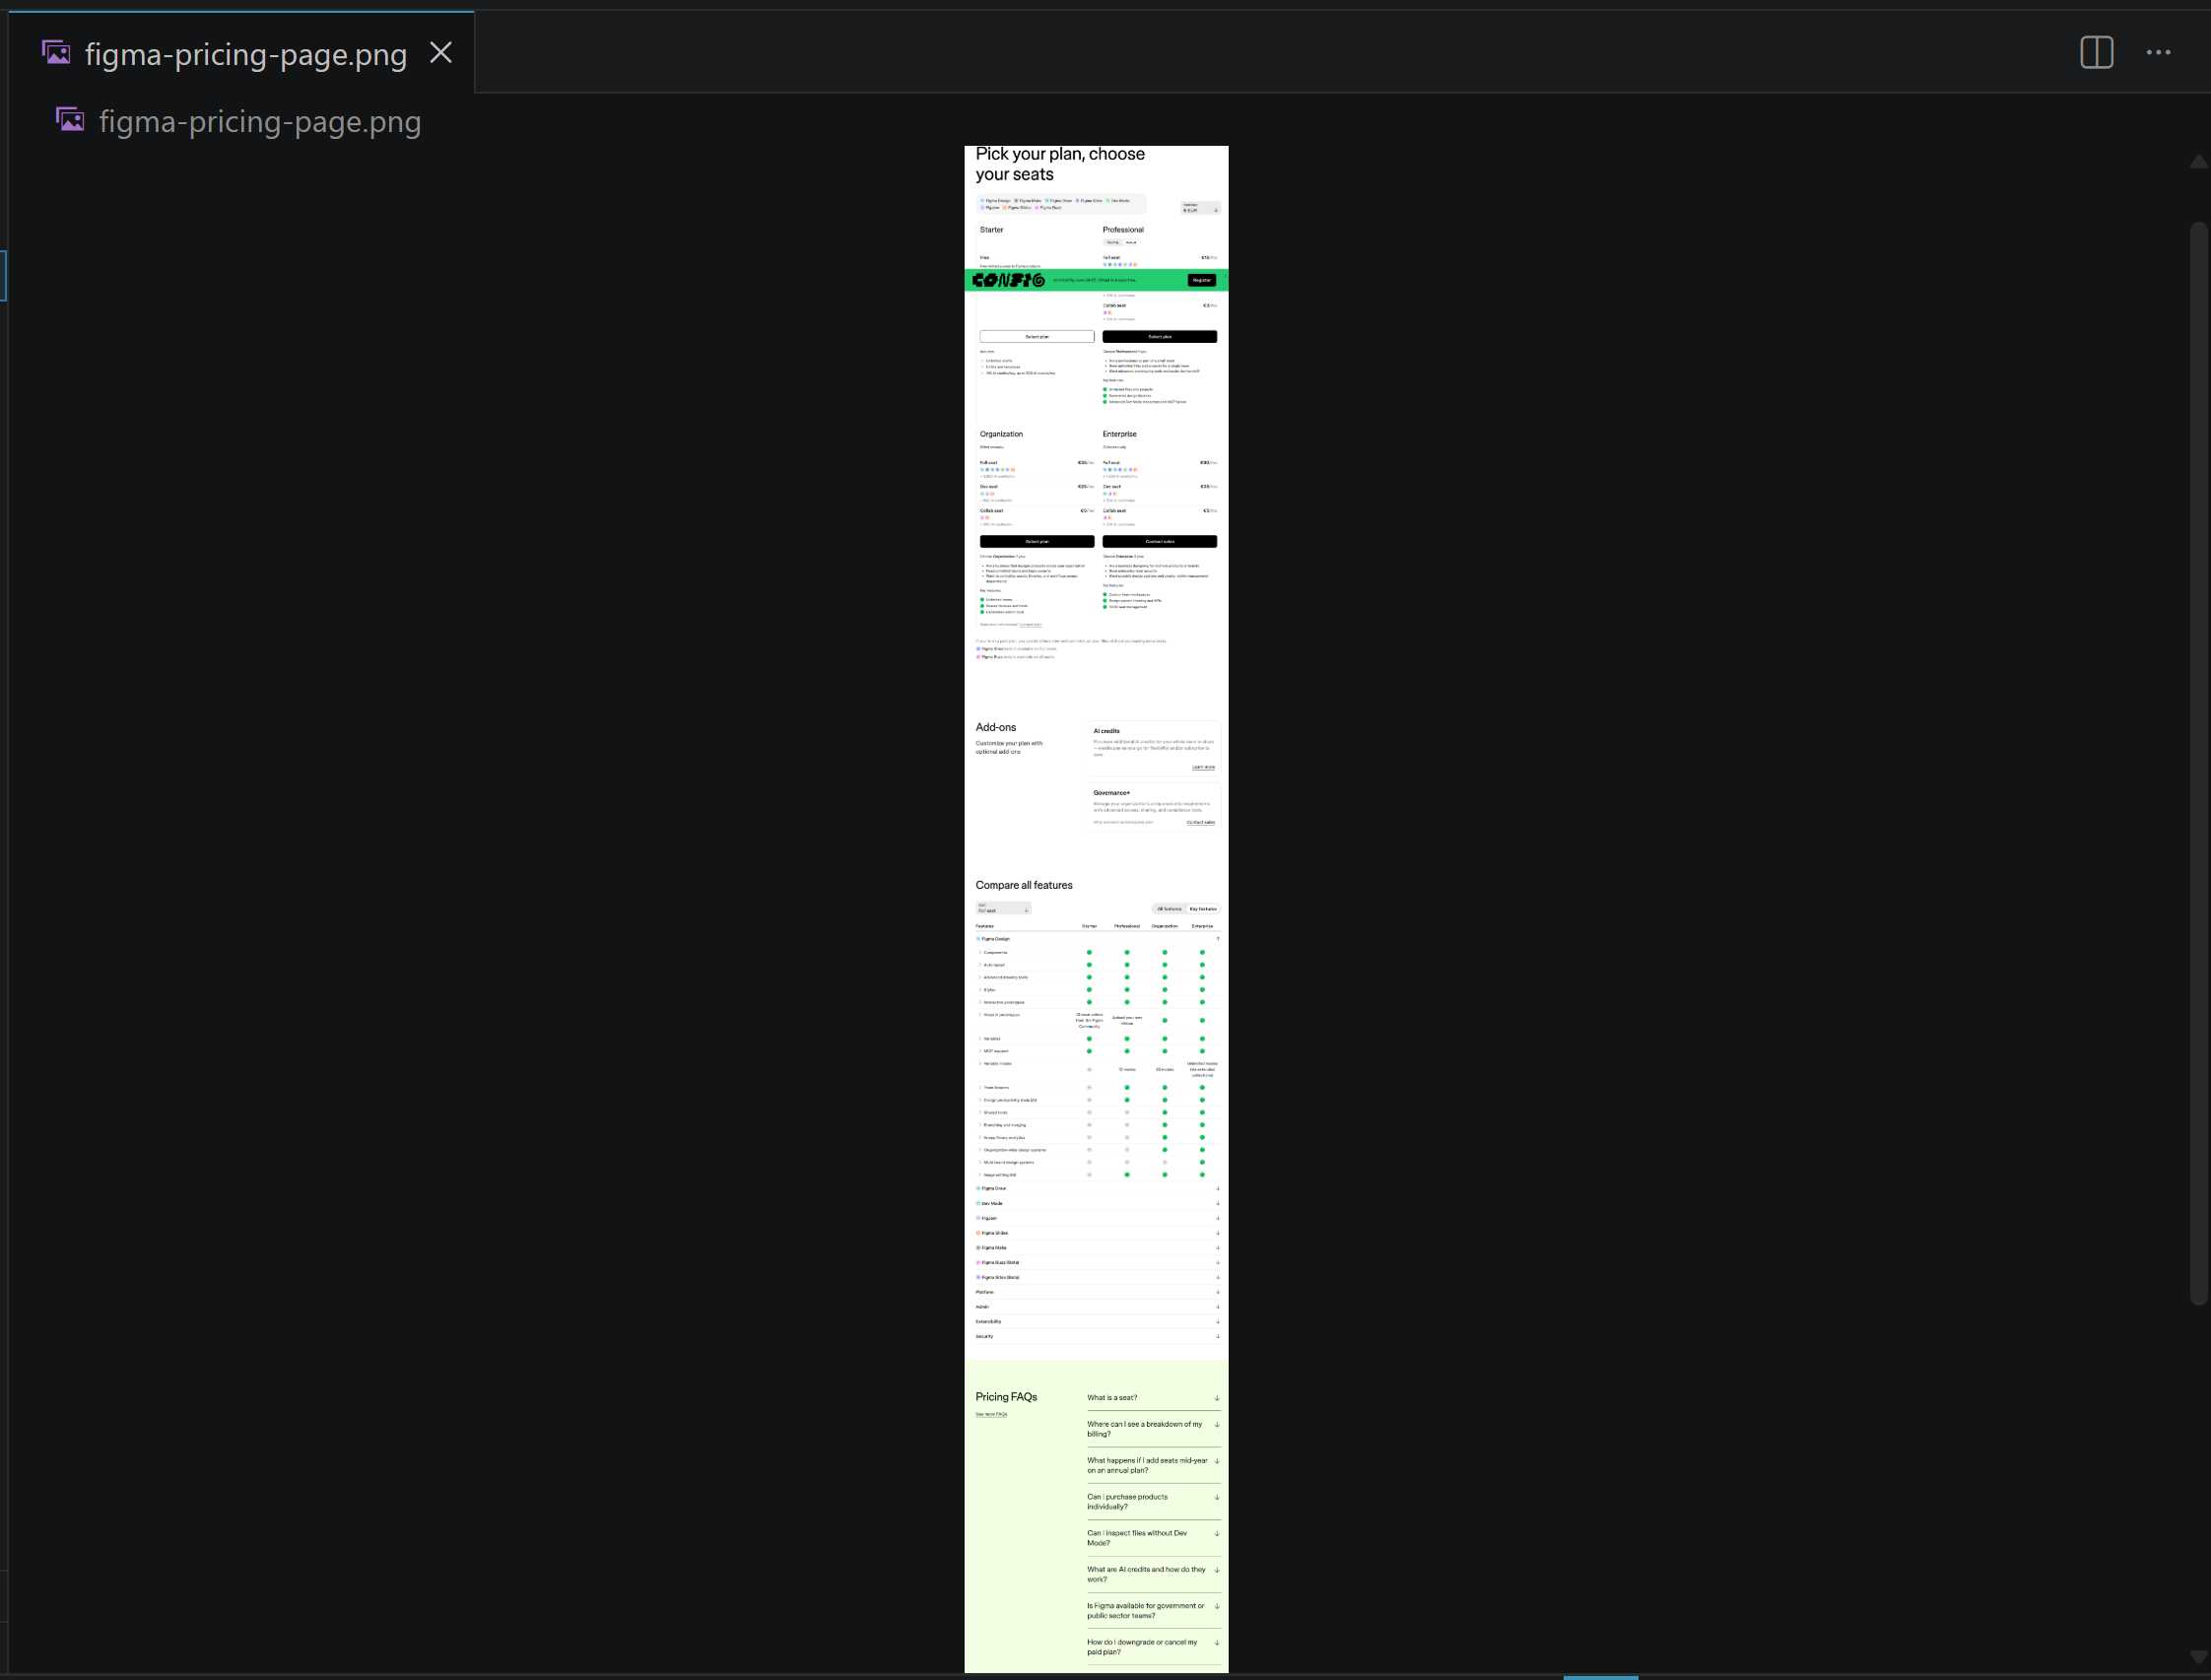
Then, take a look at the generated `figma-pricing-analysis.md` report:
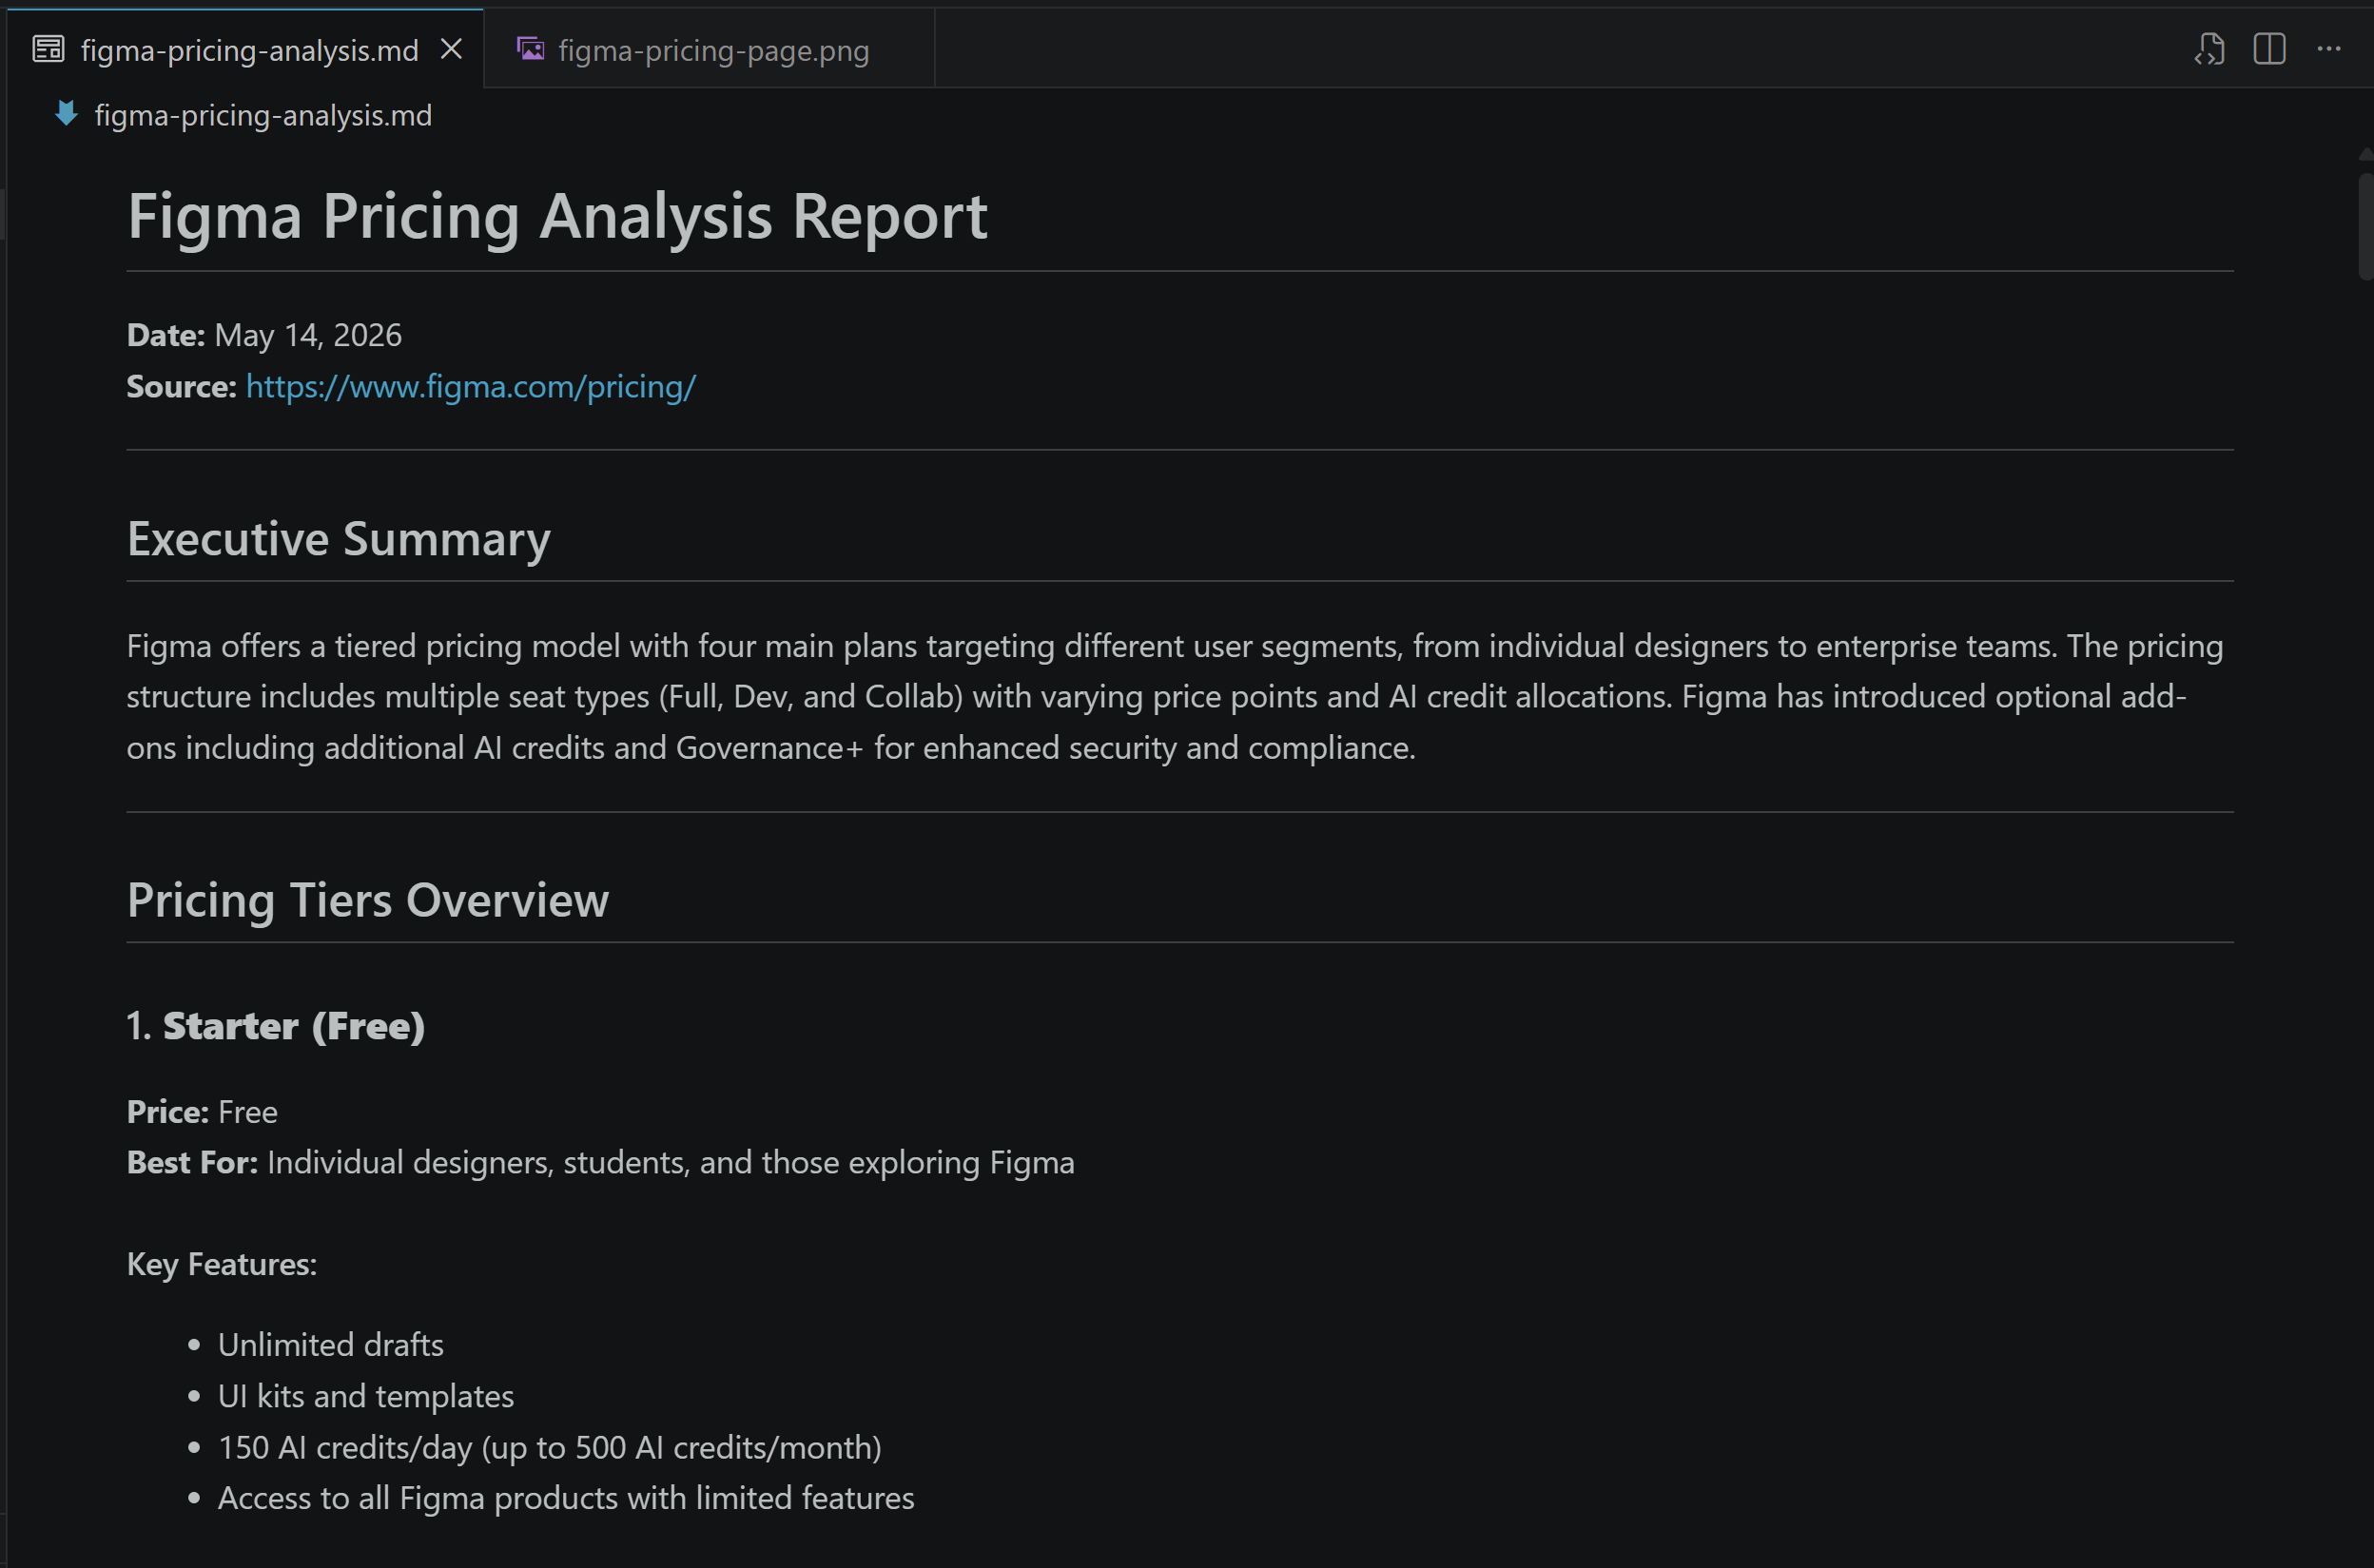
The report contains a detailed analysis of Figma’s pricing structure, covering its four tiers (_Starter_, _Professional_, _Organization_, and _Enterprise_). It breaks down seat types, AI credit allocations, feature differences, add-ons, and target audiences, and explains how Figma segments users from individuals to large enterprises with a role-based, scalable pricing model and strong AI integration.
That is more than enough for accurate competitor analysis. Woohoo!
### Automate Manual Tests
Playwright MCP lets an AI act as a human tester directly in the browser, without writing any code. It can independently explore the system, validate functionality, and even suggest improvements based on observed behavior, all through natural language prompts.
In this scenario, your agent receives a simple instruction, such as a testing focus area. Next, it navigates the application, interacts with UI elements, and observes behavior in real time. It tracks actions like clicks, navigation, and state changes, converting them into structured outputs such as test reports and test plans.
For a full walkthrough of this approach, take a look at the video below:
### Automated Test Exploration
Playwright MCP enables AI agents to:
1. Navigate a website autonomously.
2. Perform actions such as searching, clicking, and toggling UI elements.
3. Observe the results.
After this exploration, it identifies core user flows and detects edge cases. The AI can then turn this exploratory browsing into structured, runnable test cases, backed by real evidence from its interactions and observations.
For more guidance on this workflow, watch the video below:
## Playwright MCP: Main Limitations and Issues
Playwright MCP is surely a powerful tool, but it is not immune to drawbacks. Let’s dig deeper into the most important ones you must be aware of!
### Tool Proliferation Issue
When an AI agent is given too many tools, it can become less effective rather than more capable. The problem is similar to [human decision fatigue](https://pmc.ncbi.nlm.nih.gov/articles/PMC6119549/): when too many options are available, choosing the right one takes longer and frequently leads to mistakes. Instead of acting decisively, the agent spends additional time evaluating alternatives that may be functionally equivalent.
This issue becomes especially visible in Playwright MCP when all tool categories are enabled. The AI-powered application may have 70+ tools to choose from. Still, even in a basic setup, you get ~20 active tools covering browser automation.
That large set of tools creates ambiguity. The reason is that multiple tools overlap in purpose, offering different ways to inspect a page, wait for elements, or validate state. The agent is then forced to repeatedly decide between similar options, which delays execution and leads to unnecessary actions such as redundant checks or reasoning steps.
The result is slower performance, higher token consumption, and less productive AI agents.
**Solution**: Filter available tools to only the ones you need in the MCP client configuration (if possible). Also, enable only the essential categories to reduce overlap and simplify decision-making. With fewer tools, the agent spends less time choosing actions and more time completing tasks.
### Limited Assertion Capabilities
End-to-end tests rely heavily on assertions to validate application behavior. This includes checking whether elements are present, visible, enabled, contain correct text, or reflect expected state changes after user actions. Without strong assertion support, test coverage becomes shallow and less reliable.
Now, the Playwright MCP server exposes only a small set of “Assertion” tools:
- `browser_generate_locator`
- `browser_verify_text_visible`
- `browser_verify_element_visible`
- `browser_verify_list_visible`
- `browser_verify_value`
On top of that, only the last four functions behave as true assertions. This means the available verification surface is quite narrow compared to the [full Playwright test APIs](https://playwright.dev/docs/api-testing).
Consequently, an agent connected to Playwright MCP has limited ability to rigorously validate outcomes. That issue directly affects the quality of AI-based automated testing.
**Solution**: This is an inherent limitation of Playwright MCP’s current design, and there is no real workaround. However, the problem has been [discussed in GitHub issues](https://github.com/microsoft/playwright-mcp/issues/1116). So, additional assertion tools may be introduced in future releases to expand test coverage.
### Anti-Bot Blocking
To limit automated access from bots, many websites are protected by anti-bot systems. Some of the most popular solutions are WAFs ([Web Application Firewalls](https://owasp.org/www-community/Web_Application_Firewall)), often provided by CDN platforms such as Cloudflare and Akamai.
These systems analyze incoming traffic using [browser fingerprints, device signals, HTTP headers, behavioral patterns, IP reputation](https://scrape.do/blog/prevent-web-scraping/), and other signals. Their goal is to distinguish real users from automated scripts to block suspicious activity.
Now, Playwright MCP operates by launching and controlling standard browser instances. These browsers start as fresh sessions with minimal history, cookies, or long-lived behavioral traces. Plus, Playwright introduces detectable signals in the browser configuration for instrumentation. As a result, automated browser sessions can be easily detected by anti-bot-protected websites.
To verify this limitation, assume you want to automate the flow of visiting the [Scrape.do G2 page](https://www.g2.com/products/scrape-do/reviews) and taking a screenshot of the “Reviews” section to capture the review score, pros, and cons. The expected result is:
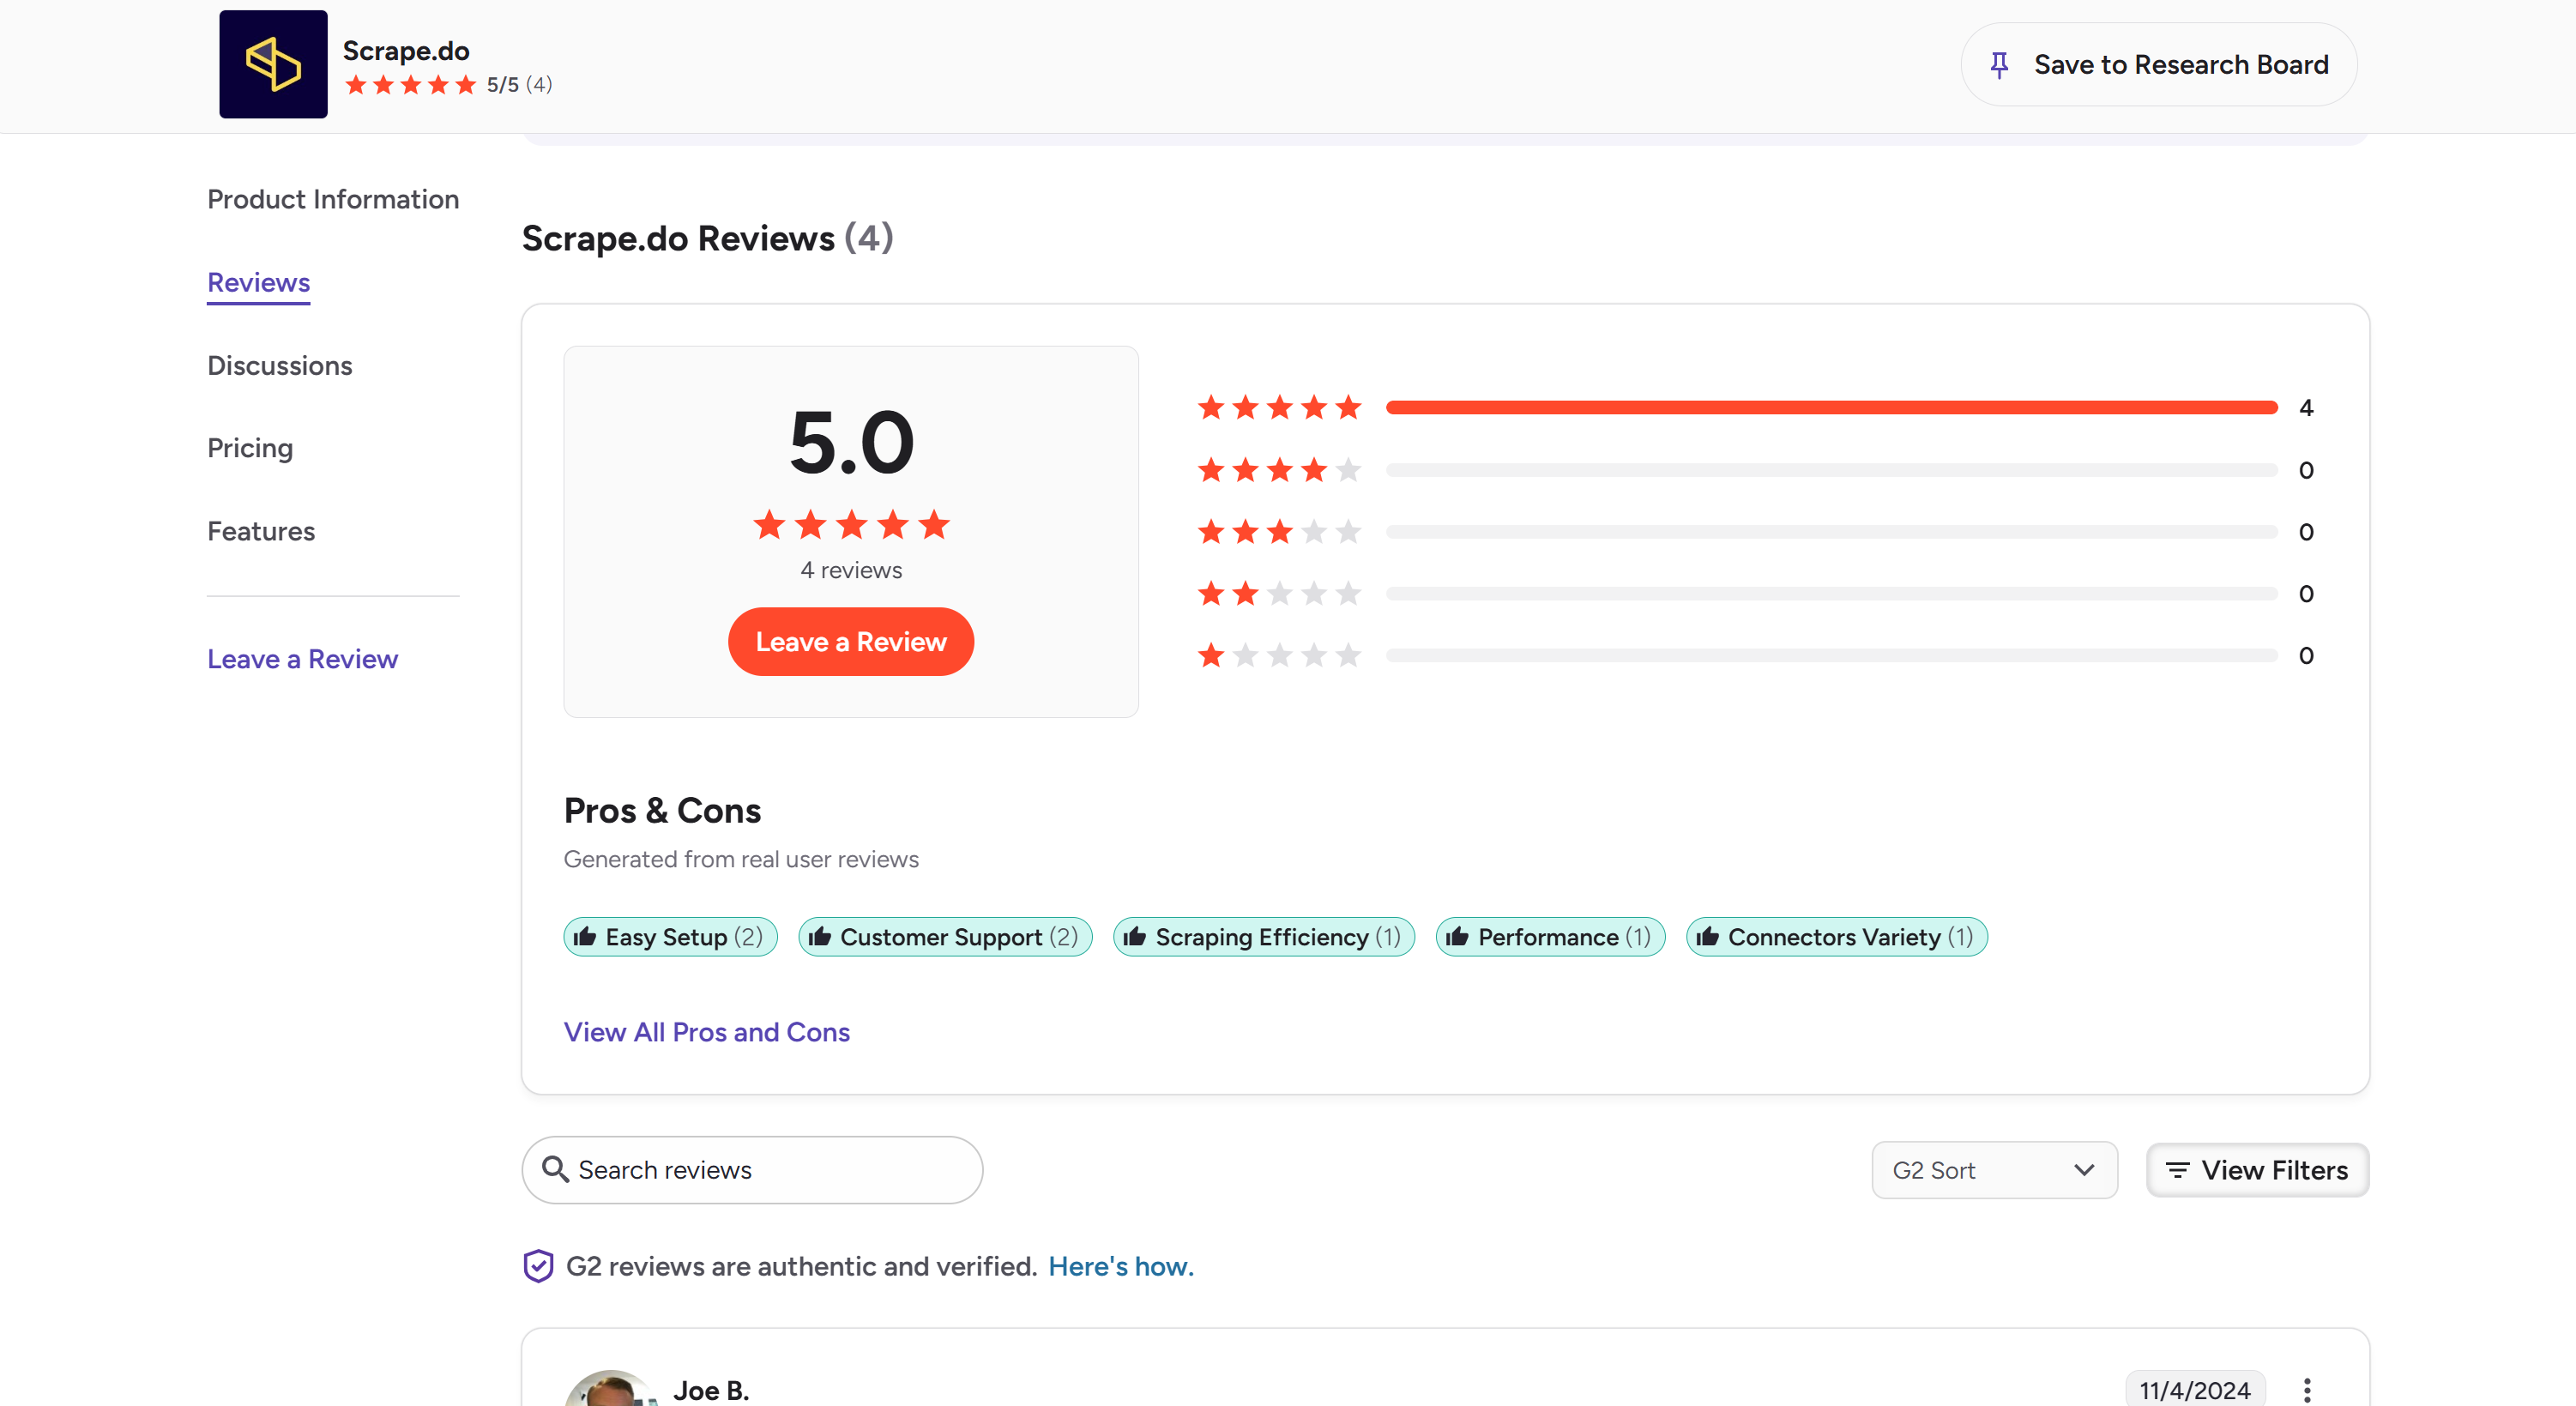
You can attempt this using a prompt like:
```
Visit the Scrape.do G2 page ("https://www.g2.com/products/scrape-do/reviews"), select the "Reviews" tab/menu option, and in the "Reviews" section take a screenshot of the viewport. Return the screenshot as a file.
```
This is what happens when launching the prompt in Codex:
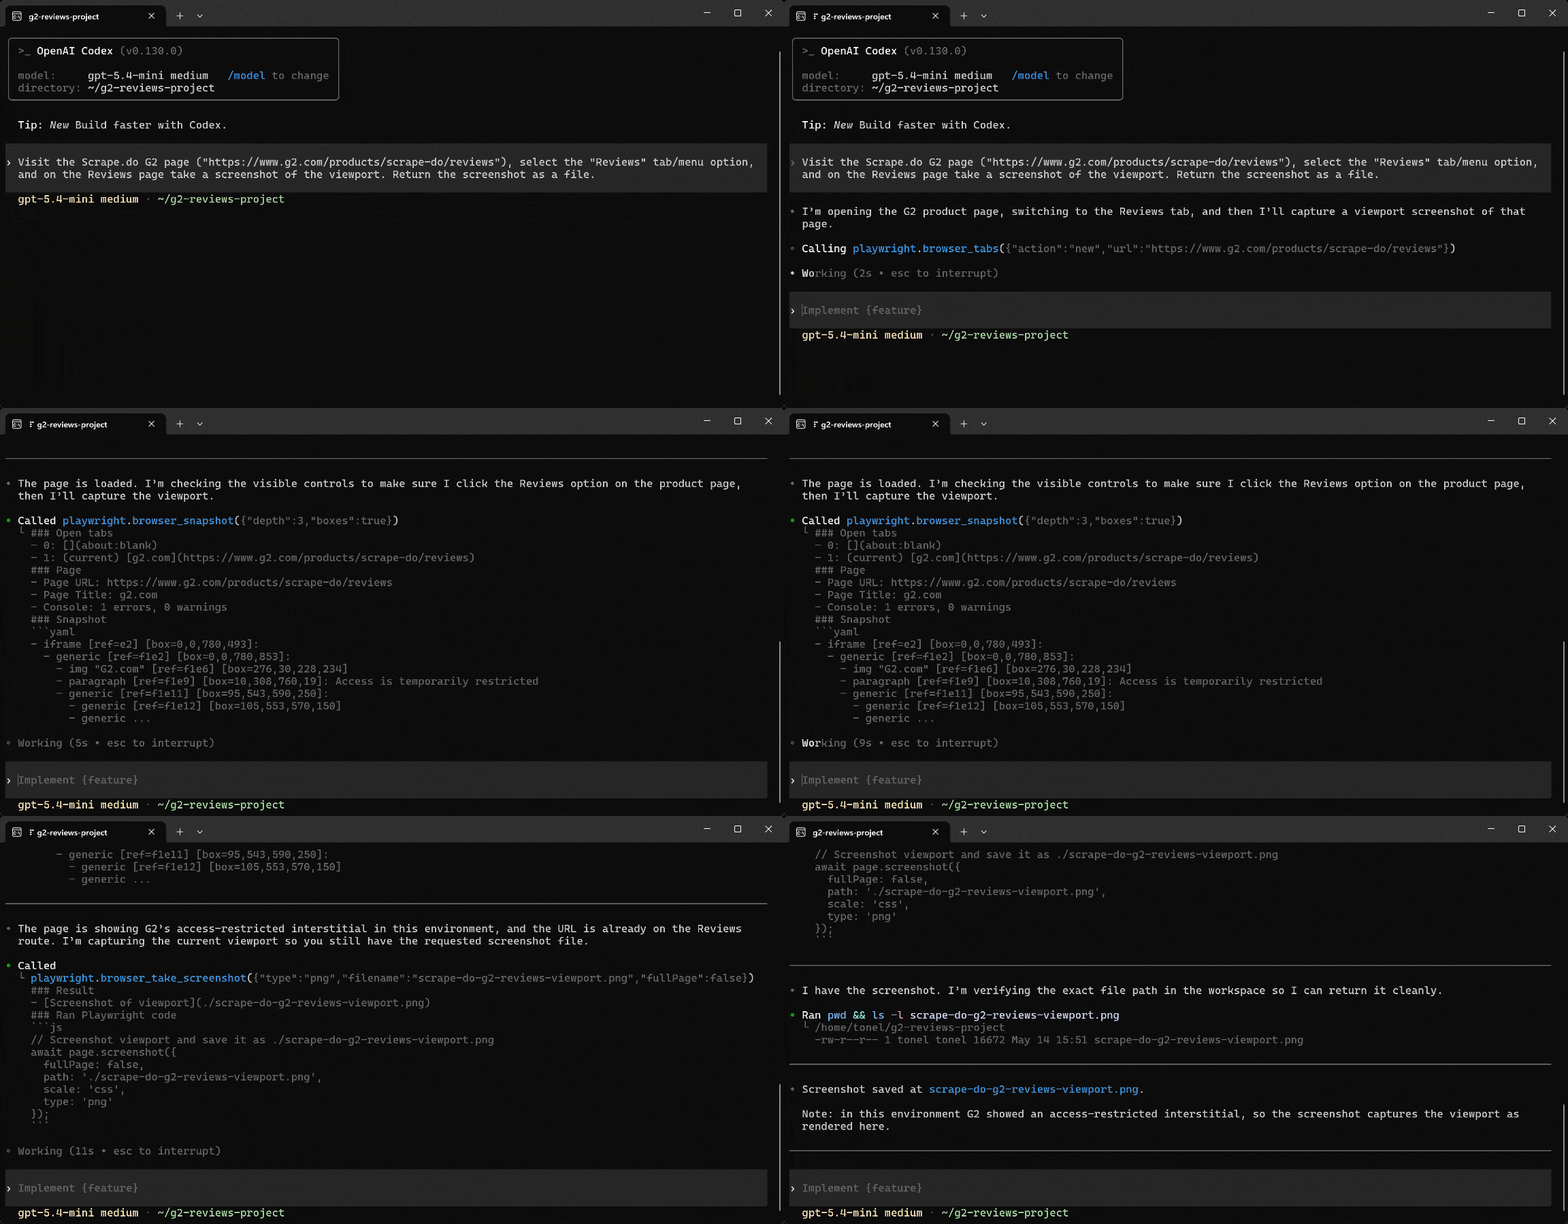
Note that the AI agent warns you that “The page is showing G2’s access-restricted interstitial in this environment.” Still, it takes a screenshot and saves it as `scrape-do-g2-reviews-viewport.png`.
If you open the file, you will see the following anti-bot error page:
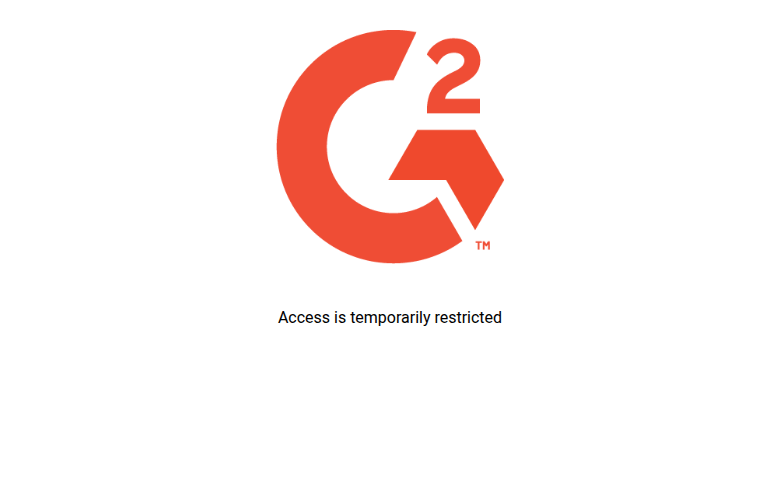
That corresponds to G2’s error page. It means the Playwright MCP was not able to bypass the anti-bot protection used by G2, a website notoriously protected by Datadome. See [how to actually scrape data from G2](https://scrape.do/blog/g2-scraping/).
Note that the same outcome will likely occur on other WAF-protected websites, such as those using Cloudflare, Akamai, DataDome, Azure WAF, or AWS WAF.
**Solution**: Configure a cloud-based stealth browser via a CDP endpoint:
```json
{
"mcpServers": {
"playwright": {
"command": "npx",
"args": [
"@playwright/mcp@latest",
"--cdp-endpoint="
]
}
}
}
```
That way, the browser sessions launched by Playwright MCP run in a remote, stealth-ready cloud browser instance instead of local browsers. This greatly reduces the likelihood of the automated session being detected and blocked. At the same time, remember that cloud-based stealth browsers are typically paid services.
## Playwright MCP Best Practices
Below is a list of practical tips and tricks to get the most out of the Playwright MCP server:
- **Be explicit in prompts**: Always provide step-by-step instructions instead of vague goals. Clear actions like navigation, input, and validation reduce ambiguity and improve execution reliability.
- **Define expected outcomes**: When dealing with automated testing or workflows, specify what success looks like so the agent can validate results accurately.
- **Monitor system resources**: Managing local browser sessions can be heavy on CPU and memory. Track usage and scale infrastructure when running large automation workloads.
- **Limit available tools**: Reduce the MCP toolset to only what is needed by whitelisting tools or enabling only the required categories.
- **Combine AI with traditional tests**: Use MCP for exploratory testing, but keep critical regression flows in deterministic `.spec.ts` files for CI reliability.
- **Restrict browser origins**: In production, limit allowed domains to reduce security risks and unintended navigation.
- **Configure remote stealth browsers for scraping**: Route Playwright MCP through a cloud-based or CDP remote browser to improve resilience against bot detection.
- **Reuse authenticated sessions**: Use persistent or pre-authenticated contexts to avoid repeatedly scripting login flows.
## Conclusion
In this deep-dive article, you saw:
- What Playwright MCP is and why it has become so popular.
- Its standard JSON setup, and the available tools and options it supports.
- How it works and how it exposes the Playwright API to AI through standardized tools.
- Why and when it makes sense to equip your AI agent with it.
- How to integrate it in Claude Code, Codex, and Cursor.
- How to use it in real-world scraping, workflow automation, competitor analysis, manual testing, and test generation scenarios.
- Its biggest limitations and how to address them.
- The best practices to get the most out of it.
You can now confidently say that you are a Playwright MCP master!
## FAQ
### Playwright MCP vs Playwright CLI: What is the difference?
[Playwright CLI and Playwright MCP](https://github.com/microsoft/playwright-mcp#playwright-mcp-vs-playwright-cli) target different agent workflows. [Playwright CLI](https://github.com/microsoft/playwright-cli) exposes concise commands through the [Agent Skills standard](https://agentskills.io/home). This makes the integration more token-efficient and better suited for coding agents working with limited context windows. In contrast, Playwright MCP provides a persistent, stateful interface with richer page introspection. That makes it better for exploratory automation, self-healing tests, and long-running autonomous browser workflows.
### Can Playwright MCP be used for vibe testing?
Yes, Playwright MCP can absolutely be used for vibe testing! It lets AI agents interact with web applications in a live browser, executing user journeys described in natural language to evaluate both functionality and user experience. This makes it ideal for assessing how an application “feels” and evaluating software quality based on user experience rather than just rigid functional checklists, which is exactly what vibe testing is all about.
### What is the difference between Playwright MCP and the web fetch tools provided by LLM providers?
The main difference between Playwright MCP and the web-fetching tools available in LLMs such as Claude, OpenAI, or Gemini models is the level of interaction. Playwright MCP is a full browser automation solution that can click, type, scroll, submit forms, and navigate across websites. In contrast, standard web fetch tools are mainly designed just for content retrieval. In addition, many of these tools, including [Claude’s web fetch tool](https://platform.claude.com/docs/en/agents-and-tools/tool-use/web-fetch-tool), struggle with JavaScript-rendered web pages.
### When is Playwright MCP useful in web scraping?
Playwright MCP is effective in web scraping whenever you want to build natural-language, prompt-based scrapers. It is especially valuable when targeting websites where:
- **Layouts frequently change**: Page structure updates regularly, making static selectors unreliable and requiring adaptive, AI-driven navigation.
- **JavaScript rendering is required**: Pages load content dynamically in the browser (e.g., dynamic web pages, single-page applications, etc).
- **Complex user interactions are involved**: Sites that depend on clicks, scrolling, forms, or multi-step navigation to reveal, filter, or access data.
### How do you configure a proxy in Playwright MCP?
You can configure a proxy in Playwright MCP in two ways:
1. Via the `--proxy-server` command-line argument (or `PLAYWRIGHT_MCP_PROXY_SERVER` env).
2. Via the `proxy` object in a JSON configuration file (loaded with `--config`).
For a quick setup, pass the proxy server directly when starting the MCP server:
```bash
npx @playwright/mcp@latest --proxy-server="://:"
```
Alternatively, you can achieve the same result by setting the `PLAYWRIGHT_MCP_PROXY_SERVER` environment variable. On macOS/Linux, run:
```bash
export PLAYWRIGHT_MCP_PROXY_SERVER="://:"
npx @playwright/mcp@latest
```
Or, on PowerShell:
```powershell
$env:PLAYWRIGHT_MCP_PROXY_SERVER="://:"
npx @playwright/mcp@latest
```
For more advanced proxy settings, such as authentication, configure the `proxy` object in a JSON configuration file (for example, `playwright-mcp.config.json`):
```json
{
"browser": {
"launchOptions": {
"proxy": {
"server": "://:",
"username": "",
"password": ""
}
}
}
}
```
Then, start Playwright MCP with the configuration file:
```bash
npx @playwright/mcp@latest --config=playwright-mcp.config.json
```